How to Make Paper Spider (Folding Origami Spider + Video)
Have you noticed that we’re working on a series of origami Halloween crafts? We’re excited to share today’s tutorial, on origami spiders! Learn how to make origami spiders with our step-by-step instructions and video tutorial.
Hello Craftaholics, I have a question for you. Do you fear spiders? TBH, I’m terrified of these 8-leged creatures but the Halloween crafts list would obviously seem incomplete without them. So, I tried to craft spiders out of paper and make them look as cute as possible! But, you can also make these origami spiders look creepy by not adding those cute puppy eyes.
The cost of this craft is way less than a dollar. It required a square sheet only. And, if you want to add a cute face t it, you’ll need a few basic supplies. It would still cost less than a dollar.
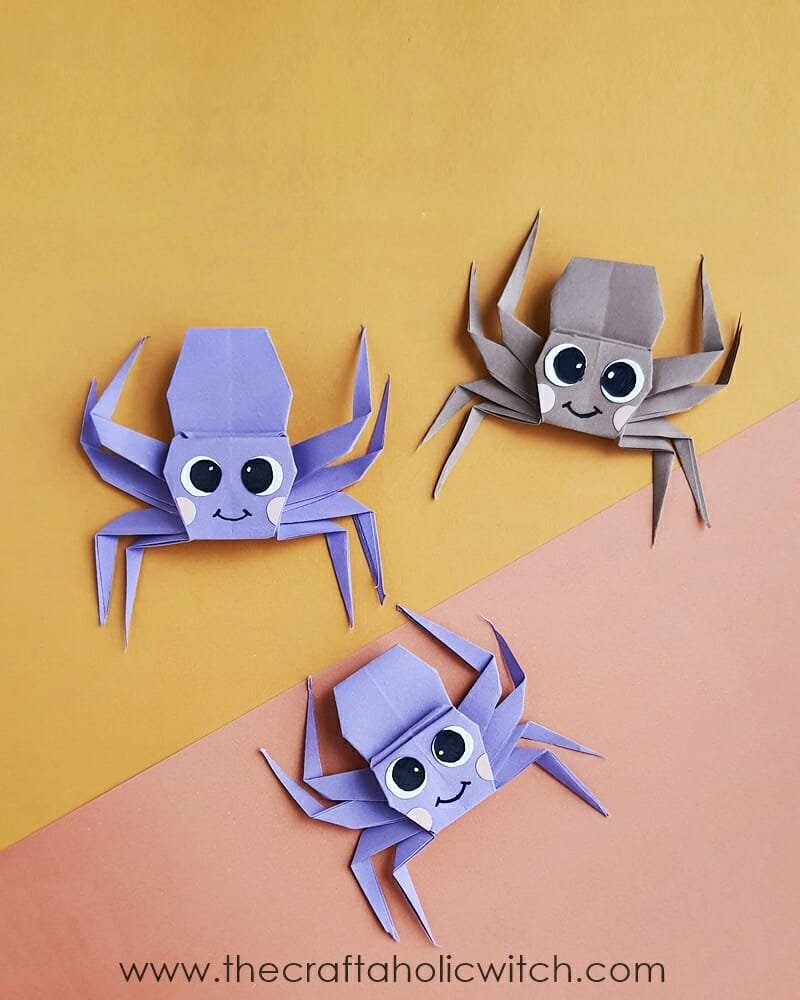
How to Make Origami Spiders
List of Supplies
Tools
- Gel pen
- Scissors
Materials
- Craft paper
Step by Step Instructions:
Step 1: Base Creases and Folds
Take a piece of square paper and fold it in half, diagonally, from both sides. Unfold the diagonal folds so that they leave creases. Flip the paper to the other side and fold it in half horizontally and vertically for creases as well.
Fold the diagonal creases inwards and keep the horizontal-vertical creases upwards. Follow the last 2 images of this step to be clear.
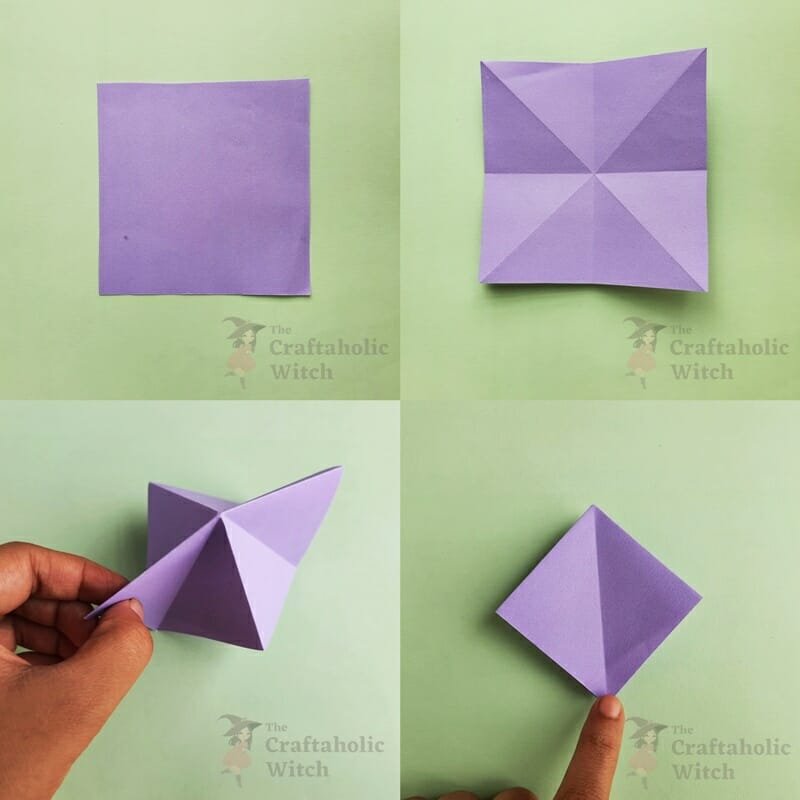
Step 2: Folding the Sides
Let’s work on the open sides. Fold the open side along the middle crease of the current pattern. Similarly, fold the other side.
Flip the paper to the other side and similarly fold that side. Unfold the 4 side folds sot hat they leave creases.
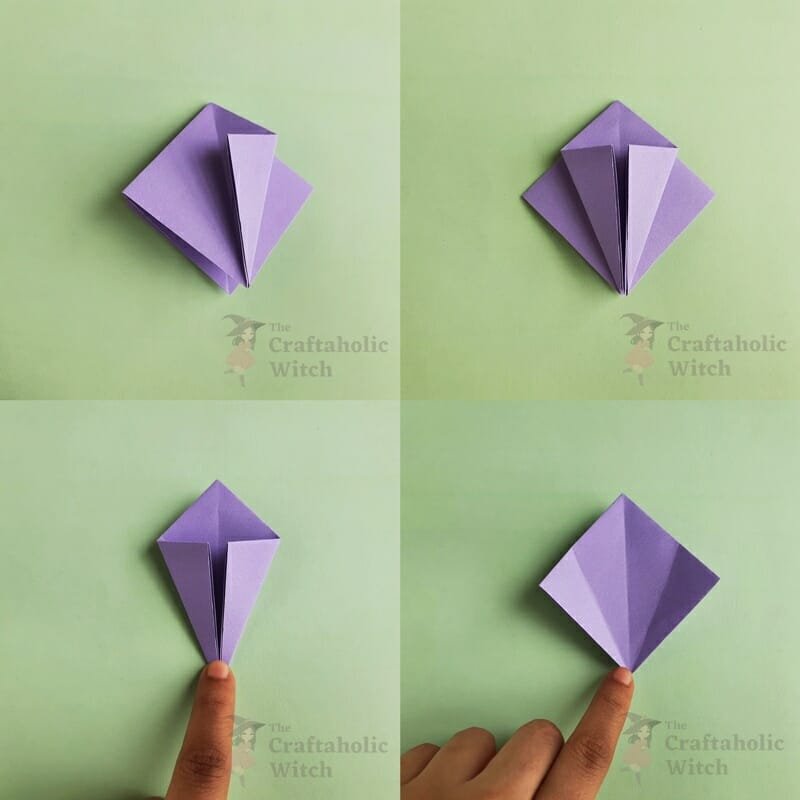
Step 3: Fold the Sides Inwards
Use the last 4 creases as guidelines to fold the sides inwards.
Fold all 4 sides along the crease lines. The current pattern should have 2 flaps on one side. Fold the flap outside.
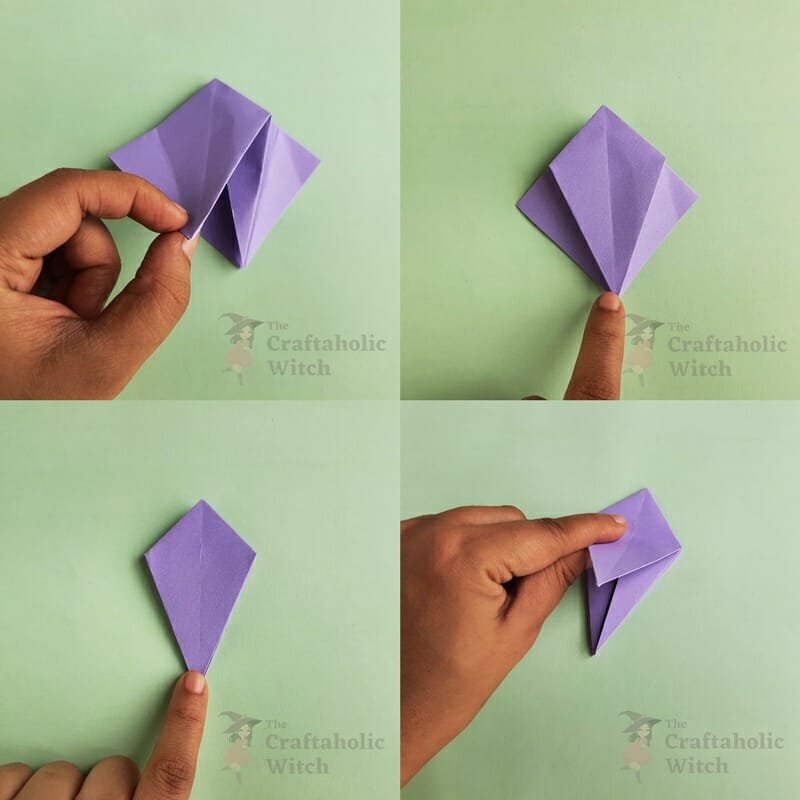
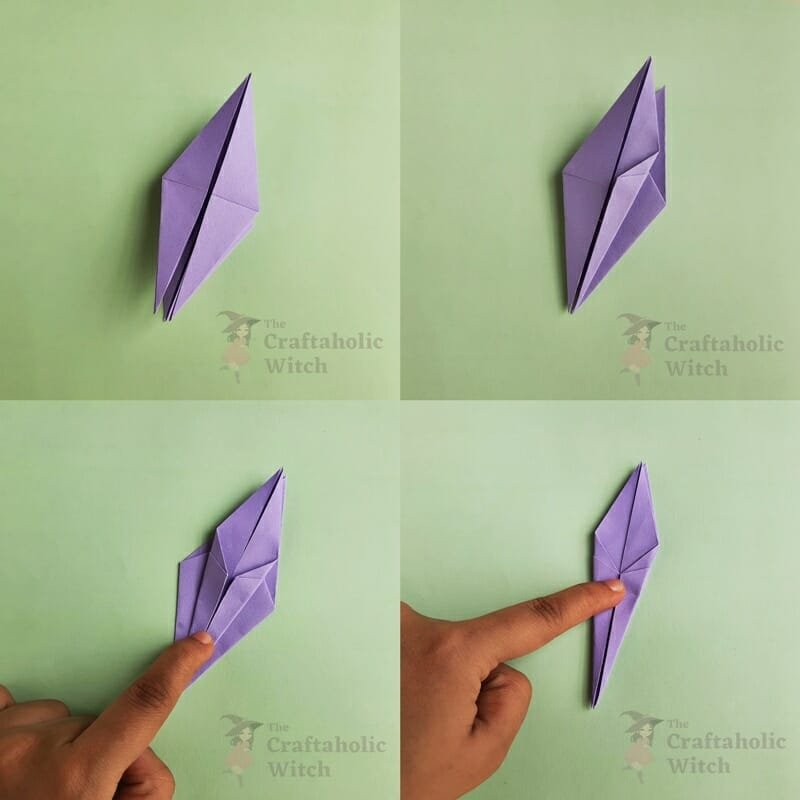
Step 4: Creating Creases for the Spider Legs
Now, fold the outer side of the closed part along the middle crease of the current pattern.
Similarly, fold the other side of the pattern. lip the pattern and fold the 2 sides as we did for the other side.
Step 5: Separating the Legs
Unfold the last 4 side folds. Use scissors to cut the pattern along the side creases. Slightly open the side after cutting the crease lines.
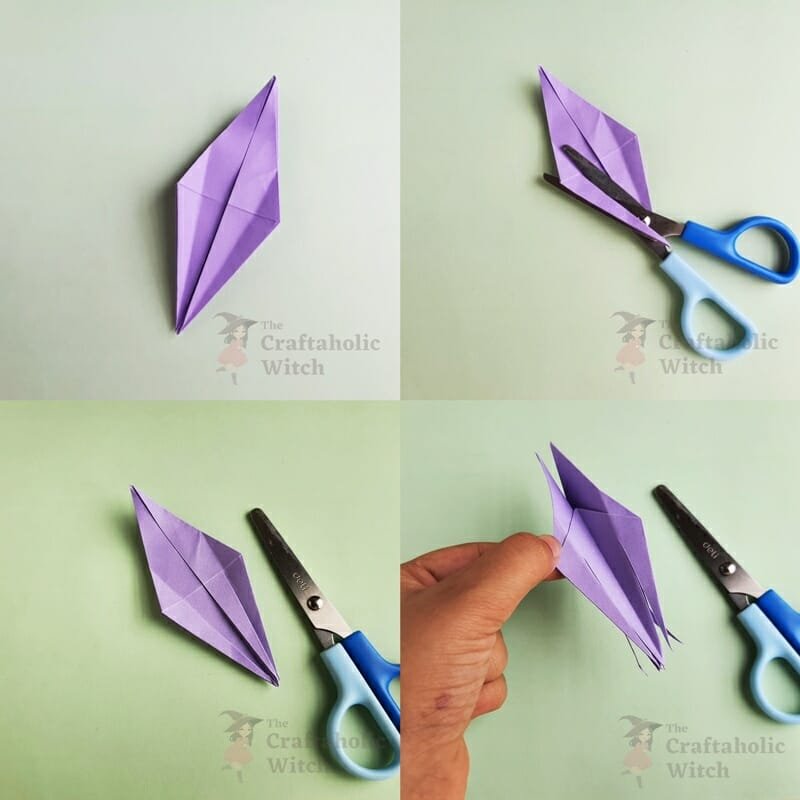
Step 6: Separating the Legs
Notice that the side is closed? See scissors t cut a slit along its crease. Similarly, cut the other side of the pattern.
Now, fold the sides like they were before (in step 4). Fold the top edge halfway inside.
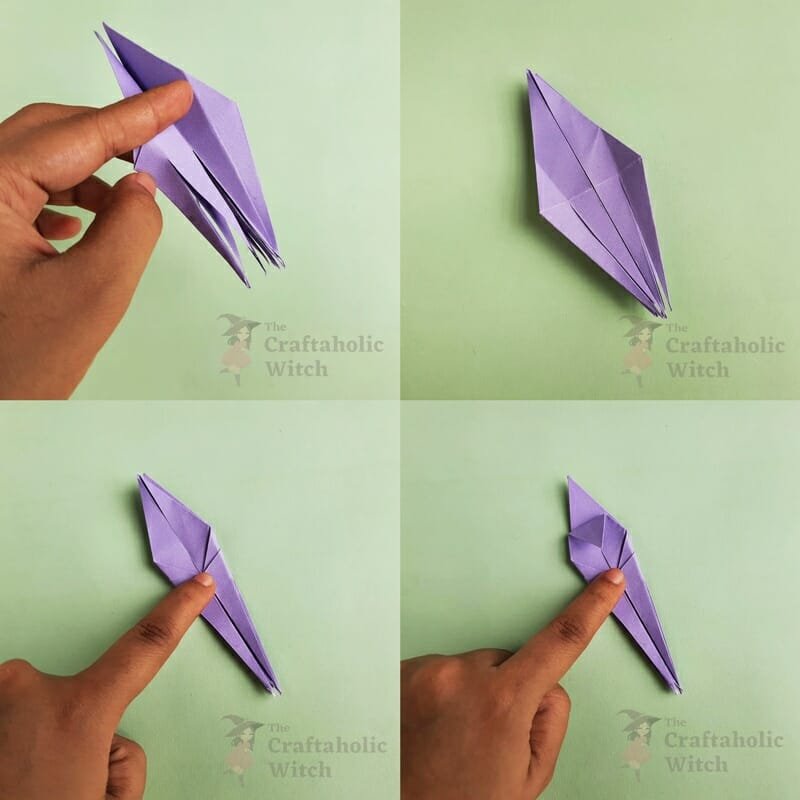
Step 7: Shaping the Top Side of the Spider
Flip the pattern to the other side. Fold the remaining flap all the way through.
Now, turn the pattern to the other side again, to work on the legs. Take the top strip on the right and fold it upwards (slightly more than 90-degree).
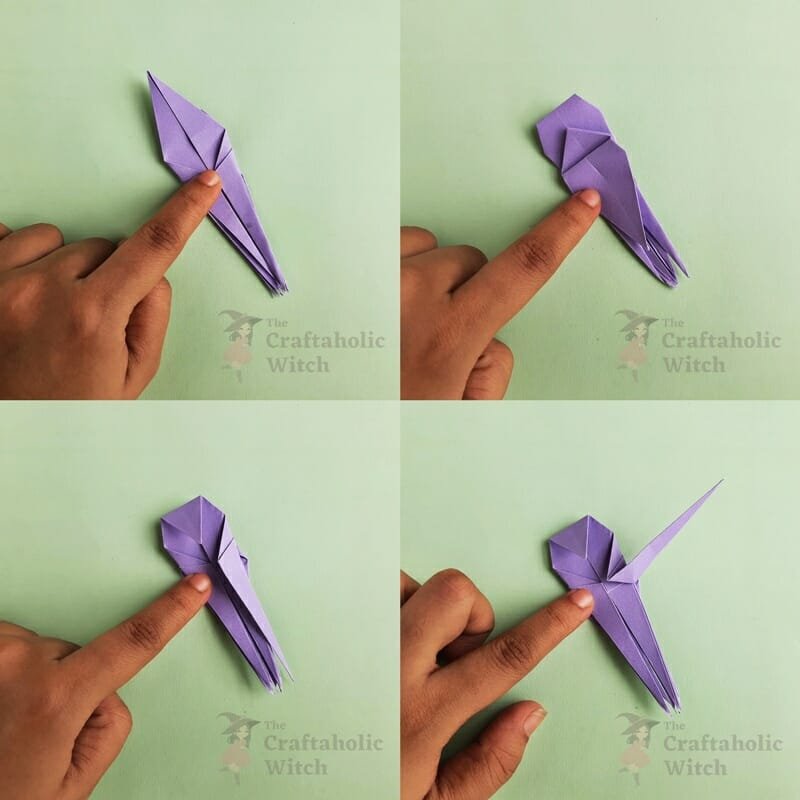
Step 8: Shaping the Legs of the Spider
Fold the next strip slightly below the first one and the third strip slightly below the second one.
Fold the 4th strip of the right side slightly below the third one. Now, fold the 2 top strips (legs) halfway, toward the outside direction. Fold them to somewhat 90-degree.
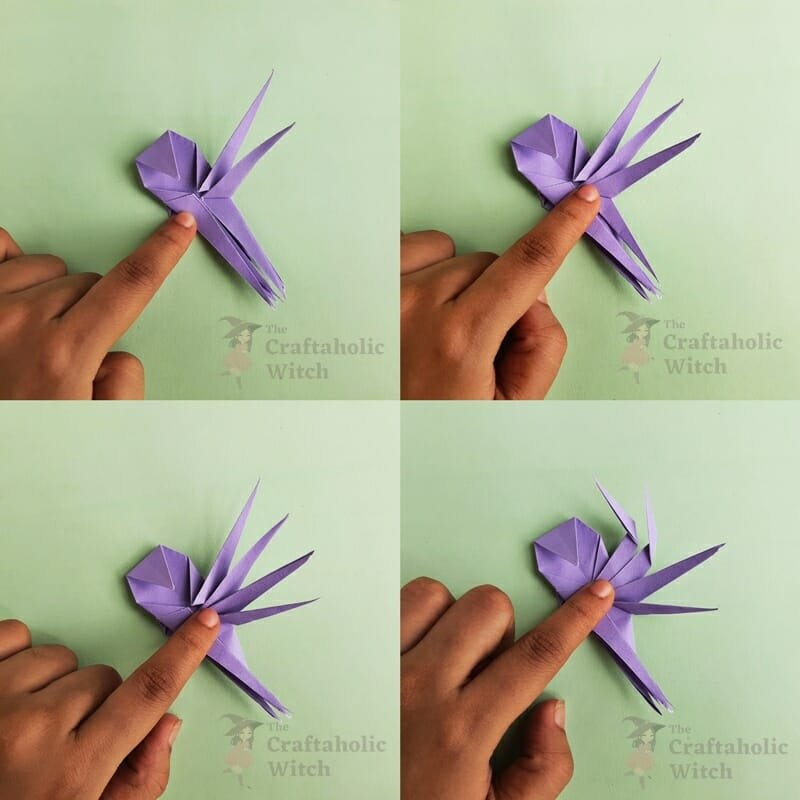
Step 9: Shaping the Legs & Completing the Spider
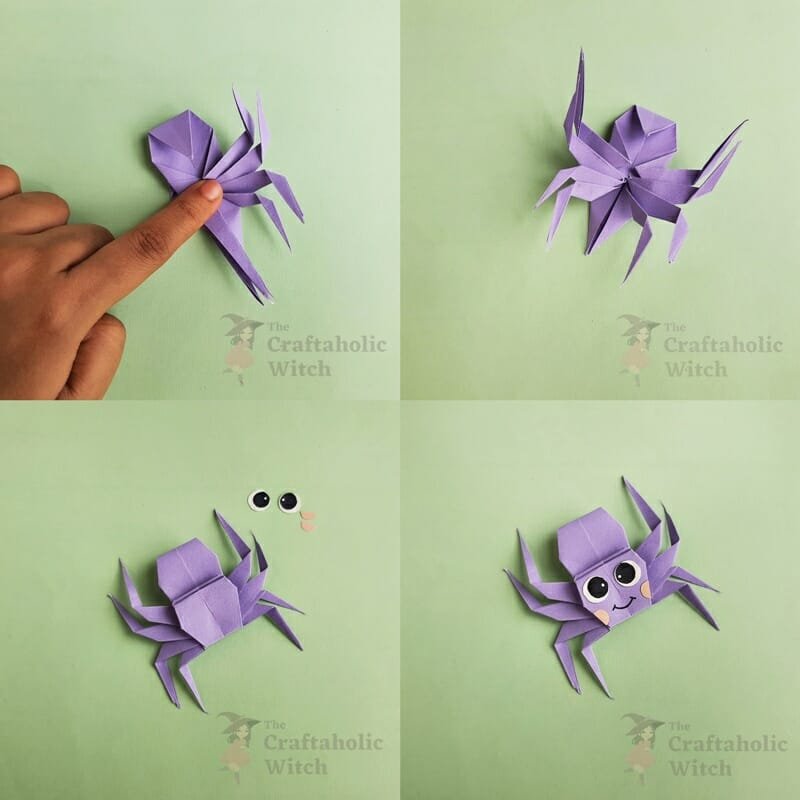
Now, fold the 2 bottom strips (legs) halfway, in the opposite direction of the previous ones. Fold them to somewhat 90-degree. Similarly, fold the strips of the left side to form the legs.
Fold up the pointy-bottom layer over the legs. Turn the pattern to the other side. Draw and cut out blush and eye patterns from craft papers. Attach the eye and blush cutouts on the top part of the origami spider. Use a gel pen to draw a smiling face.
Video Tutorial: How to Make Spiders out of Paper
Not used to making origami by reading instructions? We got you covered. Watch our easy-to-follow origami spider video tutorial and complete the craft in no time.
Tips for Beginners on Making this Paper Spider
Here are some tips if you’re having difficulty crafting the origami spider.
- Use a piece of square paper for the origami spider pattern.
- It’s always important to do the base creases (horizontal, vertical, and diagonal) neatly.
- Use light or medium-light craft paper to craft this origami project.
- If the separated strips (for the legs) seem to confuse you, you can attach 2 strips in groups for each leg.
- You may also apply glue to attach the extra part of the front flap when folding it over the legs, on the backside.
Here are some of our origami project tutorials that you may also like
- How to Make Origami Ghost
- How to Make Origami Shark
- How to Make Origami Jumping Frogs – 2 Ways
- How to Make Origami Pumpkins
- How to make Origami Bats
This origami spider pattern is mostly easy, the only tricky part is cutting and forming the legs. This origami craft can also be used to make garlands or mobile hanging for Halloween decorations. If you re-create this origami paper spider, please tag us on Facebook or Instagram (use #thecraftaholicwitch).
Happy Crafting!


