

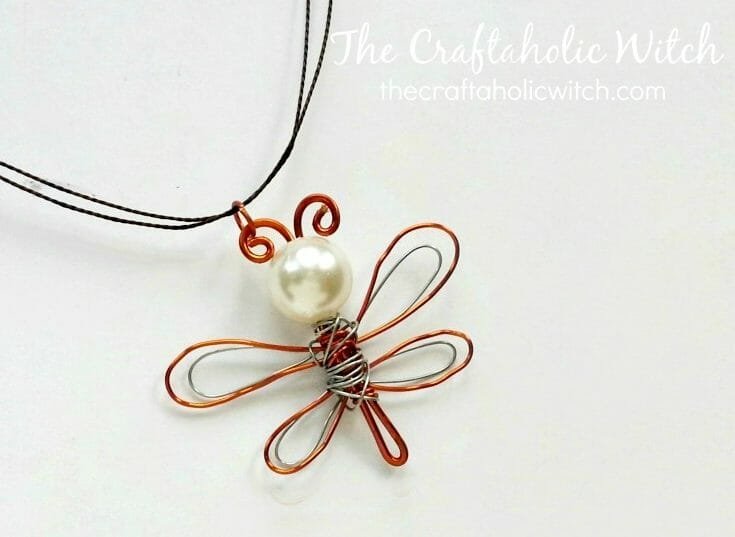
A wire wrapped dragonfly pendant only needs three inexpensive supplies, but the finished piece looks far more complicated than that. Layered wings, a two-tone wire contrast, and a set of curled antennae come together into a necklace that sits about two inches wide with the wings spread, light enough to layer with a simple chain or wear on its own over a plain top.
The technique is wire wrapping: shaping and coiling craft wire by hand rather than soldering or stringing beads. It’s beginner-friendly work. You need about 20 to 30 minutes, a pair of pliers, and enough patience to keep the four wings roughly matched as you go. Nothing here is complicated on its own. The wings just reward a little care.
If wire wrapping turns out to be your thing, this project sits inside our full jewelry making collection, sorted by skill level so you can find the next project once this one’s finished.
Dragonfly Pendant at a Glance
- Difficulty: Beginner
- Time: 20-30 minutes
- Cost: Under $5
- Ages: 10+ with adult help for the wire cutting
- Best for: Handmade gifts, everyday accessories, or a first wire jewelry project
Join Craft Challenge: Craft Your Calm
Make something that brings you a sense of peace, share a photo, and tell us your story. It's free to enter, open to everyone, and the entry with the most reactions takes home a $100 gift card. Takes five minutes to join.
Entries close August 30, 2026. No purchase necessary.
What You Need to Make a Wire Wrapped Dragonfly Pendant
Materials
- Craft wire, 16 gauge, for the body, wings, and antennae; it’s stiff enough to hold its shape once bent
- Craft wire, 22 gauge (silver works well), for the inner wing detail; a thinner gauge so it weaves through the wing frames without distorting them
- 1 faux pearl bead, threaded onto the folded wire to form the dragonfly’s body
- 1 jump ring, to connect the finished pendant to a chain or cord
- Chain or cord, about 18 inches, to wear the pendant; a cord works just as well as a chain for a casual look
Tools
- Craft pliers (round-nose and flat-nose both useful): round-nose gives the cleanest swirls and loops, and flat-nose grips the thinner wire without leaving marks
Ask inside "Crafty Q&A" while you are making.
"Crafty Q&A" is free to join. Share your question, photo, or the exact step where you got stuck, and chat with other makers plus the Craftaholic Witch team. You can also join any discussion thread already happening inside the space.
How to Make a Wire Wrapped Dragonfly Pendant
Step 1: Form the Body and Antennae
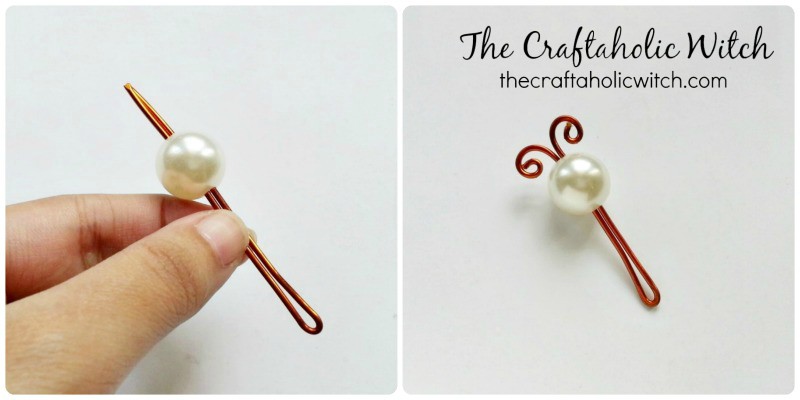
Cut a piece of 16 gauge wire about 4 inches long, longer if you’d like a bigger pendant. Bend it in half, then thread the faux pearl bead onto both open ends so it rests right at the fold. Push it in until it sits snug against the crease.
With the two wire ends pointing up, curl each one into a small, tight swirl to form the antennae. This is the same coiling move behind our swirly wire charms, so if the shape isn’t clicking, that tutorial breaks the coil down further. Keep both swirls close in size. They double as the loop you’ll hang the jump ring from in step 4, so a lopsided pair will show once the pendant is strung.
Step 2: Shape the Four Wings
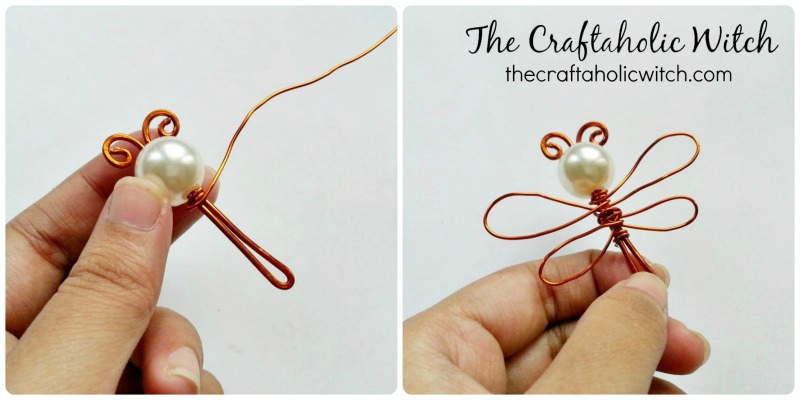
Cut a second piece of 16 gauge wire, this time 6 to 7 inches long. Longer is the safer call here. You can always trim extra wire, but you can’t add it back once it’s cut.
Shape the wire into four loops, two on each side of the body, working your way around the pearl. Once the wings hold their loops, wrap the tail end of the wire around the body a few times to lock everything in place. Don’t worry if the wings look a little uneven right now. The next step tightens the whole shape.
Step 3: Add the Inner Wing Detail
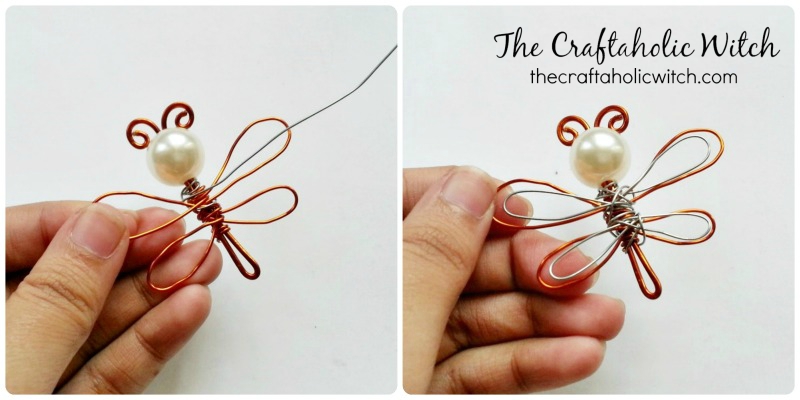
Switch to the 22 gauge wire for contrast. Silver against the 16 gauge frame is what gives the wings their layered look. Weave this thinner wire through the existing wing loops to build a second pattern inside them.
Once the inner detail is in place, coil whatever wire is left randomly around the body. This hides the raw wire ends and adds a bit of texture at the same time. If the thin wire keeps slipping out of your fingers, switch to flat-nose pliers. They grip without leaving dents the way round-nose pliers can on thinner gauges.
Step 4: Attach the Jump Ring and Chain
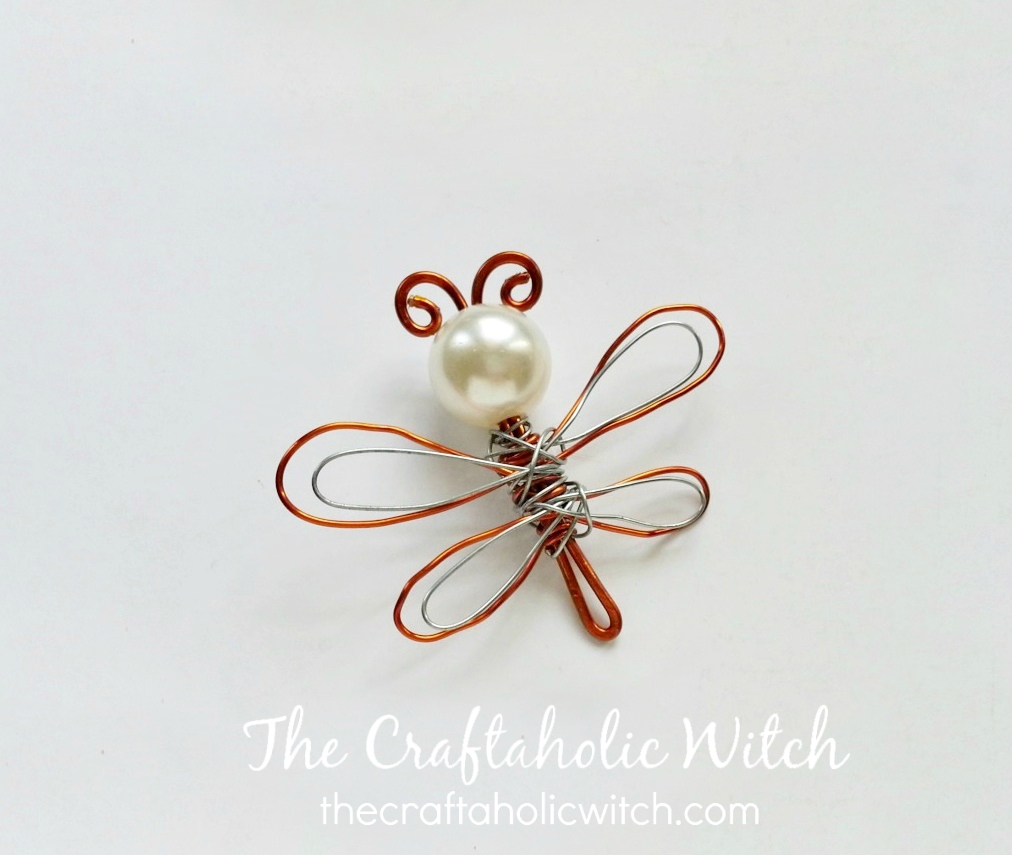
Open the jump ring with pliers (twist one side forward rather than pulling it apart sideways, or it loses its round shape) and thread it through the looped antenna ends from step 1. That’s the pendant finished. If you don’t already have a jump ring shaped and ready, our guide to making jump rings covers it in a couple of minutes.
Thread the pendant onto a chain or cord next. An 18-inch length keeps the proportions clean if you’re making this as a gift.
Share it in "I Made It" and let us cheer you on.
Post your finished make in "I Made It" so the community can celebrate it with you. Cheer on other makers too. Each month, the most loved craft wins 1 year of Craftaholic Premium ($59)
Tips for Your Dragonfly Pendant
- Store the finished pendant flat, or hang it separately from other jewelry. Wings that get pressed flat in a drawer are hard to reshape back into an even spread.
- Swap the pearl for a different bead style, a small round crystal or a colored glass bead both work, to shift the whole look without changing the technique.
- If your two wire tones look too similar to show the layered wing detail, pick colors with more contrast. Copper against silver reads clearest, but any two distinct finishes work.
Frequently Asked Questions
Can I make a wire wrapped dragonfly pendant without special tools?
Round-nose pliers give you the cleanest wire loops, but in a pinch, regular needle-nose pliers work fine for most of the shaping. The swirly antennae are the only step that genuinely benefits from a round tip. Everything else just needs a firm grip.
What gauge wire works best for a DIY dragonfly pendant?
16 gauge is the right weight for the body and wings because it holds its shape without being too stiff to bend by hand. The 22 gauge secondary wire is thin enough to weave through the wing frames without distorting the structure. Avoid going thinner than 22 gauge for the detail layer, or it’ll be hard to control.
Can I use colored craft wire for this project?
Colored wire works well and changes the whole personality of the pendant. Copper tones look earthy and vintage; silver reads clean and minimal. Just make sure both wires you use contrast enough with each other so the inner wing detail actually shows.
Why do my dragonfly’s wings look uneven or floppy instead of holding their shape?
Loose wings almost always come from a loose wrap at the body in step 2. Unwrap the tail end, pull the wing loops snug against each other, and re-wrap it tighter around the body before moving on. Cutting the 16 gauge wire a little longer than you think you need also helps, since extra length gives you more to wrap and secure.
How is this different from your herringbone wire wrapped pendant?
They use the same two wire gauges but in different ways. This dragonfly pendant shapes wire into a figure (wings, a body, antennae), while the herringbone wire wrapped pendant weaves wire around a single stone or bead in a structured pattern. The herringbone technique is the better next step once you’re comfortable with basic wire control.
More Necklace & Pendant Tutorials
For more pendant projects at every skill level, browse our necklace and pendant tutorials.
Share your finished pendant in the I Made It space inside Craftaholic Community. The most-loved post each month wins a one year free Premium membership.
0 Comments
Join the conversation
Log in to your Craftaholic Community account to comment, ask questions, and cheer on fellow makers.
Log in to comment