• Home
  • Craft
    • Paper Crafts
    • Green Crafts
    • Threads and Fibers
    • DIY Jewelry
    • DIY Decors
  • Recipes
    • Breakfast
    • Snacks
    • Drinks and Smoothies
    • Bengali Cuisine
    • Dessert
  • Misceláneo
    • Crafty Round-Ups
    • Featured Artist

      It is our immense pleasure to announce that we have launched a new category ‘Featured Artist’ to our blog this month and it is going to be a monthly issue from now on. The Featured Artist contents can be found under the ‘MISCELÁNEO’ category from our blog. We will be featuring talented artists and crafters every month. This is going to be a great opportunity for us to discover, know a little more about them and their creative journey. As we are primarily based on Bangladeshi platform, we’re starting this category with talented and creative peeps from this region and hopefully, we’ll broaden our horizon over time.

    • Free Printable
    • Lifestyle
    • Travel
  • About
  • Contact
The Craftaholic Witch - Imagine, Create and Inspire! The Craftaholic Witch - Imagine, Create and Inspire!
  • Home
  • Craft
  • DIY Jewelry
  • DIY Dreamcatcher Pendant
September 16, 2019

DIY Dreamcatcher Pendant

DIY Jewelry
DIY Dreamcatcher Pendant

DIY Dreamcatcher Pendant Tutorial

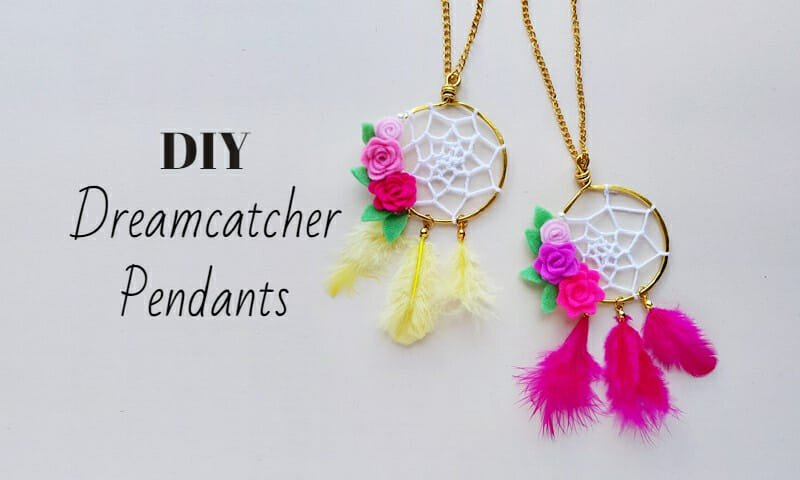
Dreamcatchers are adorable, all time popular and you’ll never get bored of the patterns! It’s amazing to see the endless possibilities of patterns you can come up with for dreamcatchers. This DIY dreamcatcher pendant is so easy to make and will take you only a few minutes. I LOVED making these dreamcatcher pendants and I’m already planning to make more versions of it! Please do check out the tutorial and try making one!

DIY dreamcatcher pendant

Check out the list of supplies and get crafty!

DIY Dreamcatcher Pendants

List of Supplies

  • Craft wire – 16 gauge
  • Jump rings
  • Bead tips
  • Yarn 
  • Felt fabrics
  • Scissors
  • Craft pliers
  • Colorful craft feathers

Make a Dream-catcher Pendant!

DIY Dreamcatcher Pendant

Step 1

You’ll need 16 gauge (or 14 gauge) craft wire to make the dream-catcher base. Hold the wire bundle but do not cut it. Use the looping pliers to create a small loop at the open end of the wire. Leave 1 cm of wire below the loop and bend the wire to 90 degrees. Leave the loop and 1 cm bent part and create a round base with the wire. The base can be of any size you prefer.

DIY Dreamcatcher Pendant

Step 2

After forming the round base; coil the open end of the wire around the 1 cm part below the loop. Cut off extra wire from the bundle once the coiling is done. 

DIY Dreamcatcher Pendant

Step 3

Hammer the round wire band to give the band a nice finished look. 

Select a yarn for the dream-catcher weaving.  Grab the yarn bundle and tie a knot around the base band, towards the loop and coiled part. Leaving a small amount of yarn intact, wrap the yarn around the band once. Draw the yarn through the loop created between the yarn and the band.

DIY Dreamcatcher Pendant

Step 4

Pull the wrapped yarn to make sure that the wrapped part is nice and tight around the band. 

DIY Dreamcatcher Pendant

Step 5

Continue to wrap and tighten wraps until reaching near the first knot. 

DIY Dreamcatcher Pendant

Step 6

For the second layer, wrap the current yarn around the previous yarn layer (like the previous yarn was wrapped around the wire band).

DIY Dreamcatcher Pendants

Step 7

Continue to wrap (or weave) towards the center of the band. Keep wrapping and creating layers until there is a really small hole in the center. Once the yarn reaches the center, tie a tight knot and cut off the extra yarn.

DIY Dreamcatcher Pendant

Step 8

Select colored felt fabrics to make flowers. Cut out spiral-shaped patterns from the felt. You can keep it plain or create a scallop border on the spiral pattern. Roll the spiral felt from its outer end and continue to roll towards the center. Apply hot glue on the center part or simply stitch to secure the roll. There! Make 2 or 3 of these rolled flowers.

DIY Dreamcatcher Pendant

Step 9

Take a craft feather and attach a bead tip on the hollow shaft of the feather. Prepare 2 or 3 more craft feathers with bead tips. You will need a jump ring to attach each feather to the dream catcher band.

DIY Dreamcatcher Pendant

Step 10

Attach the felt flowers and the feathers to the dream catcher. Cut out some leaf patterns from green colored felt and attach them between the flowers.

The pendant is now ready! Wear it with a jewelry chain or string and filter in all the sweet and good dreams!

DIY dreamcatcher pendant

Previous Post
DIY Recycled Pumpkin Box
Next Post
Fall Inspired 3d Papercraft Scene

Muhaiminah Faiz

You May Also Like

How to Make Earrings That’ll Get Everyone’s Attention
January 13, 2021

How to Make Earrings That’ll Get Everyone’s Attention

DIY Beaded Earrings: Make Beautiful Festive Style Earrings
January 1, 2021

DIY Beaded Earrings: Make Beautiful Festive Style Earrings

DIY Beaded Wire Ring
January 24, 2020

DIY Beaded Wire Ring

Create Simple & Cute Dragonfly Pendant
September 29, 2017

Create Simple & Cute Dragonfly Pendant

Create Paper Clip Ring
April 15, 2017

Create Paper Clip Ring

No Image
November 18, 2016

Create Stud Earring Organizer

About me

Muhaiminah Faiz

Muhaiminah Faiz

Hey, I'm Muhaiminah, a craft addict! I love swirls, colors, triangles and... oh well, everything crafty! Follow my blog for fun and wonderful craft ideas!

Categories

  • Bengali Cuisine (1)
  • Breakfast (2)
  • Craft (56)
  • Crafty Round-Ups (7)
  • Dessert (1)
  • DIY Decors (9)
  • DIY Jewelry (22)
  • Featured Artist (3)
  • Free Printable (4)
  • Green Crafts (16)
  • Lifestyle (3)
  • Misceláneo (10)
  • Paper Crafts (30)
  • Recipes (4)
  • Threads and Fibers (17)

Latest Post

How to Make Earrings That’ll Get Everyone’s Attention
January 13, 2021
How to Make Pretty Paper Lilies (+ Free Printable Template)
January 6, 2021
DIY Beaded Earrings: Make Beautiful Festive Style Earrings
January 1, 2021
DIY Cute Owl Valentine Card (With Free Printable Template)
December 28, 2020
An Interview with Saifullah Galib of Kichuna
November 26, 2020

MY BADGES!

MY BADGES!
MY BADGES!
MY BADGES!

Imagine, Create and Inspire!


The Craftaholic Witch is a creative blog which shares DIY projects and art-craft related articles. Guest posts are also published occasionally.

Userful Link

  • Home
  • About
  • Contact
  • Terms and conditions
  • Privacy Notice
  • Disclaimer

Join the Newsletter

Subscribe to get our latest content by email.

We won't send you spam. Unsubscribe at any time.

Thank you!

You have successfully joined our subscriber list. 

.
© 2016 - The Craftaholic Witch. All Rights Reserved. Designed by Omar Sohrab