• Home
  • Craft
    • Paper Crafts
    • Green Crafts
    • Threads and Fibers
    • DIY Jewelry
    • DIY Decors
  • Recipes
    • Breakfast
    • Snacks
    • Drinks and Smoothies
    • Bengali Cuisine
    • Dessert
  • Misceláneo
    • Crafty Round-Ups
    • Featured Artist

      It is our immense pleasure to announce that we have launched a new category ‘Featured Artist’ to our blog this month and it is going to be a monthly issue from now on. The Featured Artist contents can be found under the ‘MISCELÁNEO’ category from our blog. We will be featuring talented artists and crafters every month. This is going to be a great opportunity for us to discover, know a little more about them and their creative journey. As we are primarily based on Bangladeshi platform, we’re starting this category with talented and creative peeps from this region and hopefully, we’ll broaden our horizon over time.

    • Free Printable
    • Lifestyle
    • Travel
  • About
  • Contact
The Craftaholic Witch - Imagine, Create and Inspire! The Craftaholic Witch - Imagine, Create and Inspire!
  • Home
  • Craft
  • DIY Decors
  • DIY Rainbow Wall Hanging
October 19, 2019

DIY Rainbow Wall Hanging

DIY Decors
DIY Rainbow Wall Hanging

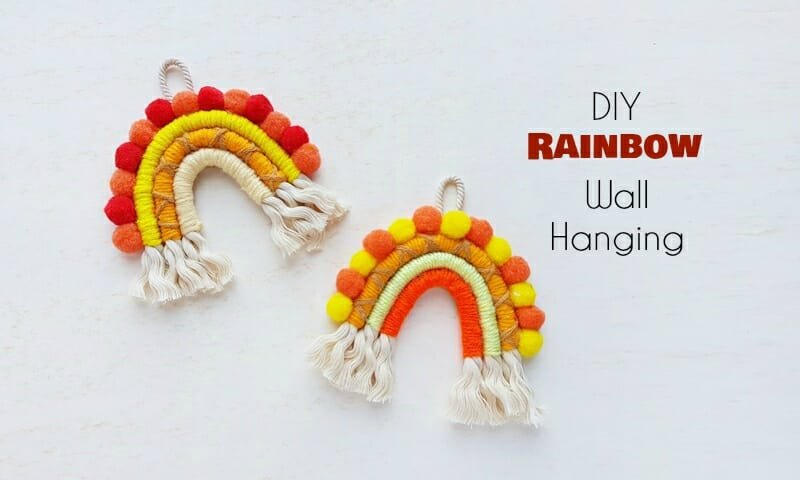
DIY Fall Inspired Rainbow Wall Hanging

Back with another Fall craft! DIY rainbow wall hanging is super trendy right now and they can be made easily with some basic craft supplies. I made hand sized macrame rainbow this time, so that I can use them as wall decors as well as bag charms. 

DIY macrame rainbow wall hanging

Don’t they look adorable! You can search on Pinterest for more pattern ideas.

DIY rainbow wall hanging

List of Supplies:

  • Natural twisted rope
  • Colorful yarns – at least 3 different colores
  • Scissors
  • Felt
  • Hot glue gun
  • Tapestry needle

Tutorial

DIY Rainbow Wall Hanging

Step 1

First of all, make up your mind about the size of the rainbow wall hanging and the number of layers for the rainbow. I’m making a 3 layered macrame rainbow. Prepare pieces of rope strands according to the determined numbers and sizes for each layer.

DIY Rainbow Wall Hanging

Step 2

Grab some fall-inspired colors for the yarn. Take any one of the selected yarn bundle and tie the open end of the yarn around any one of the rope strands, leaving an inch intact from the open end of the rope. Start wrapping the tied yarn around the rope strand. Wrap the yarn as evenly and tightly as possible, making sure not to leave any gap between the wrapping. 

DIY Rainbow Wall Hanging

Step 3

Continue to wrap the yarn all the way to the other side of the rope but make sure to keep an inch of the rope intact on the other open end as well. Once the wrapping is complete, keep a few inches of yarn extra (about 3 inches will do) and cut off yarn from the bundle. Attach a tapestry needle to the yarn through the open end and draw the needle between 4 or more yarn wrapping. Pull the needle all the way through and then cut off the extra yarn.

DIY Rainbow Wall Hanging

Step 4

Now, let’s take a different colored yarn and prepare it with a tapestry needle. Draw the yarn through the wrapping from any one of the open ends. Keep half an inch of the yarn inside the wrapping. Wrap the current yarn loosely around the previously wrapped yarn. Wrap the yarn loosely to create different patterns, I made a cross pattern wrapping. 

DIY Rainbow Wall Hanging

Step 5

Prepare the other 2 rope strands the same way. But make sure to keep an even amount intact on both open sides of the ropes. 

DIY Rainbow Wall Hanging

Step 6

I’ve seen other DIY bloggers using the stitching technique to attach the yarn wrapped ropes together but I find that technique difficult so I had to come up with an easier way. Cut out a piece of felt which will be used as the base. The felt should be big enough to hold the rope rainbow pattern. Use the hot glue gun to atatch the yarn wrapped ropes on the felt cutout.

DIY Rainbow Wall Hanging

Step 7

Attach all wrapped ropes on the felt cutout. Done attaching the ropes on the felt base? Use a pair of sharp scissors to cut the felt along the borderline of the attached ropes.

DIY Rainbow Wall Hanging

Step 8

I’ve attached colorful craft pompoms around the top end of the rope rainbow and also attached a thin rope loop on the backside as a hanging mechanism.

DIY rainbow wall hanging

Tada! Here you go! A beautiful, fall-inspired rainbow wall hanging

DIY rainbow wall hanging


Previous Post
Fall Inspired 3d Papercraft Scene
Next Post
DIY Gnome Plush (Free Pattern)

Muhaiminah Faiz

You May Also Like

DIY Sunflower Coasters ( Easy Step by Step Tutorial)
September 8, 2020

DIY Sunflower Coasters ( Easy Step by Step Tutorial)

DIY Spring Flower Wreath
March 10, 2020

DIY Spring Flower Wreath

DIY Heart String Art
January 29, 2020

DIY Heart String Art

Easy No Sew Gnome Dolls DIY Tutorial With Free Pattern
December 4, 2019

Easy No Sew Gnome Dolls DIY Tutorial With Free Pattern

Abstract Painting for Beginners
August 5, 2019

Abstract Painting for Beginners

DIY Concrete Note Holders
July 17, 2019

DIY Concrete Note Holders

Leave a Reply Cancel reply

Your email address will not be published. Required fields are marked *

This site uses Akismet to reduce spam. Learn how your comment data is processed.

About me

Muhaiminah Faiz

Muhaiminah Faiz

Hey, I'm Muhaiminah, a craft addict! I love swirls, colors, triangles and... oh well, everything crafty! Follow my blog for fun and wonderful craft ideas!

Categories

  • Bengali Cuisine (1)
  • Breakfast (2)
  • Craft (56)
  • Crafty Round-Ups (7)
  • Dessert (1)
  • DIY Decors (9)
  • DIY Jewelry (22)
  • Featured Artist (3)
  • Free Printable (4)
  • Green Crafts (16)
  • Lifestyle (3)
  • Misceláneo (10)
  • Paper Crafts (30)
  • Recipes (4)
  • Threads and Fibers (17)

Latest Post

How to Make Earrings That’ll Get Everyone’s Attention
January 13, 2021
How to Make Pretty Paper Lilies (+ Free Printable Template)
January 6, 2021
DIY Beaded Earrings: Make Beautiful Festive Style Earrings
January 1, 2021
DIY Cute Owl Valentine Card (With Free Printable Template)
December 28, 2020
An Interview with Saifullah Galib of Kichuna
November 26, 2020

MY BADGES!

MY BADGES!
MY BADGES!
MY BADGES!

Imagine, Create and Inspire!


The Craftaholic Witch is a creative blog which shares DIY projects and art-craft related articles. Guest posts are also published occasionally.

Userful Link

  • Home
  • About
  • Contact
  • Terms and conditions
  • Privacy Notice
  • Disclaimer

Join the Newsletter

Subscribe to get our latest content by email.

We won't send you spam. Unsubscribe at any time.

Thank you!

You have successfully joined our subscriber list. 

.
© 2016 - The Craftaholic Witch. All Rights Reserved. Designed by Omar Sohrab