

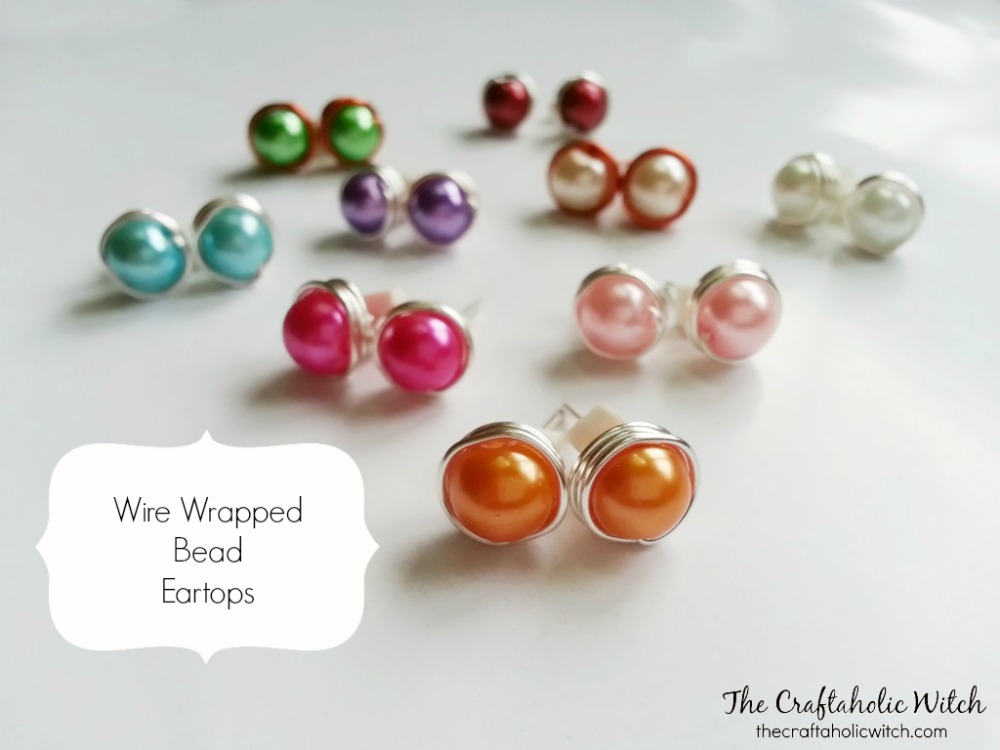
These little wire wrapped bead earrings are the project I reach for when I want something pretty on my ears in a few minutes with almost nothing on the table. You bend a length of craft wire, cradle a bead inside it, add a neat post, and you are done. No kit, no soldering, no special skills.
A spool of 18 gauge wire, a handful of beads, one pair of pliers, and a spare eraser will get you a full pair, and I usually keep going until I have a little pile of them. If you enjoy quick earring makes like this, you will probably love my beaded hoop earrings too.
They cost pennies, they use up the odd beads left over from bigger projects, and a wrapped pair tied with a bit of ribbon makes a sweet handmade gift.
Wire Wrapped Bead Earrings at a Glance
- Difficulty: Beginner
- Time: About 30 minutes for several pairs
- Cost: Under $5
- Ages: 12 and up, with adult help for the craft knife
- Best for: everyday studs, quick handmade gifts, and using up leftover beads
Join Craft Challenge: Craft Your Calm
Make something that brings you a sense of peace, share a photo, and tell us your story. It's free to enter, open to everyone, and the entry with the most reactions takes home a $100 gift card. Takes five minutes to join.
Entries close August 30, 2026. No purchase necessary.
What You Need to Make Wire Wrapped Bead Earrings
Materials
- 18 gauge craft wire, in any color you like. It is soft enough to bend by hand but still holds a wrapped shape and a straight post without collapsing.
- 8mm faux pearl or round beads. Any bead works as long as the hole slides over the wire; round beads sit the most like classic studs.
- A rubber eraser, for cutting quick DIY earring backs. Store-bought rubber or metal backs work too if you have them.
Tools
- Flat nose jewelry pliers, for the bends and for pressing the wraps flat against the bead.
- Wire cutters, or the cutting edge on your pliers, to snip the finished post off the spool.
- A craft or X-Acto knife, to cut the eraser into small squares.
Ask inside "Crafty Q&A" while you are making.
"Crafty Q&A" is free to join. Share your question, photo, or the exact step where you got stuck, and chat with other makers plus the Craftaholic Witch team. You can also join any discussion thread already happening inside the space.
How to Make Wire Wrapped Bead Earrings in 4 Steps
Step 1: Bend the Wire and Add Your Bead
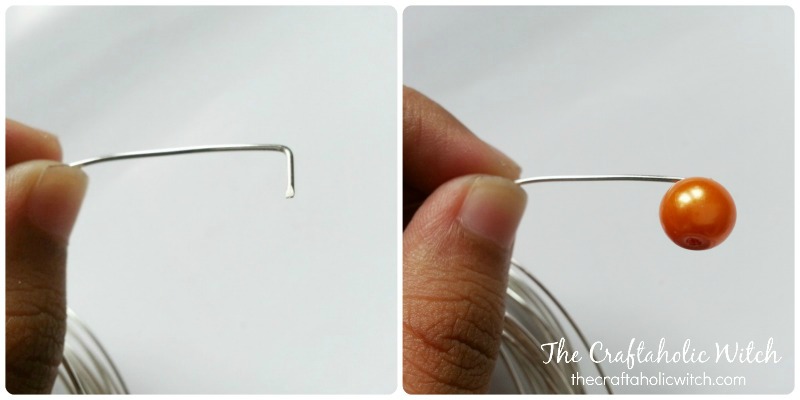
Leave the wire attached to the spool for now, it gives you something solid to hold onto. Grip it near the end with your flat nose pliers and bend a right angle. Match the length of that bent section to your bead, so for the 8mm pearls I used I bent about 8mm of wire.
Slide the bead onto the short bent end and push it snugly into the corner of the bend.
Step 2: Wrap the Wire Around the Bead
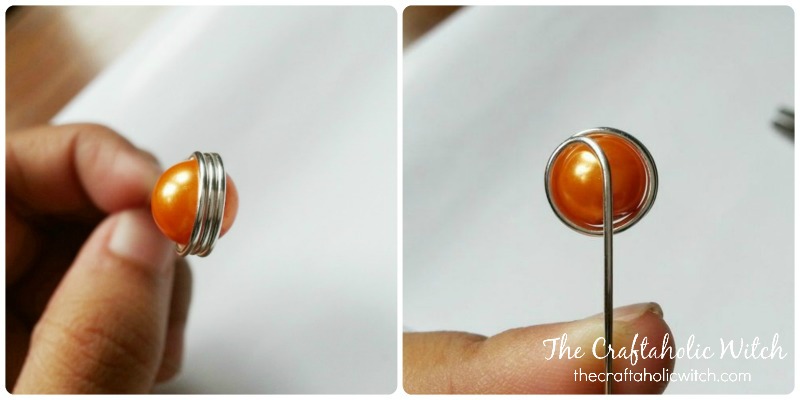
Now wind the long side of the wire around the bead, keeping it flat against the surface as you go. Two or three passes is plenty to hold the bead and give it a pretty framed edge. If you want a bolder, cage-like border, just keep wrapping over the same path. Firm, even tension is the thing that stops the bead wobbling loose later, so keep it snug.
Step 3: Bend the Wire Down to Form the Post
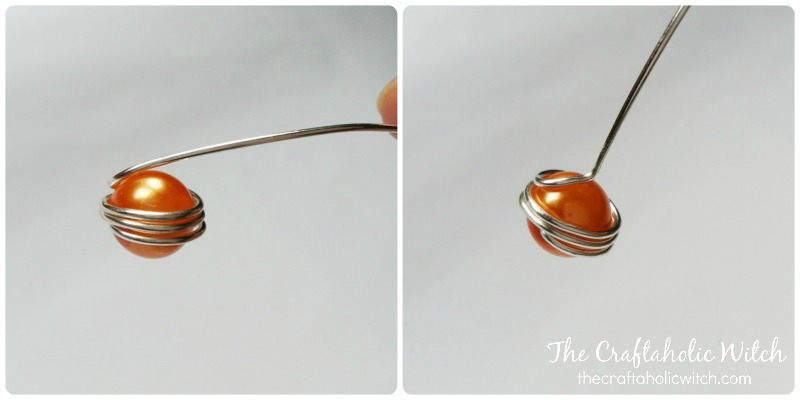
Once the bead is wrapped, the leftover wire becomes the earring post. Bend it straight down from the exact point where your last wrap ends. Then take your pliers and put a second bend in it so the wire lines up behind the center of the bead. That centered post is what makes the finished stud sit flat against your ear instead of tipping forward.
Step 4: Trim the Post and Make the Earring Backs
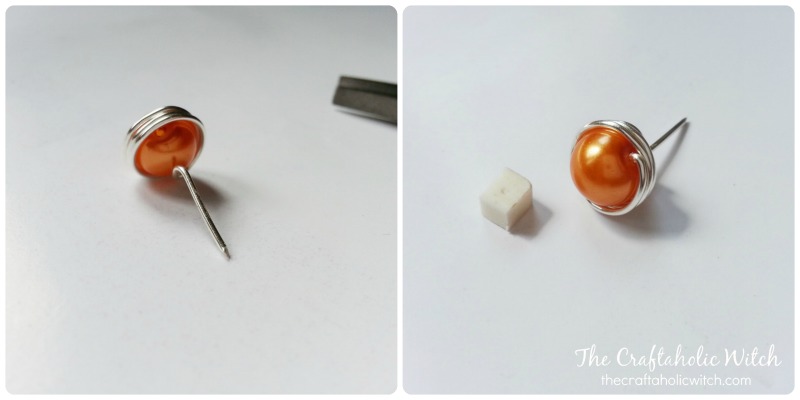
Leave about 2cm of straight wire for the post and cut it free from the spool. For the backs, I raid the stationery drawer: slice a rubber eraser into small squares, then push and twist a square onto each post so it bores its own little hole. That is your homemade earring back sorted. If you would rather, store-bought rubber or metal backs slip straight on instead.
Warning: Cut the eraser on a board with the blade moving away from your fingers. A craft knife slips easily on smooth rubber, so go slow.
Share it in "I Made It" and let us cheer you on.
Post your finished make in "I Made It" so the community can celebrate it with you. Cheer on other makers too. Each month, the most loved craft wins 1 year of Craftaholic Premium ($59)
Tips for Wire Wrapped Bead Earrings
- Batch them. Because the wire stays on the spool while you work, you can make one pair after another and end up with a whole set in about half an hour.
- Swap the pearl for faceted glass, gemstone chips, or little wooden beads to change the whole mood of the earrings.
- Store the finished studs flat in a small box or pressed into a scrap of foam so the thin posts stay straight.
Frequently Asked Questions
What gauge wire is best for wire wrapped bead earrings?
18 gauge craft wire is the sweet spot for these studs. It is thin enough to bend and wrap by hand, yet stiff enough to hold a straight post that will not bend flat the first time you wear it. If all you have is 20 gauge it will still work, it is just a little more delicate.
Do I have to make the earring backs from an eraser?
No, the eraser is just a free stand-in. A rubber eraser cut into squares makes a soft back in seconds, but a pack of store-bought rubber or metal earring backs works exactly the same way and looks tidier for gifting. Use whichever you have on hand.
Are these earrings okay for sensitive ears?
It depends on the wire. Plain craft wire can irritate sensitive or newly pierced ears, so if that is you, make the post from hypoallergenic wire such as surgical steel, niobium, or gold-filled wire. The wrapping and shaping steps are exactly the same, you are only changing the metal that touches your skin.
How do I stop the wrapped wire from loosening?
Keep firm tension while you wrap and press each pass flat against the bead with your pliers. Finish by tucking the wire end down close to the bead so nothing sticks out to catch and unwind. A snug, flat wrap will stay put through everyday wear.
Can I use different beads?
Yes, almost any bead works as long as its hole slides onto the wire and it is light enough to hang comfortably from a post. Round 8mm beads sit most like a classic stud, but smaller beads make dainty studs and a small cluster of tiny beads is pretty too.
More Jewelry Tutorials
- How to Make Hoop Earrings with Beads
- How to Make Leather Earrings (Teardrop Style)
- How to Make Clay Earrings at Home
- DIY Beaded Wire Ring in 6 Easy Steps
- How to Wire Wrap Stones and Make a Pendant
Share your wire wrapped bead earrings in the I Made It space inside Craftaholic Community. The most-loved post each month wins a one year free Premium membership.
0 Comments
Join the conversation
Log in to your Craftaholic Community account to comment, ask questions, and cheer on fellow makers.
Log in to comment