


These swirly wire charms take about 15 minutes to make and cost almost nothing, but they punch well above their weight. Clip one onto an earring hook, string three on a chain, or stack a handful onto a bracelet; the same little charm works across all of it. All you need is a short piece of craft wire and a pair of round-nose pliers.
I’ve been making these for years as quick add-ons to bigger jewelry projects. They’re also my go-to for last-minute gifts: a pair of copper swirly earrings costs less than a dollar and takes ten minutes from start to finish.
Wire Charms at a Glance
- Difficulty: Beginner
- Time: 15 minutes
- Cost: Under $1 per charm
- Ages: 12+
- Best for: Jewelry making, quick gifts, accessories

Join Craft Challenge: Craft Your Calm
Make something that brings you a sense of peace, share a photo, and tell us your story. It's free to enter, open to everyone, and the entry with the most reactions takes home a $100 gift card. Takes five minutes to join.
Entries close August 30, 2026. No purchase necessary.
What You Need to Make Wire Charms
Materials
- Craft wire, 18-20 gauge: copper, silver-toned, or colored craft wire. This gauge bends easily by hand and holds the coiled shape well once finished. Thinner wire (22+ gauge) tends to lose its shape; thicker wire (16 gauge and below) is harder to coil without heavy-duty pliers.
Tools
- Round-nose (looping) pliers: for forming the small loops at each end of the wire. The tapered cone jaws let you control exactly how tight each loop is.
- Cutting pliers: for snipping the wire to length. Regular craft scissors won’t cut through wire cleanly and will leave a crushed, ragged end.
- Flat-nose pliers or a craft hammer: for flattening the finished charm. This step is optional but gives a much more polished result.
Ask inside "Crafty Q&A" while you are making.
"Crafty Q&A" is free to join. Share your question, photo, or the exact step where you got stuck, and chat with other makers plus the Craftaholic Witch team. You can also join any discussion thread already happening inside the space.
How to Make Wire Charms
Step 1: Cut the Wire and Form the First Loop
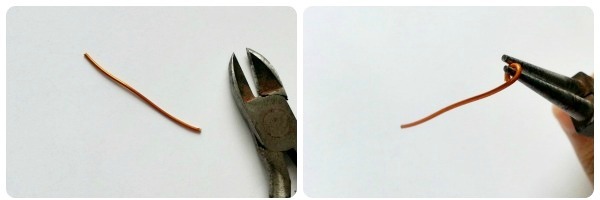
Start with about 3 cm of wire, roughly the width of two fingers. Snip it cleanly with your cutting pliers; scissors leave a crushed end that’s almost impossible to loop neatly. Then grip the very tip of one end with your round-nose pliers and roll it into a tight, closed loop. This is your attachment point, where you’ll thread a jump ring or an earring hook later. Keep it small and flush so it sits neatly against a chain or hook without sticking out.
Step 2: Create the S-Shape and Coil the Wire
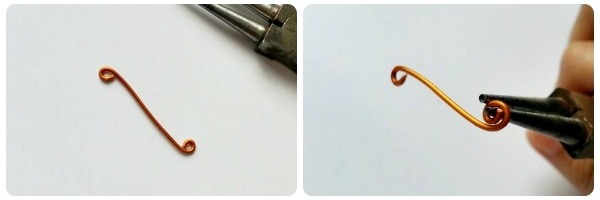
Move to the opposite end of the wire and form another small loop, but curl it in the reverse direction. If the first loop rolled toward you, this one rolls away. You now have an S-shape: the top loop is for hanging, the bottom loop is what the coil will wrap around.
Hold that bottom loop steady with your round-nose pliers and use your other hand to guide the remaining wire in a spiral around it, like winding a snail shell outward. Each pass sits just outside the one before it. Keep the tension even; if the wire slips off-center, nudge it back into a clean circle with your flat-nose pliers.
Step 3: Finish the Coil and Flatten
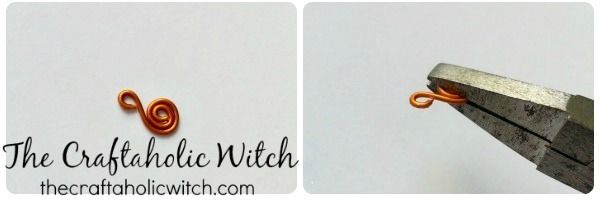
With a 3 cm piece you’ll get roughly one full revolution around the bottom loop, which is the finish shown in the photos. If your wire is a little longer, keep spiraling for a fuller, bolder swirl. Once all the wire is used up, press the end of the coil inward with your flat-nose pliers so there are no sharp points that could snag on fabric or skin.
For a polished finish, lay the charm on a firm surface and squeeze it flat with your flat-nose pliers, or tap it a few times with a craft hammer on a steel bench block. Flattening is optional, but it widens the wire slightly and makes the spiral really pop.
Share it in "I Made It" and let us cheer you on.
Post your finished make in "I Made It" so the community can celebrate it with you. Cheer on other makers too. Each month, the most loved craft wins 1 year of Craftaholic Premium ($59)
What Can You Use These Wire Charms For?
This is where it gets fun. The small loop at the top of each charm connects to almost anything with a jump ring, so one batch opens up a lot of possibilities:
- Earrings: attach a charm to an earring hook for an instant pair. Copper wire has a warm, vintage feel that works beautifully with bohemian and nature-inspired styles.
- Necklaces and pendants: thread the top loop onto a thin chain for a simple pendant, or wire a small cluster together for a layered charm necklace.
- Bracelets and anklets: clip several charms onto a chain bracelet using jump rings. Mixing copper, silver-tone, and colored wire in one bracelet adds variety without extra effort.
- Keychains: connect a charm to a keyring with a jump ring for a handmade gift that takes under five minutes to assemble after you’ve made the charm.
- Stitch markers: the small top loop slips onto a knitting needle or crochet hook just like a commercial stitch marker, and they’re much prettier.
- Zipper pulls and bookmarks: thread the loop through a zipper pull hole, or tie it onto a ribbon bookmark for a personal, handmade touch.
Tips for Making Wire Charms
- Make a batch in one sitting; once the motion clicks, each charm takes about 2 minutes and it’s satisfying to see a pile of them build up.
- 18 gauge gives sturdier, bolder charms; 20 gauge produces more delicate ones suited to fine chain. Both techniques are identical.
- If you hammer, do it on a steel bench block rather than a wooden table; the hard surface transfers impact into the wire instead of absorbing it.
- These make excellent add-ons for a beaded wire ring or any wire jewelry project where you want a small decorative connector.
Frequently Asked Questions
What gauge wire is best for making wire charms?
18 to 20 gauge craft wire is the sweet spot. It’s thick enough to hold the coiled shape once finished but flexible enough to bend and loop by hand without straining. Thinner wire (22 gauge and above) tends to lose its shape over time. Thicker wire (16 gauge and below) needs heavier pliers to bend and produces a chunkier coil that can look out of proportion on a small charm.
What can I use wire charms for?
Wire charms attach to earrings, necklaces, bracelets, anklets, and keychains via a simple jump ring. They also work as stitch markers for knitting and crochet, zipper pulls on bags, and quick gift toppers on wrapped presents. A cluster of three on a plain chain necklace looks far more expensive than it is.
How do I attach a wire charm to jewelry?
Open a small jump ring with flat-nose pliers, thread it through the small loop at the top of the charm, then connect it to your earring hook, chain, or bracelet. Close the jump ring firmly. If you don’t have jump rings on hand, lightweight chains can thread directly through the top loop of the charm without one.
Can I use colored wire or different metals?
Yes. Copper wire (used in this tutorial) gives a warm, vintage look. Silver-toned aluminum wire produces charms that pair with sterling jewelry. Colored craft wire comes in dozens of shades for a playful, modern feel. The technique is identical for all of them; just stay in the 18-20 gauge range for the best results.
Do I need a hammer to finish the charm?
No, hammering is optional. Pressing the charm flat with flat-nose pliers gives a cleaner, more polished finish and makes the spiral more visible, but the charm works perfectly without it. If you prefer a rounder, more dimensional coil, skip the flattening step altogether.
More Wire Jewelry Tutorials
- How to Make Earring Hooks: make the hooks your swirly charms hang from
- How to Wire Wrap a Bead Pendant (Herringbone Wrap)
- DIY Beaded Wire Ring
- Easy Wire Wrapped Dragonfly Pendant
- How to Make a Heart Necklace with Wire
Made a pair of swirly wire earrings or found a new use for them? Share your finished piece in the I Made It space inside Craftaholic Community. The most-loved post each month wins a one year free Premium membership.