DIY Cactus Pincushion

DIY Pincushion (Cactus Pincushion Pattern)
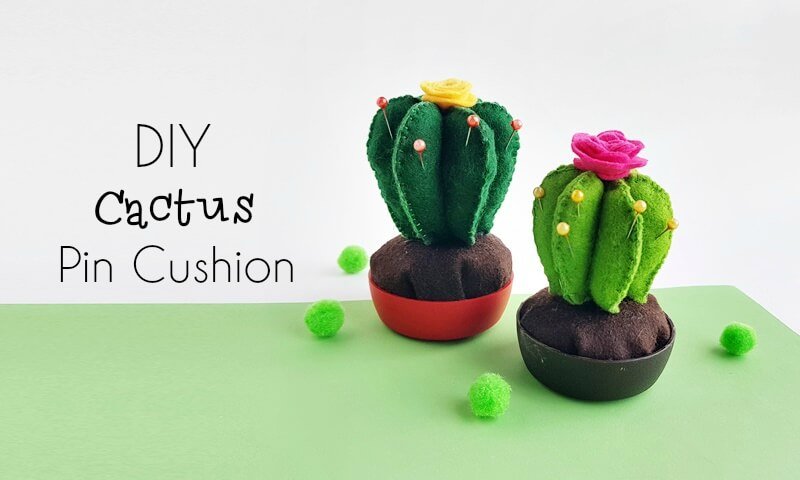
Keep your pins and needles safe and organised with this super cute DIY cactus pincushion! I absolutely enjoyed crafting these pincushions. Kept one for myself and gifted one to my grandmother. I used a coffee jar lid as the planter for the cactus pincushions. This DIY cactus pincushion can be a great project for beginners in felt crafts and this is also an amazing project for a weekend therapy session! Check out the tutorial and let us know what you think in the comments!
This cactus pincushion pattern is relatively easy to trace and cut out. Use green felt for the main cactus patterns and any coloured felt for the spiral pattern to craft the flowers.
List of Supplies
- Felt fabric – green and brown
- Needle
- Thread
- Cotton
- Lid – at least 1 inch deep
Template
Download this Cactus Pincushion Pattern and print it out. The template includes 2 different sizes for the cactus pincushion pattern, you can select any size you want. Cut out the patterns neatly and let’s get started!
Cactus Pincushion DIY Tutorial
Step 1: Preparing the Patterns
You can select a size you’d like from the template and trace the pattern on a selected piece of felt. You will need 6 pieces of the pattern for each cactus plush. Cut out the traced patterns from the felt as neatly as possible.
Step 2: Stitching the Patterns
Place 2 pattern cutouts together and stitch around the 2 sides and the top side, leaving the bottom end open. Doing flat-blanket stitch is the best opention when stitching around the sides of felt plush crafts.
Step 3: Assembling the Patterns
Hold all 3 stitched felt patterns together, making sure that they are matched nicely on both sides.
Step 4: Stitching and Joining the Base
Stitch along the middle line of the 3 stitched felt patterns. Make sure that this stitch is neat and tight. I did overlapped running stitches.
Step 5: Stuffing the Base Pattern
Grab some cotton and start to fill the stitched felt cactus pattern through the bottom open ends.
Step 6: Closing the Bottom
Keep filling until the pockets are tight. Once you are done stuffing the felt cactus pockets, stitch the bottom end neatly to secure the stuffing.
Step 7: Stitching the Soil Base
Cut out the round shape from brown coloured felt and stitch around the side of the round felt by simply doing running stitch.
Step 8: Stuffing the Soil Base
Pull the open ends of the stitched thread and form a pouch with the round-shaped felt cutout. Fill the felt pouch with cotton and pull the open ends of the thread tightly to close the pouch as much as possible. I’m using a small piece of felt to close the open end of the stuffed pouch but it’s okay if you don’t, this step is optional as we’ll be gluing the bottom end of the pouch with the lid (planter) and the open end will be secured anyways.
Step 9: Joining the Soil and Cactus Patterns
Apply hot glue on the bottom end of the lid (or any other object you’ve selected for the planter) and place the bottom end of the stuffed pouch on the glued area. Press the pouch (soil) against the glued side to make sure that it is attached nicely. Now attach the felt cactus on the top end of the felt soil with the help of hot glue. Our DIY cactus pincushion is almost ready!
Step 10: Attaching the Flowers
Use the spiral pattern to create the flower. Simply trace the spiral pattern on a colourful felt, cut it out and roll the entire spiral pattern from its outer end to form the flower. Apply hot glue to secure the spiral part with the centre of the spiral pattern. Also, use hot glue to attach the felt flower on the top end of the DIY cactus pincushion.


