


I made my first basket using A4 scrap paper, but newspaper is actually my favorite material now. It folds more easily and gives the weave a lovely rustic look. Old magazines, used notebook pages, brown packaging paper, or any leftover paper all work just as well. If you have a pile of scrap paper and are looking for what to make with it, this basket and my notebook from scrap papers are a great pair of projects.
The over-under pattern scales up easily too. Start with 8 strips for a palm-sized basket, or use 16 strips divided into two groups of 8 for a larger one. The technique is exactly the same either way. If you want more paper project ideas, my construction paper crafts guide has plenty to explore.
The finished basket is much stronger than it looks. Three lengthwise folds create rigid strips, and the tight over-under weave locks everything in place. Brush diluted craft glue over the outside when you are done for extra durability. Use it as desk storage, on a shelf as decor, or fill it and give it as a gift. It also makes a fun afternoon project to do with children.
Paper Basket Weaving at a Glance
- Difficulty: Beginner
- Time: 45 minutes
- Cost: Free (scrap paper or newspaper)
- Ages: All ages
- Best for: Home decor, small storage, recycling activities

Join Craft Challenge: Craft Your Calm
Make something that brings you a sense of peace, share a photo, and tell us your story. It's free to enter, open to everyone, and the entry with the most reactions takes home a $100 gift card. Takes five minutes to join.
Entries close August 30, 2026. No purchase necessary.
What You Need to Make a Woven Paper Basket
Materials
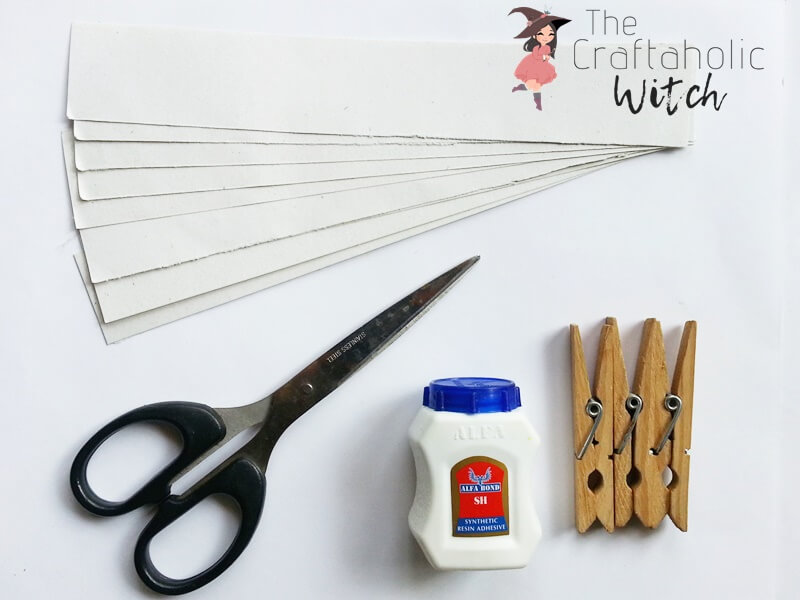
- Paper strips (at least 8, each about 11 inches long and 2.5 inches wide): newspaper, scrap A4 sheets, brown packaging paper, old magazine pages, or any leftover paper. Newspaper, printer paper, and packaging paper are the easiest to fold cleanly; avoid glossy magazine pages for your first attempt.
- Craft glue: to secure the tucked ends at the top rim. Diluted with a splash of water and brushed over the outside, it also stiffens the finished basket.
Tools
- Scissors: any standard pair for cutting strips to size.
- Clothespin or binder clip: holds the woven corner in place while you build the next side.
- Pen or pencil: for marking the center of the first two strips and drawing the inner base square guide in step 5.
Ask inside "Crafty Q&A" while you are making.
"Crafty Q&A" is free to join. Share your question, photo, or the exact step where you got stuck, and chat with other makers plus the Craftaholic Witch team. You can also join any discussion thread already happening inside the space.
How to Make a Paper Basket with Strips
Step 1: Fold Your Paper Strips
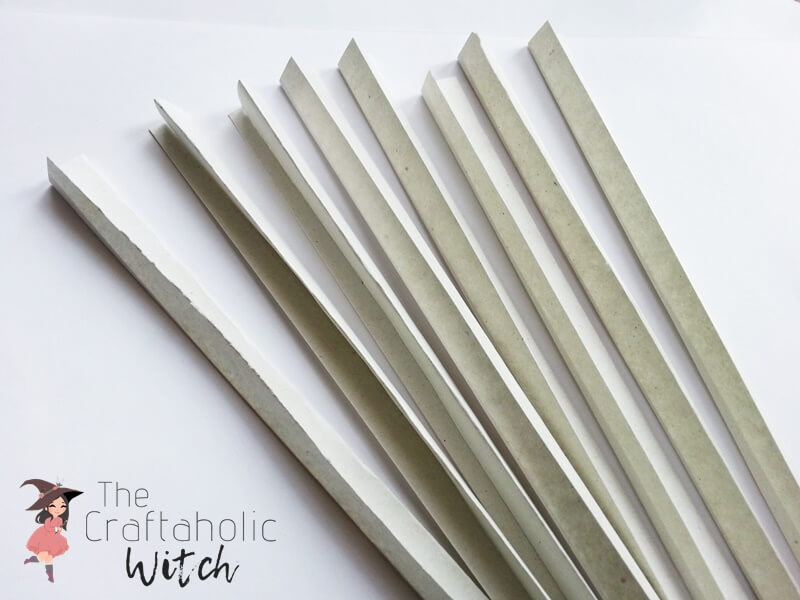
Cut 8 strips from your paper, each around 11 inches long by 2.5 inches wide. Newspaper, scrap A4 sheets, or magazine pages all work here. Fold each strip lengthwise three times so it becomes a narrow, rigid band about 5/8 inch wide. Press each crease firmly as you go. Once all 8 are folded, divide them into two equal groups of 4.
Note: You need an even number of strips total, always split into two equal groups, for the over-under weave to work out symmetrically at each corner. 8 strips (2 groups of 4) make a palm-sized basket; 16 strips (2 groups of 8) make a larger one. The technique is exactly the same either way.
Step 2: Mark the Center of Two Strips and Cross Them
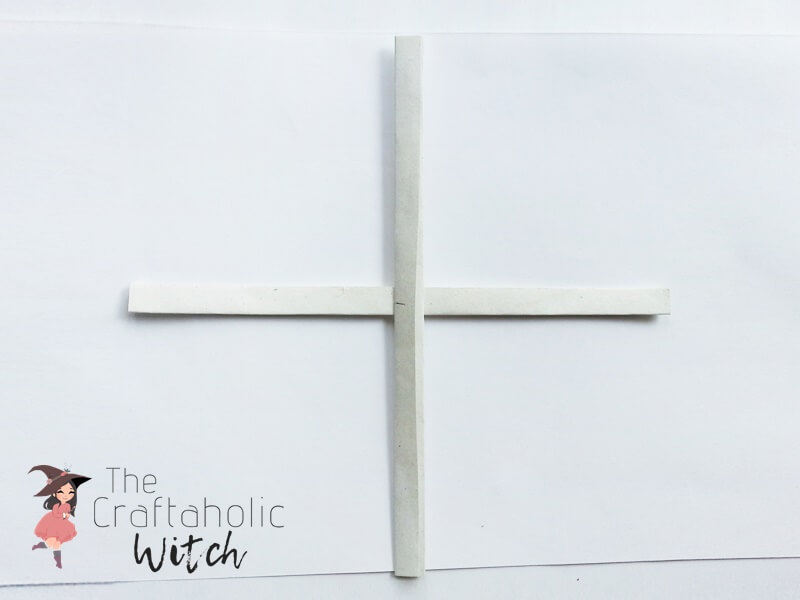
Pick one strip from each group and mark the exact center of both with a pencil. Lay them flat on your work surface in an X, lining up the pencil marks so both strips cross at their midpoints. This cross is the anchor for the whole basket base.
Step 3: Weave Three Strips Alongside the Vertical
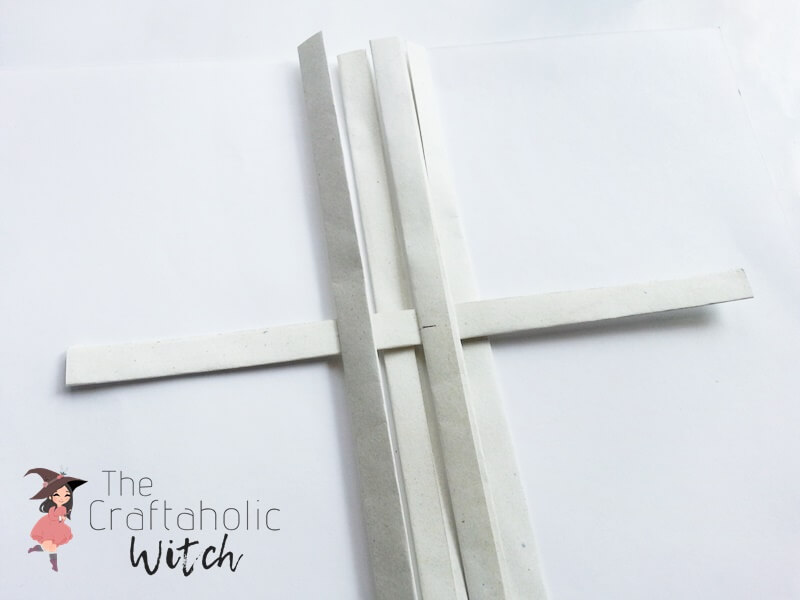
Take the 3 remaining strips from the vertical group and place them parallel to the first vertical strip, spacing them evenly on both sides. As you position each strip, alternate the over-under crossing with the horizontal strip so that adjacent vertical strips go opposite directions. You should see the checkerboard pattern starting to form.
Step 4: Complete the Woven Square Base
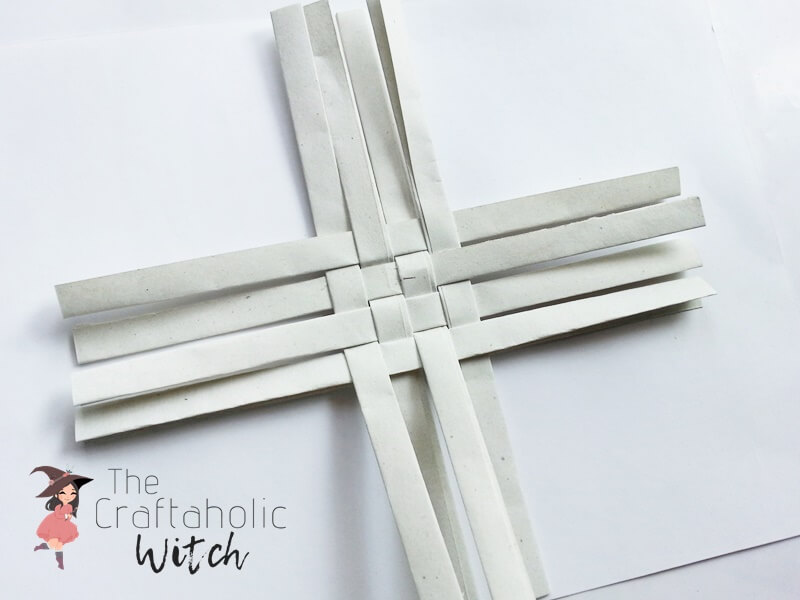
Grab the 3 remaining horizontal strips and weave them alongside the first horizontal strip, one by one. Each new strip alternates the over-under crossing with the vertical strips. Pull everything snug as you go. When all 8 strips are in, you should have a tight, flat 4×4 woven square. Nudge the strips close together so there are no gaps between them.
Step 5: Mark and Fold the Inner Base Square
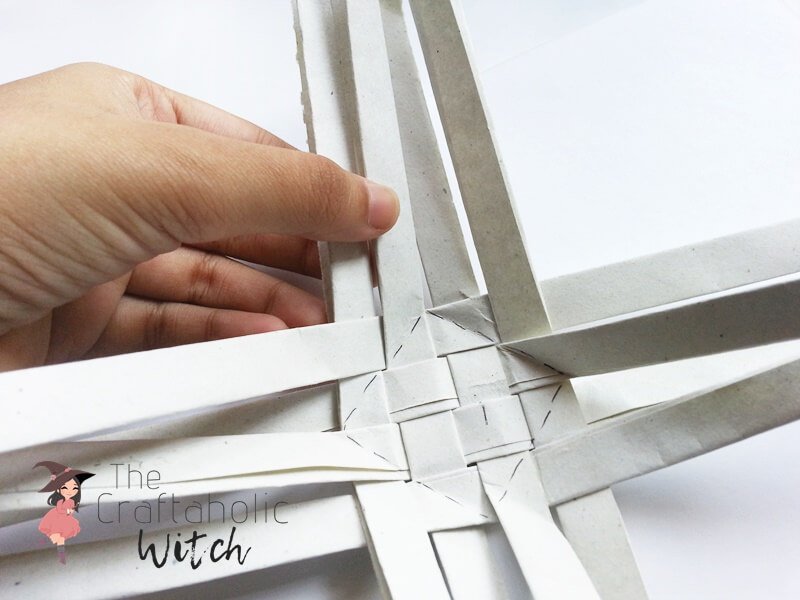
Find the midpoint on each of the 4 outer edges of the woven square and connect those points with pencil lines to draw a smaller, tilted square inside. This inner square is the actual bottom of your basket. Fold firmly along all 4 pencil lines to create sharp creases. The strips will naturally angle upward from these crease lines when you start building the sides.
Step 6: Flip the Piece Over and Choose Your Starting Strips
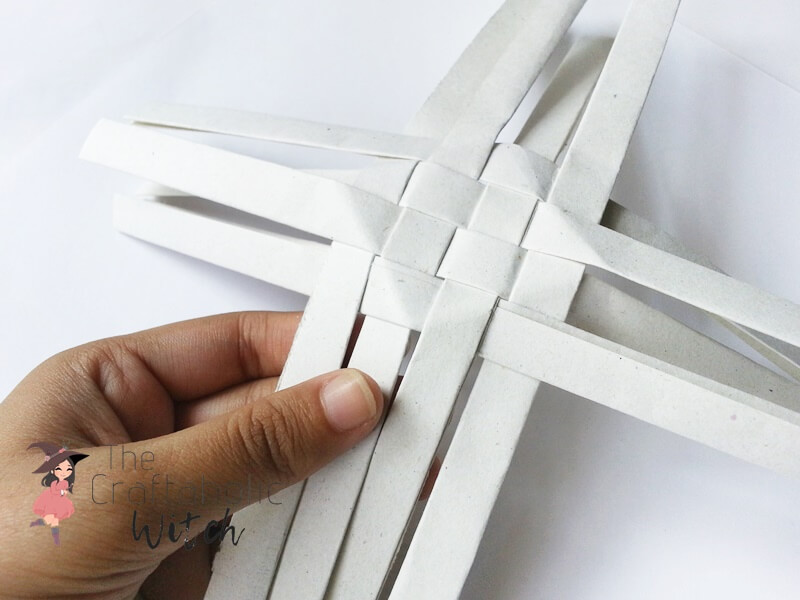
Flip the whole woven piece over so you are looking at the back. Pick any two adjacent middle strips, one from the vertical group and one from the horizontal. These two are the first corner pair you will bring up to form the basket’s sides.
Step 7: Fold the First Corner Up to 90 Degrees
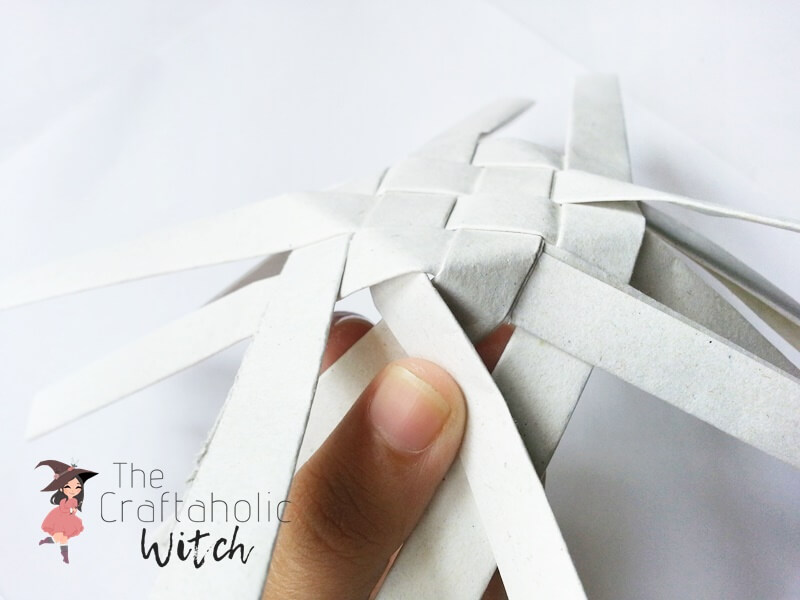
Take the strip that was going under its neighbor in the flat base and weave it over that neighbor. Then pull both strips up together to 90 degrees along the crease line from step 5. Work slowly here. This is the trickiest move in the project, but once you feel the corner click into position the logic becomes clear and the next three corners go much faster.
Step 8: Weave the Four Strips of the First Side
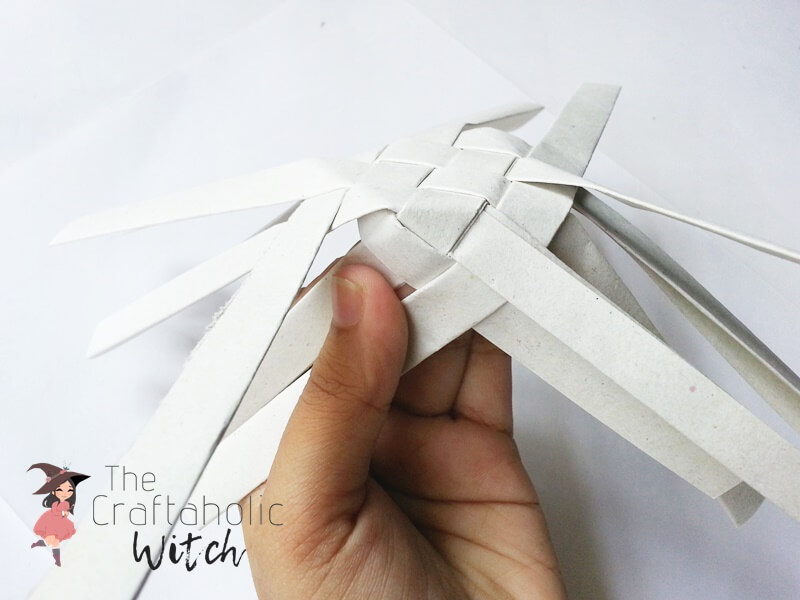
Continue weaving all 4 strips on this side over and under each other to build the first corner fully. Pull each strip snug as it crosses. A loose weave at the corner is the quickest way to end up with a floppy basket, so tighten as you go.
Step 9: Clip the Corner and Weave the Other Three Sides
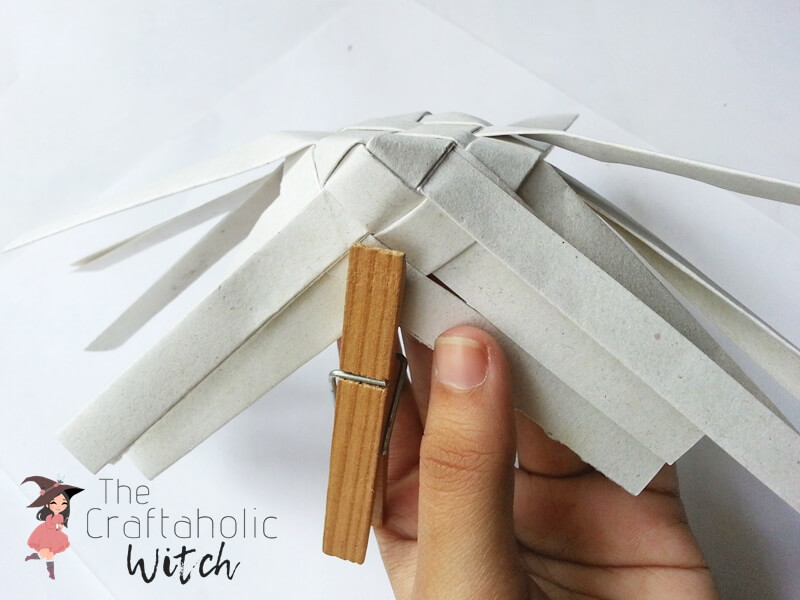
Clip a clothespin over the finished corner to hold it in place. Now weave the remaining 3 corners the same way, moving the clothespin to each new finished corner as you go. After all 4 corners are done, the basket should stand on its own.
Step 10: Check the Completed Bottom
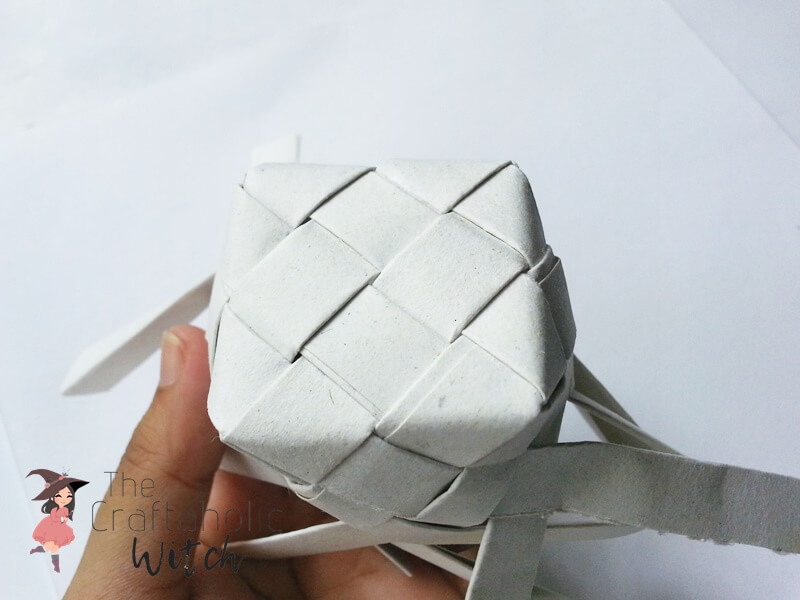
Flip the basket over and look at the bottom. All 4 corners should be woven and the strips should angle up evenly from each side of the inner square. If any corner looks loose or uneven, tighten it now. It is much harder to adjust once the sides are taller.
Step 11: Continue Weaving the Sides
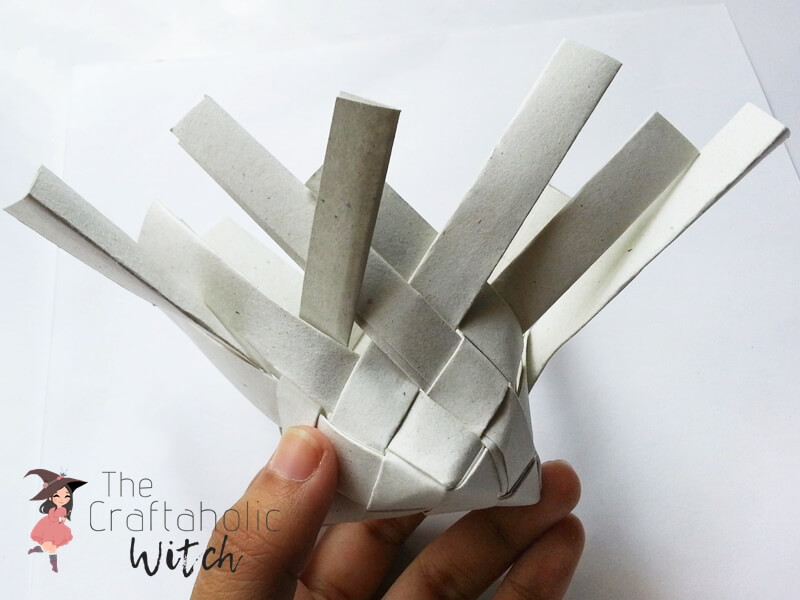
Once all 4 corners are formed, keep weaving the strips over and under as you work upward around the basket. The same alternating pattern that built the base now builds the walls.
Step 12: Weave to Your Desired Height
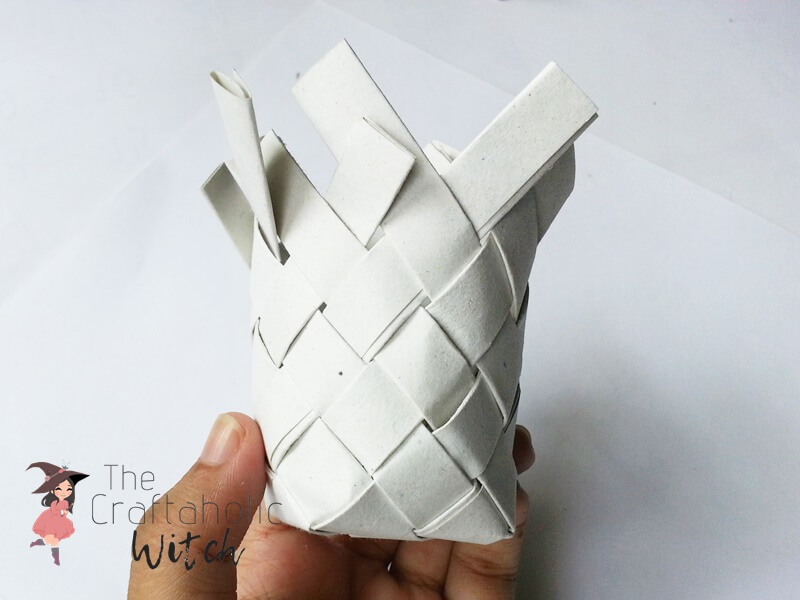
Keep weaving until the basket reaches the height you want, or until the strips are nearly used up. The shortest strip in your bunch sets the final height. Leave at least half an inch of each strip sticking above the last woven row. You will need that tail to tuck the ends in cleanly in the next step.
Step 13: Tuck in the Open Ends
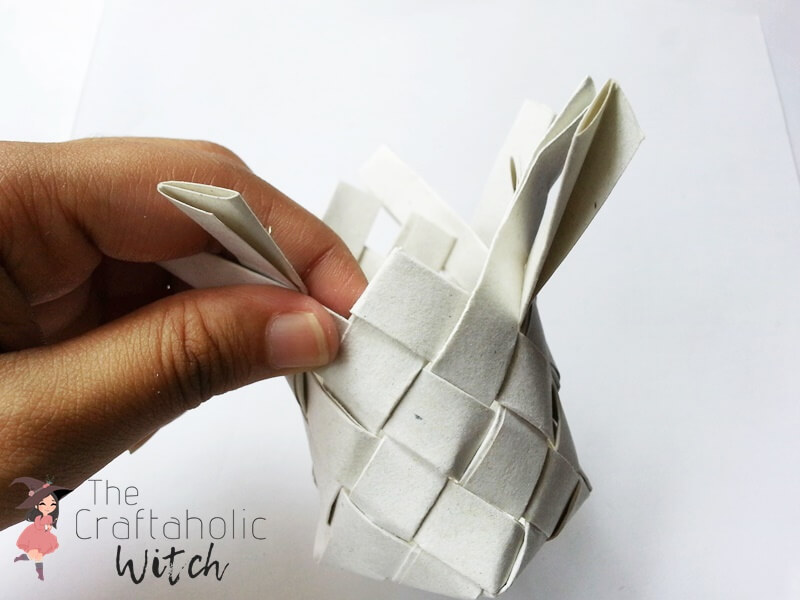
Find the shortest strip first. Tuck its end neatly inside the weave on the adjacent side, flush with the top edge. Work around the basket, tucking each remaining strip to the same height as the shortest one. Take your time here. Rushed tucks leave a bumpy rim; neat tucks make the basket look polished.
Step 14: Glue the Rim and Finish
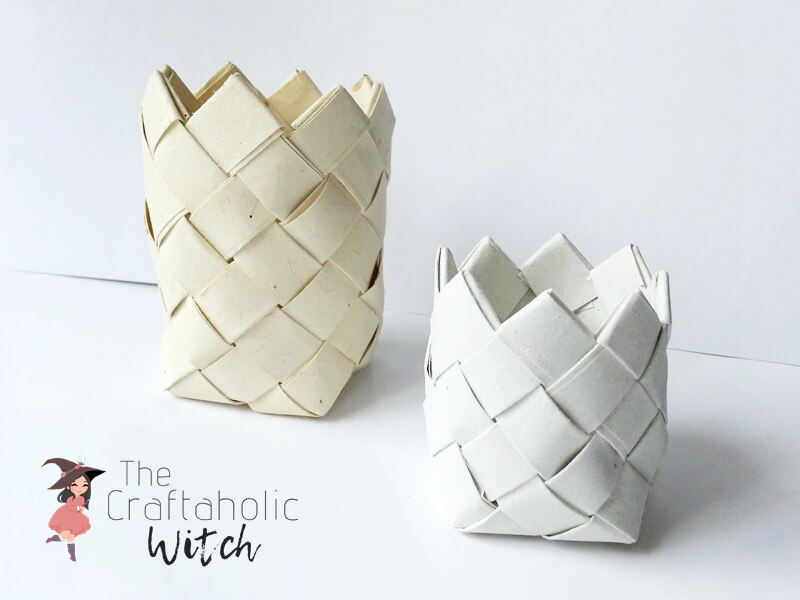
Apply a small amount of craft glue to each tucked end and press it in place. Hold or clip each one until set. Once dry, your woven paper basket is complete. For extra strength, mix a few drops of water into some craft glue and brush a thin coat over the entire outside surface, then let it dry fully. This simple step transforms a pretty paper basket into one strong enough for real everyday storage.
Share it in "I Made It" and let us cheer you on.
Post your finished make in "I Made It" so the community can celebrate it with you. Cheer on other makers too. Each month, the most loved craft wins 1 year of Craftaholic Premium ($59)
Tips for Paper Basket Weaving
- For cleaner folds on heavier paper, pre-score each fold line with the back of a scissors blade before creasing.
- Cut strips from two different-colored papers to create a natural checkerboard pattern on the basket sides.
- A coat of diluted craft glue over the outside not only stiffens the weave but also seals the surface, making the basket suitable for storing dry items like fruit or small craft supplies.

Frequently Asked Questions
Can I use newspaper to make a paper basket?
Yes, newspaper works really well for this paper basket weaving project. The thin, flexible newsprint folds into clean strips and produces a tighter weave than heavier paper. Newspaper is also easy to cut into even strips because it comes in large, flat sheets. Avoid sections with heavy color ink on your first try, as the coating makes them slightly stiffer to fold.
How many paper strips do I need for this basket?
You need a minimum of 8 strips, divided into two groups of 4. The total must always be an even number so the over-under weave works out at every corner. For this tutorial, each strip is 11 inches long and 2.5 inches wide before folding. More strips means a wider base and a bigger basket.
How do I make a paper basket stronger and more durable?
Brush a light coat of craft glue diluted with water over the outside of the finished basket and let it dry completely. This stiffens the paper and locks the weave in place, making the basket firm enough for everyday storage. Multiple coats build even more rigidity. Mod Podge works as a direct alternative to craft glue.
Can kids make this paper basket on their own?
Yes, this is one of the most beginner-friendly paper basket weaving projects for kids. Children aged 8 and up can comfortably make the whole basket without help. The folding in step 1 is the trickiest part; younger kids can jump in from the weaving steps once the strips are prepared. The over-under pattern itself is simple and satisfying to do.
How big can I make a woven paper basket?
The size depends on the length and width of your strips. Longer strips produce a taller basket; wider strips produce a bigger base. Start with 11-inch strips for a palm-sized basket and scale up proportionally for a larger one. Keep your strip dimensions consistent within a single basket so the weave stays even.
What can I use instead of a clothespin?
Any spring clip, binder clip, or even a rubber band works in place of a clothespin. You just need something to hold the woven corner in place while you work on the next side. A piece of washi tape pressed over the corner works well in a pinch too.
More Paper Craft Tutorials
- How to Make Recycled Paper at Home (Easy Method)
- How to Make a Notebook from Scrap Papers
- 17 Best DIY Construction Paper Crafts with Full Tutorials
- How to Make Paper Butterflies (with Free Template)
- How to Make a Paper Quilling Photo Frame
Share your finished paper basket in the I Made It space inside Craftaholic Community. The most-loved post each month wins a one year free Premium membership.
6 Comments
Hi – Love your recycled paper basket Weaving project! i’m wondering what size your Paper strips are? (Length and width) And did you fold them all in half leNgthwise befOre start the weaving? How many StriPs did you use for the brOwn one pictured aT the top of the tutorial? Did you use a broWn paper shopping bag? -Dawn
Thank you so much! And also thanks for pointing out all these, I will update the details to my post. I used 11 inches X 2.5 inches long strips and did 3 even folding lengthwise. For the big basket, I used 16 strips, diving them into two even groups (8 strips in each group). I used a brown packaging paper which came with something I purchased from online. Thank you!
Thanks so much for this tutoriAl, im inspired! Im going to make a basket to out my fruit in 🙂
Awesome! Hope you enjoy the craft. thank you so much!
I Used your tutorial to make baskets from the laminated paper political yard signs. It worked great and made me happy to not have to send a bunch to the land fill.
How wonderful! So happy to know the tutorial was helpful. Have a nice day!
Join the conversation
Log in to your Craftaholic Community account to comment, ask questions, and cheer on fellow makers.
Log in to comment