

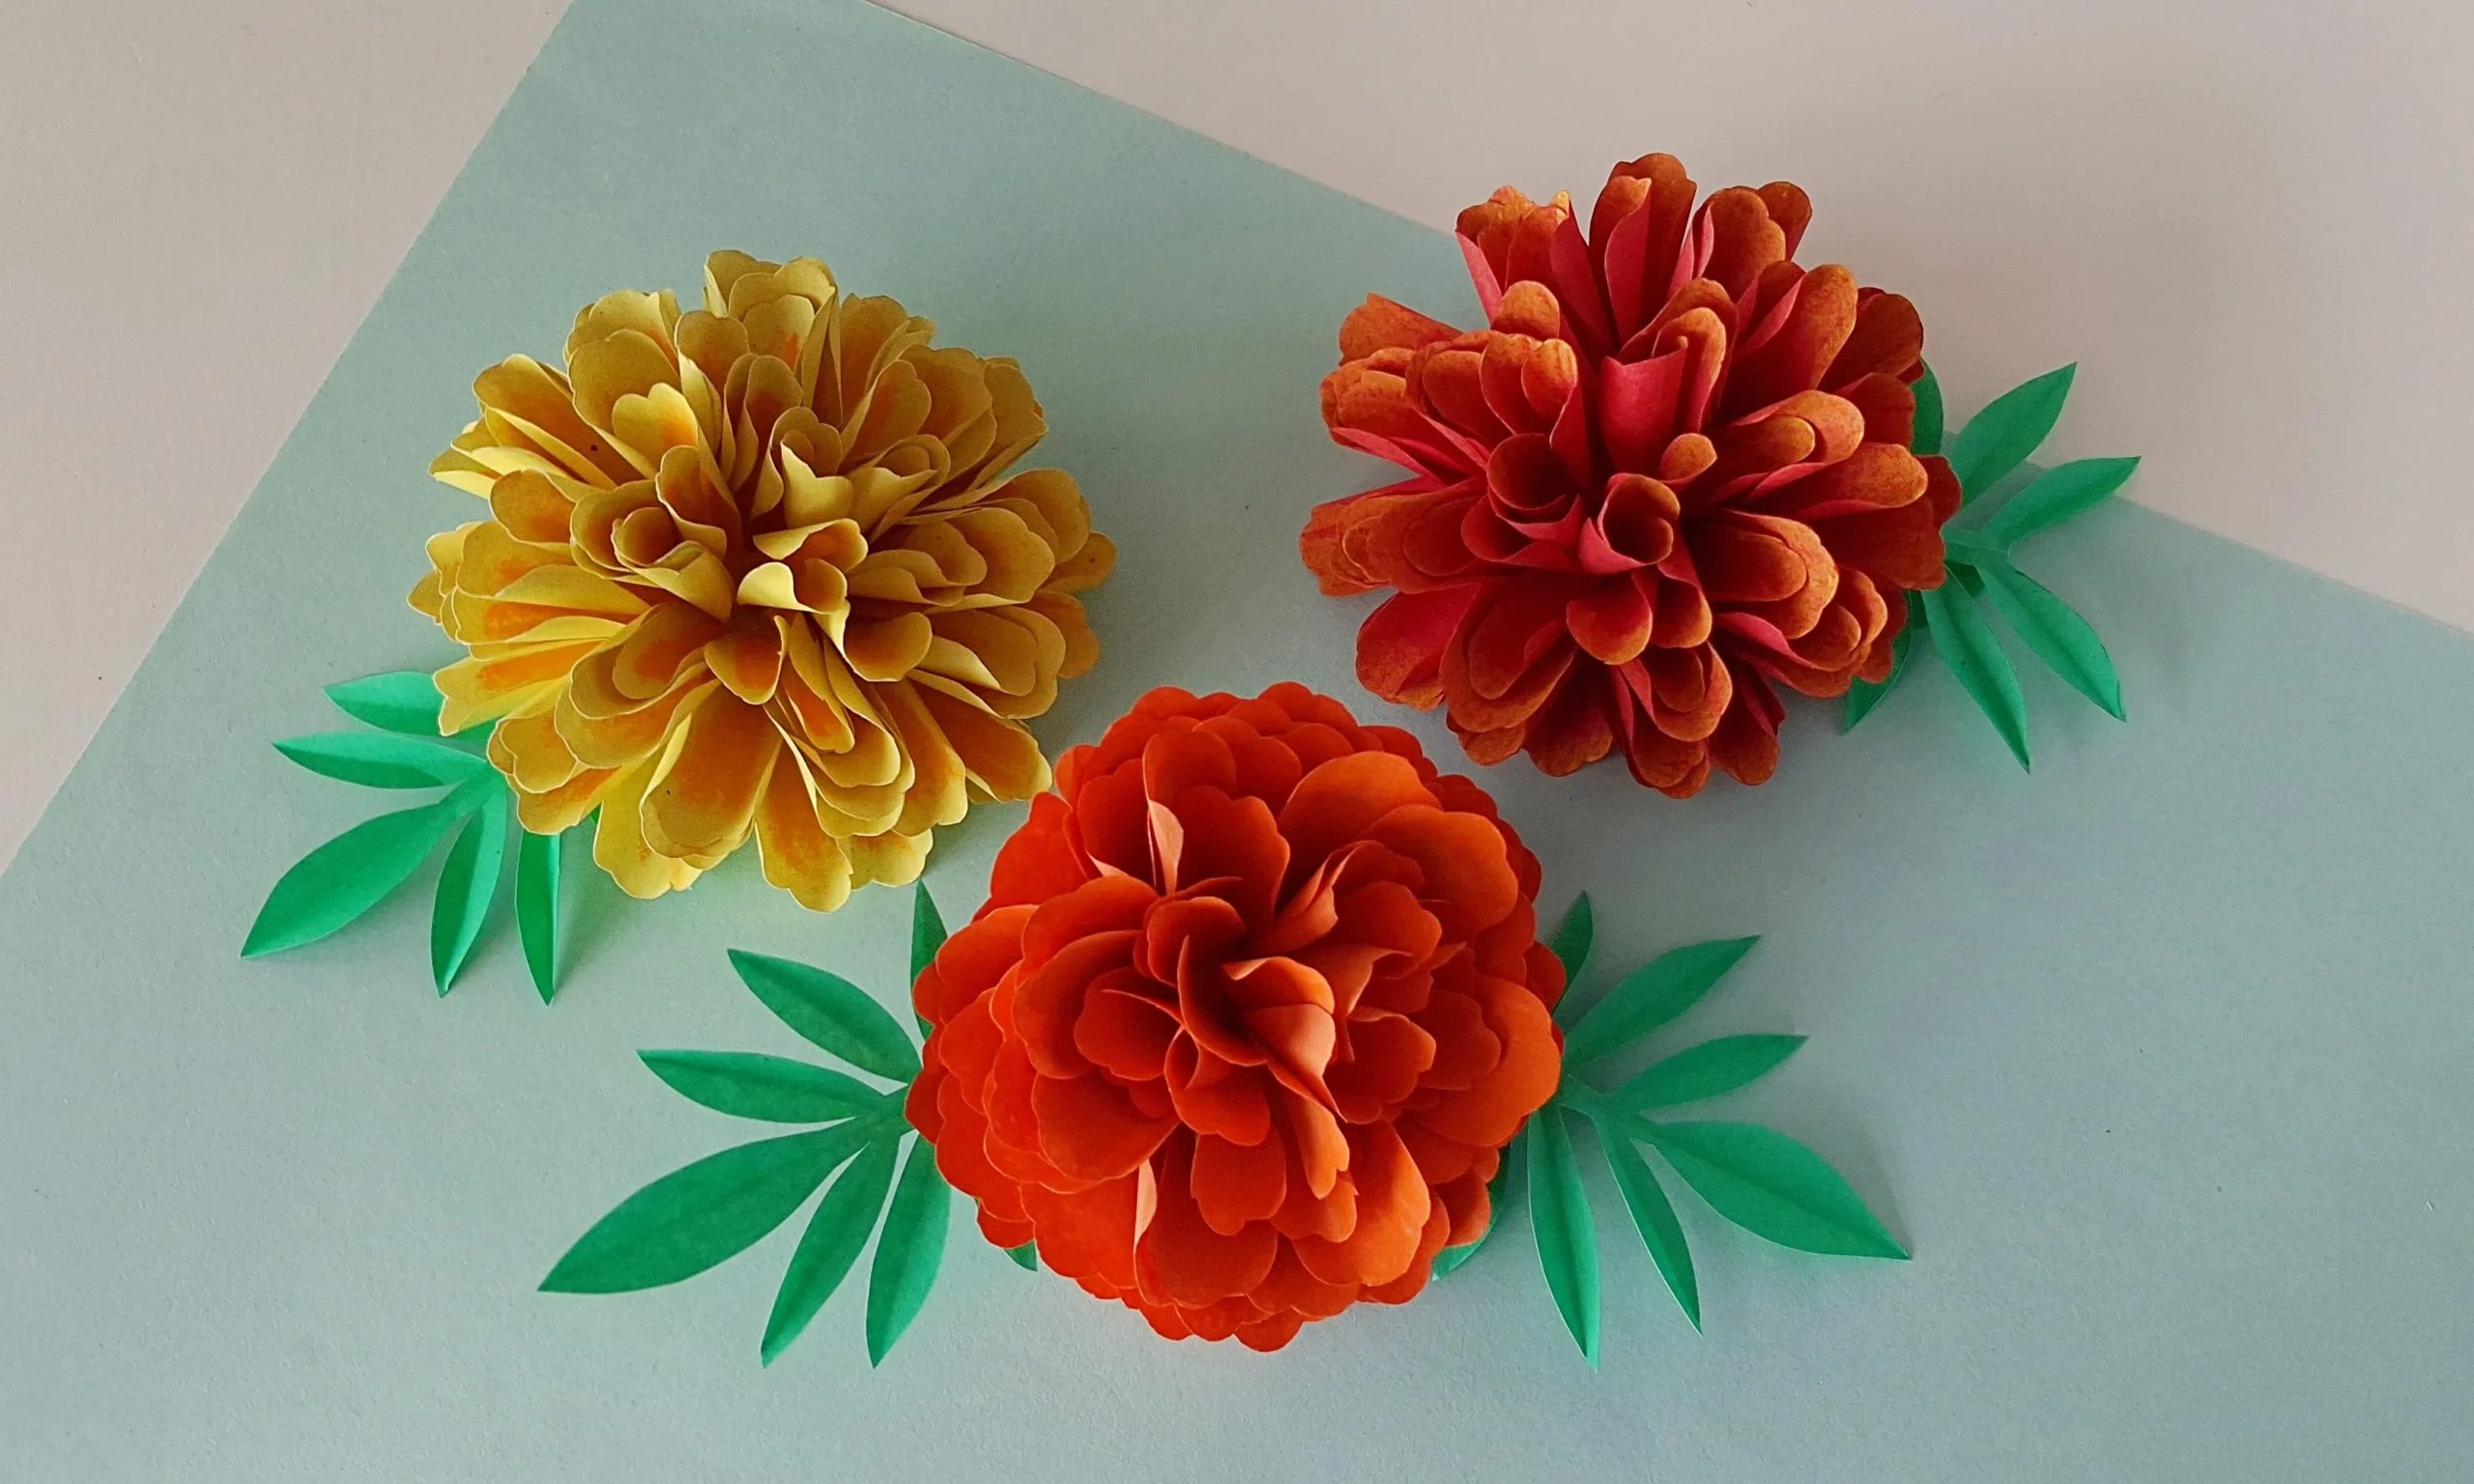
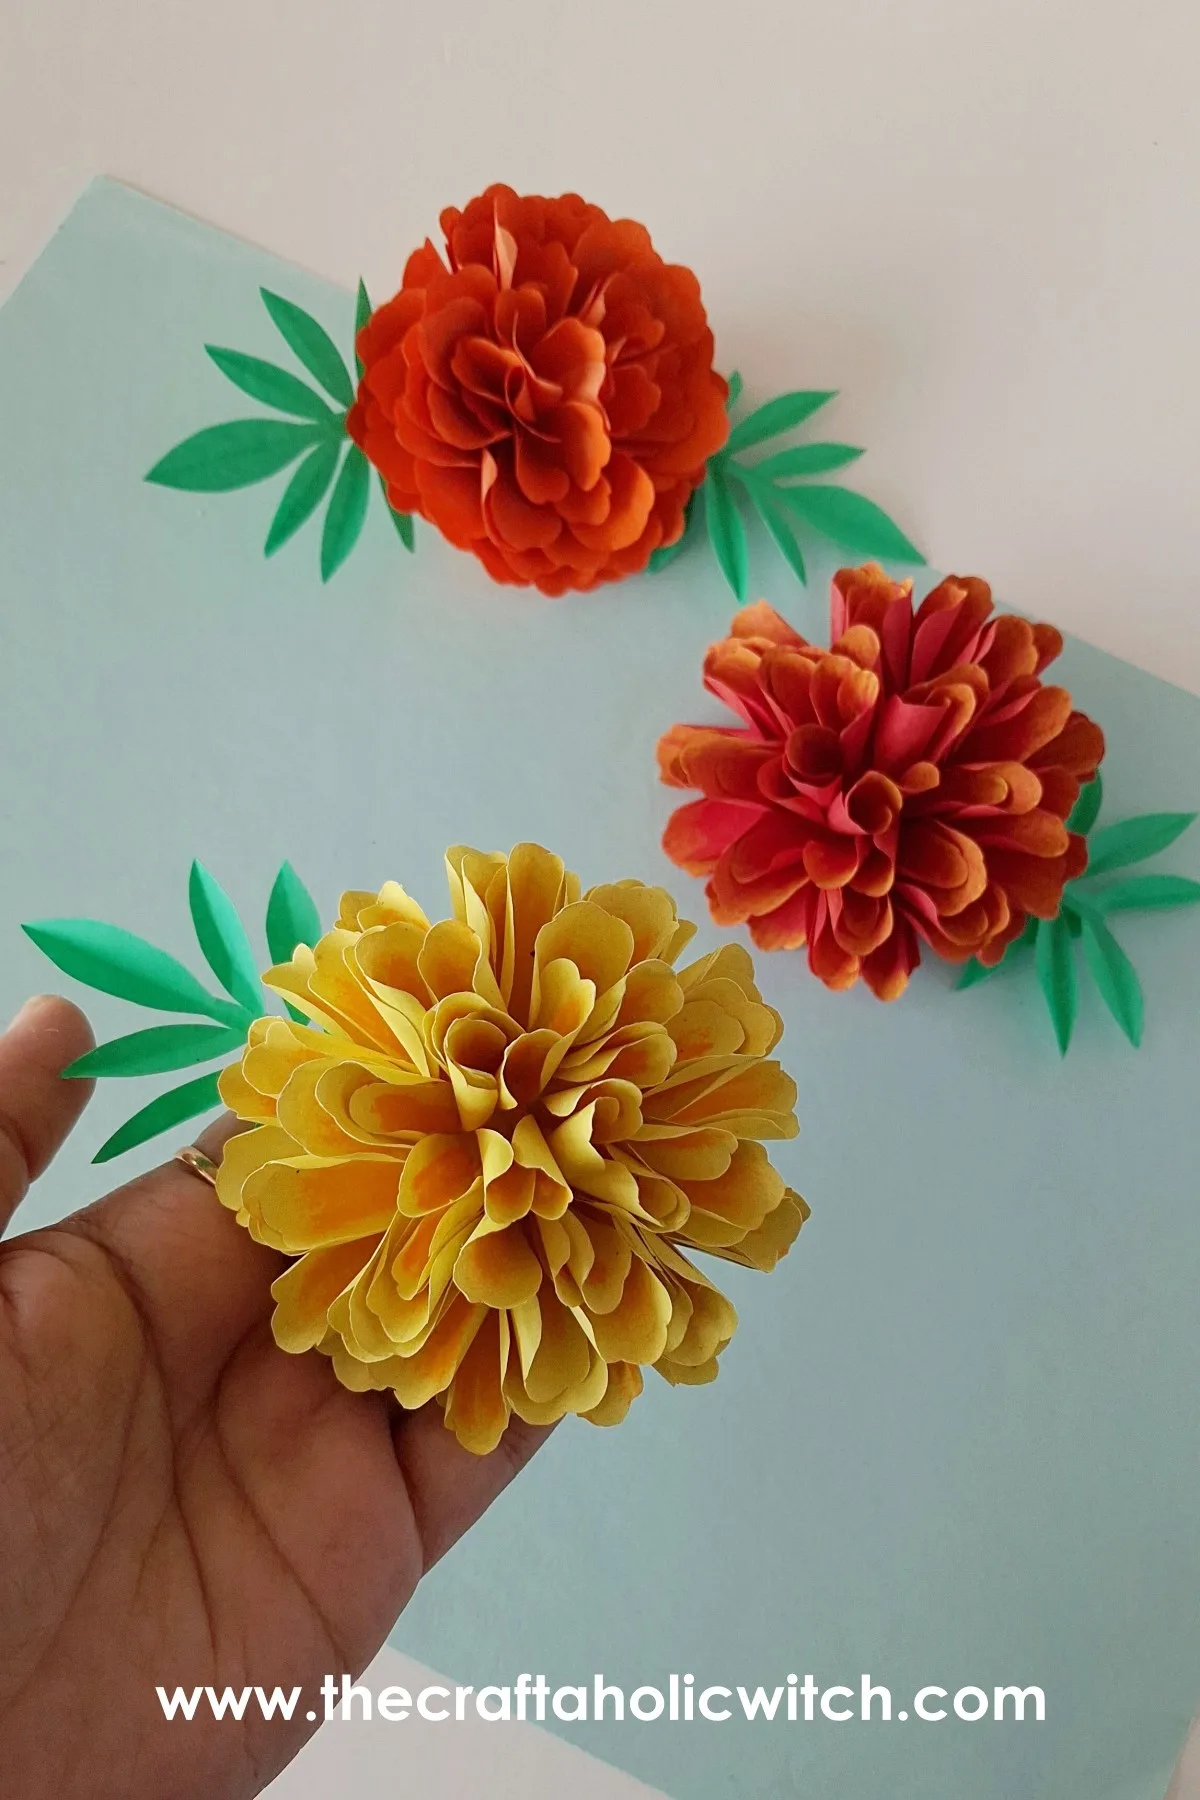
Marigolds are the flower people reach for around Día de los Muertos and Diwali, and a paper version keeps its color long after the season passes. This realistic paper marigold flower has ten curled, shaded petals built around a paper leaf and sepal base, made with nothing but craft paper, oil pastel, and glue.
None of the individual folds are hard on their own. It’s repeating that fold, shade, and curl across ten petals that takes patience, about 45 to 60 minutes once you know the steps.
It’s part of our paper flowers collection, built with the same fold-curl-shade technique as our paper gardenia flower, just with fewer, bolder petals.
Realistic Paper Marigold Flower at a Glance
- Difficulty: Intermediate
- Time: 45 to 60 minutes
- Cost: Under $5 in craft paper, oil pastel, and glue
- Ages: 8 and up, with adult help for younger kids on the cutting and curling steps
- Best for: Home decor, bouquets, or gift toppers
Join Craft Challenge: Craft Your Calm
Make something that brings you a sense of peace, share a photo, and tell us your story. It's free to enter, open to everyone, and the entry with the most reactions takes home a $100 gift card. Takes five minutes to join.
Entries close August 30, 2026. No purchase necessary.
What You Need to Make a Realistic Paper Marigold Flower
Materials
- Yellow or orange craft paper, for the petals: seven 10 cm squares for the big petals and three 9 cm squares for the small petals.
- Green craft paper, for the leaf and sepal: one 8 cm square for the leaf and one 6 cm square for the sepal.
- Oil pastel crayons, to shade the middle of each petal so the color reads as natural instead of flat.
- A scrap of fabric or a cotton swab, to blend the oil pastel shading into a smoother texture.
- Craft glue, to join every petal layer and attach the leaf and sepal to the finished flower.
Tools
- Pencil, for tracing the template pieces onto your paper.
- Template, the pattern pieces for the big petal, small petal, sepal, and leaf, available as a printable pattern in our shop.
- A pair of scissors, to cut out the traced petal, leaf, and sepal shapes.
- A round craft stick, to curl and crease the petals and leaf.
Ask inside "Crafty Q&A" while you are making.
"Crafty Q&A" is free to join. Share your question, photo, or the exact step where you got stuck, and chat with other makers plus the Craftaholic Witch team. You can also join any discussion thread already happening inside the space.
Step-by-Step Instructions
Step 1: Prepare the Template Patterns and Papers
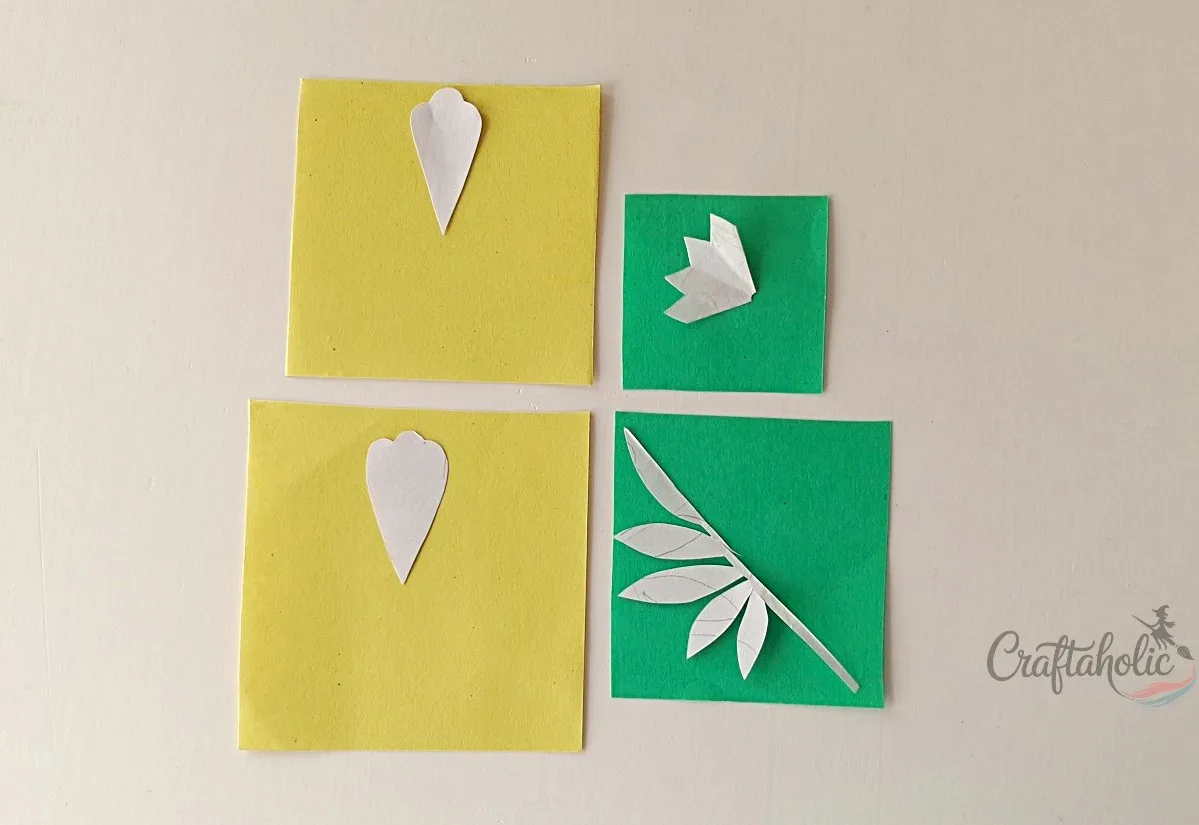
The template gives you four pattern pieces: the big petal, small petal, leaf, and sepal (the flower’s base). Cut your paper into squares to match: seven 10 cm squares in your petal color for the big petals, three 9 cm squares in the same color for the small petals, one 8 cm green square for the leaf, and one 6 cm green square for the sepal.
Step 2: Make the First Two Diagonal Folds
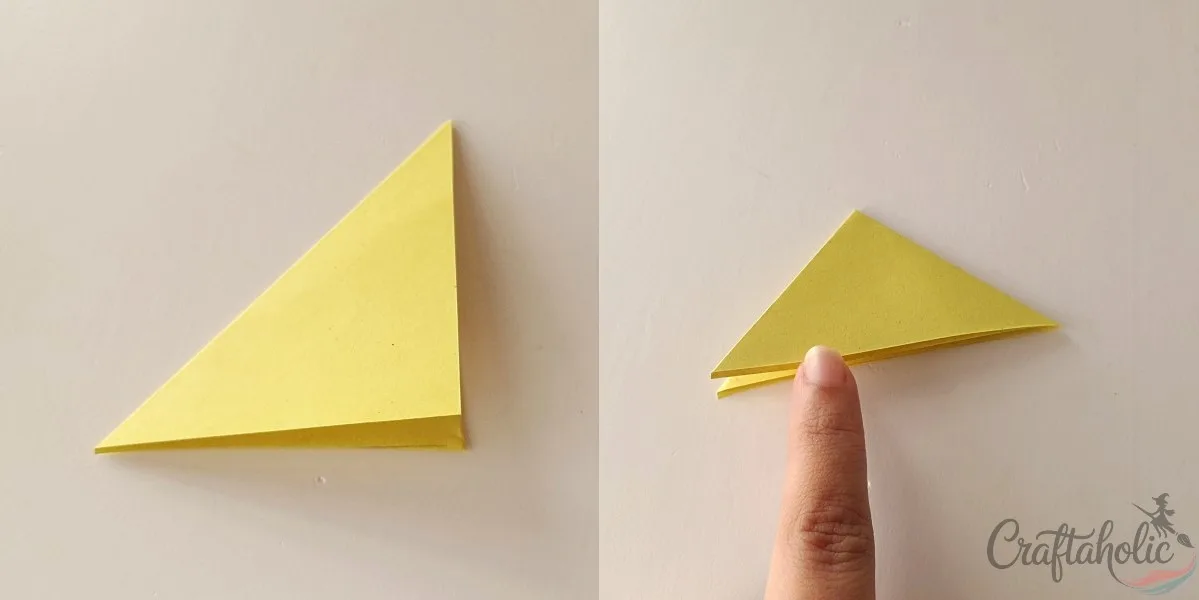
Take one of the 10 cm petal squares and fold it in half diagonally, corner to corner, to make a triangle. Fold that triangle in half again by joining its two opposite corners, so you end up with a smaller triangle four layers thick.
Step 3: Fold Each Side Flap In Half
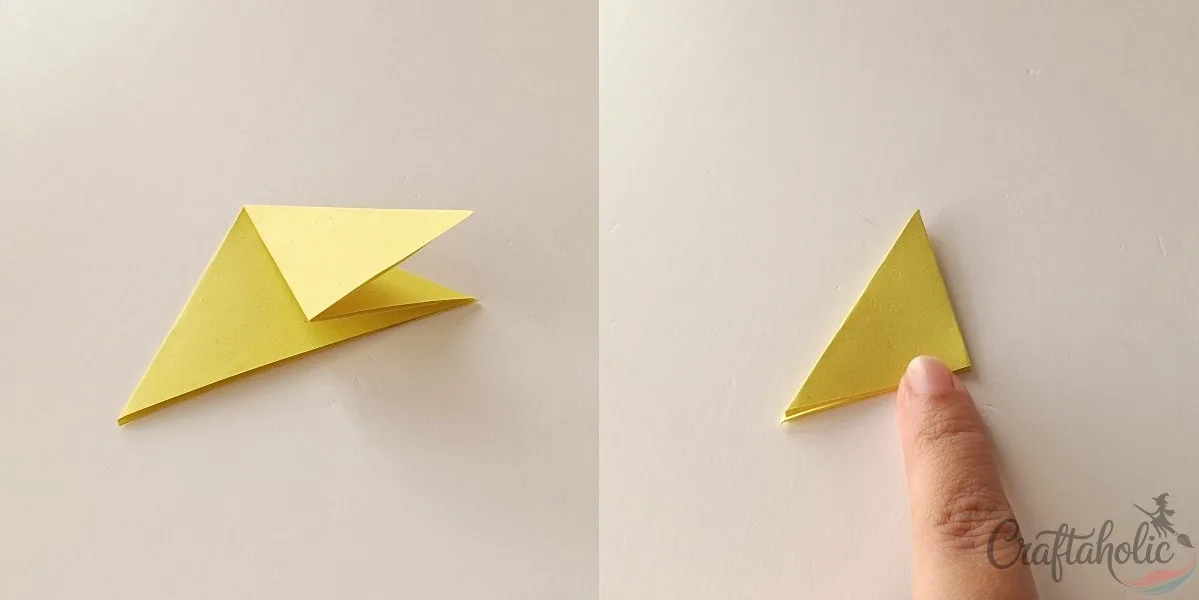
Fold the top flap of the small triangle in half. Flip the paper over to the other side and fold that second flap in half too, the same way.
Tip: Once you’ve folded the paper in half twice, folding each side flap in half on its own gives a neater cut than trying to fold the whole stack again.
Step 4: Trace the Petal Onto the Folded Paper
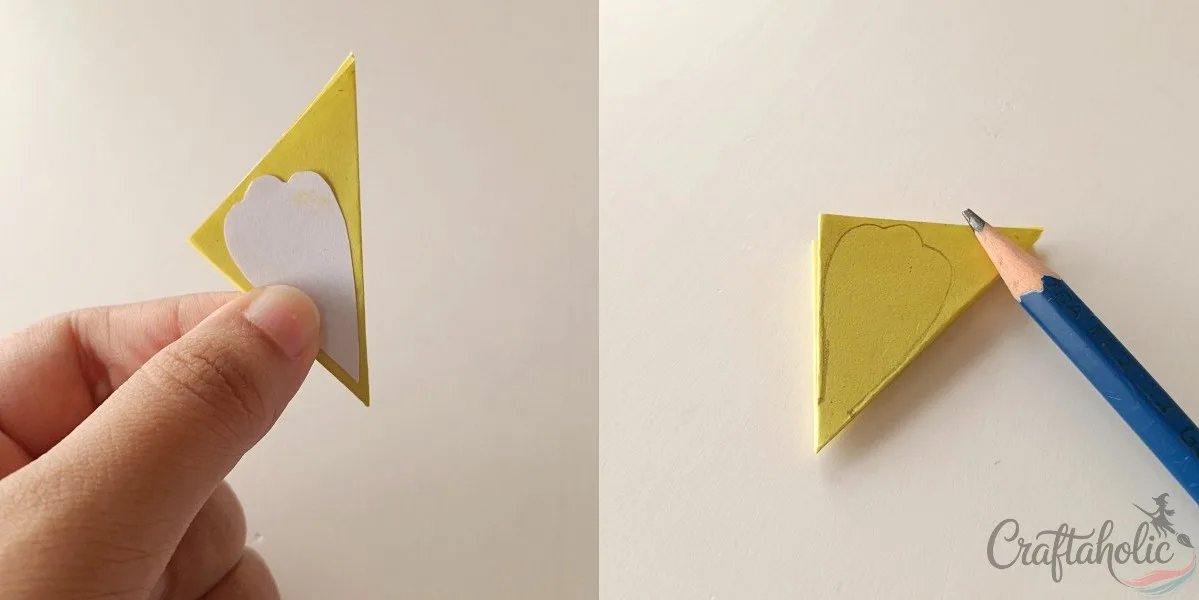
Take the big petal template piece and lay it on the folded paper so the petal’s inner corner lines up exactly with the closed corner of the fold. Trace around it from side to side, keeping that inner corner intact.
Tip: Center the petal shape on the folded paper with just a sliver of space around it. That little margin is what keeps the cut petal from coming out lopsided.
Step 5: Cut Out and Unfold the Petal
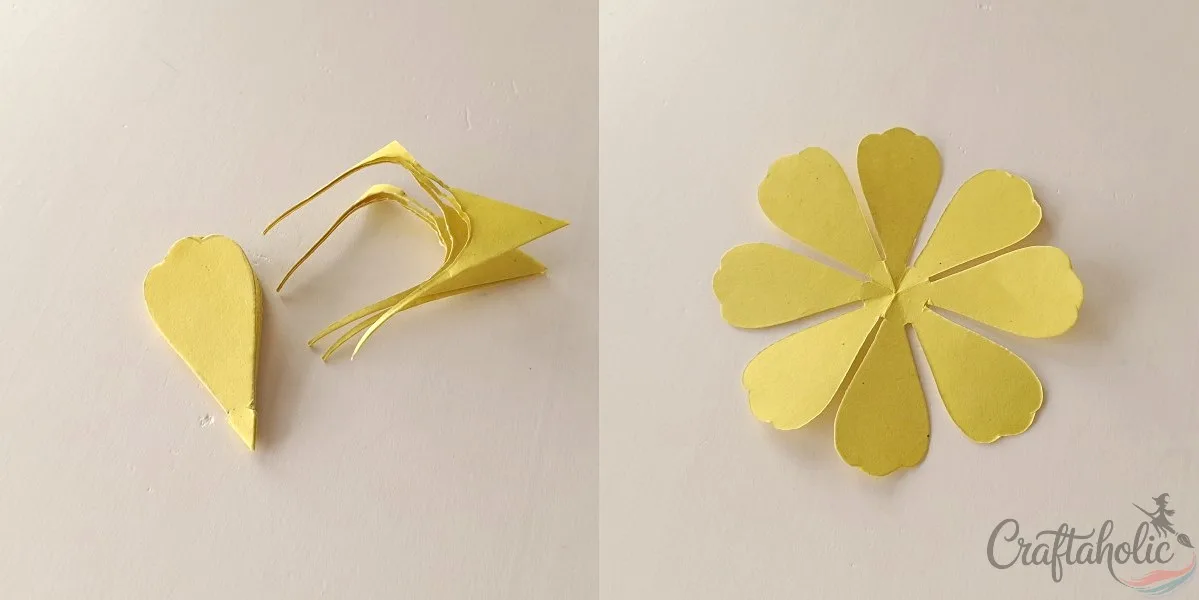
Hold the folded layers firmly with your fingers and cut along the traced line. Unfold slowly, separating the petal tips first so the thin points don’t tear.
Tip: If a tip does tear slightly, a small dot of glue on the underside holds it flat again, you’ll never see it once the petal is shaded and curled.
Step 6: Shade the Middle of Each Petal
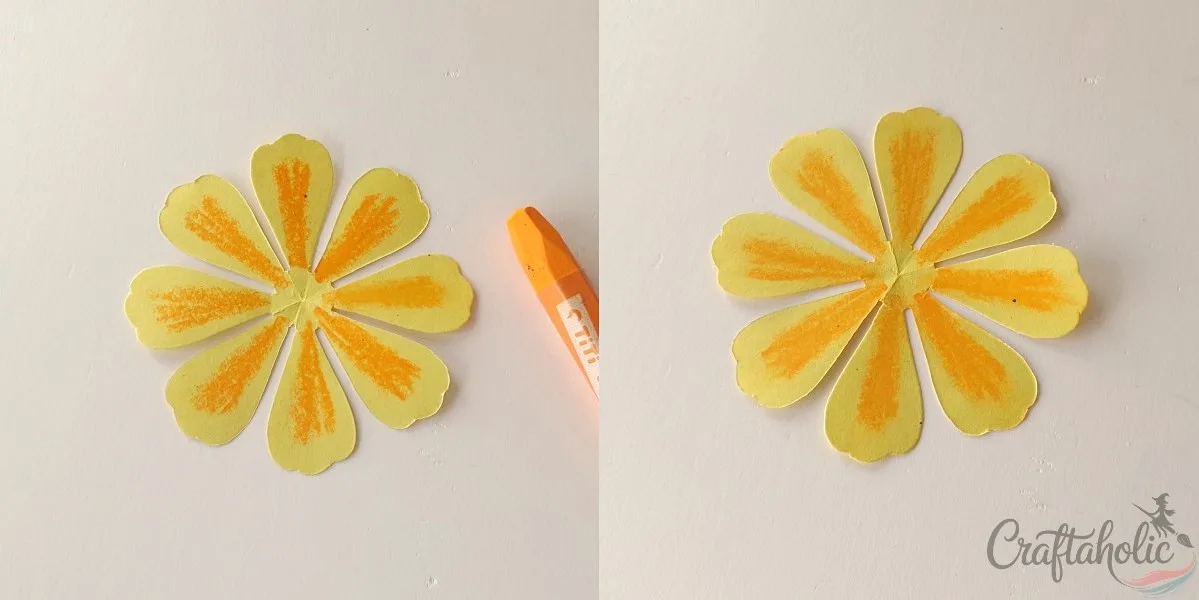
Run an oil pastel crayon down the middle of the petal to add a soft shaded line. For yellow petals, an orange crayon reads as the most natural, working from the center outward so the color fades instead of stopping in a hard edge.
Tip: Blend the crayon with a cotton swab or a scrap of fabric right after shading. It softens the pastel into a gradient instead of a chalky line, which is what makes the finished petal look real instead of colored in.
Step 7: Curl Both Sides of Each Petal
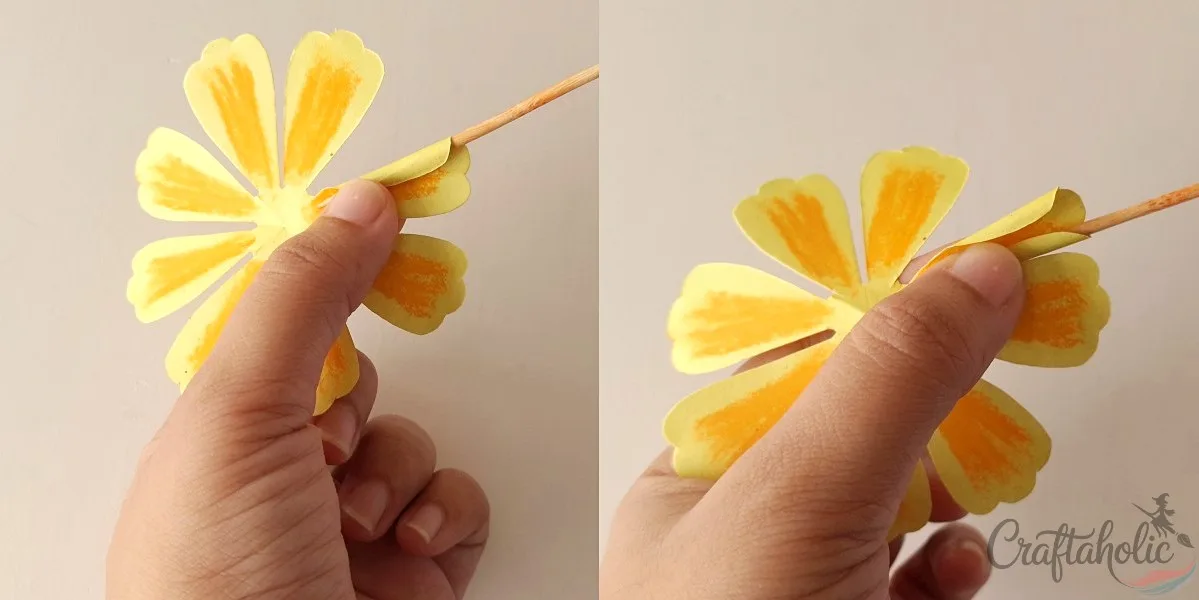
Pick up the round craft stick and lay one side of the petal against it. Gently coil that side around the stick, hold it a second, then pull the stick free without letting the curl relax. Repeat on the opposite side of the same petal.
Both sides curling toward the center is what gives a single petal its cupped, dimensional shape instead of lying flat.
Step 8: Repeat to Prepare All Ten Petal Layers
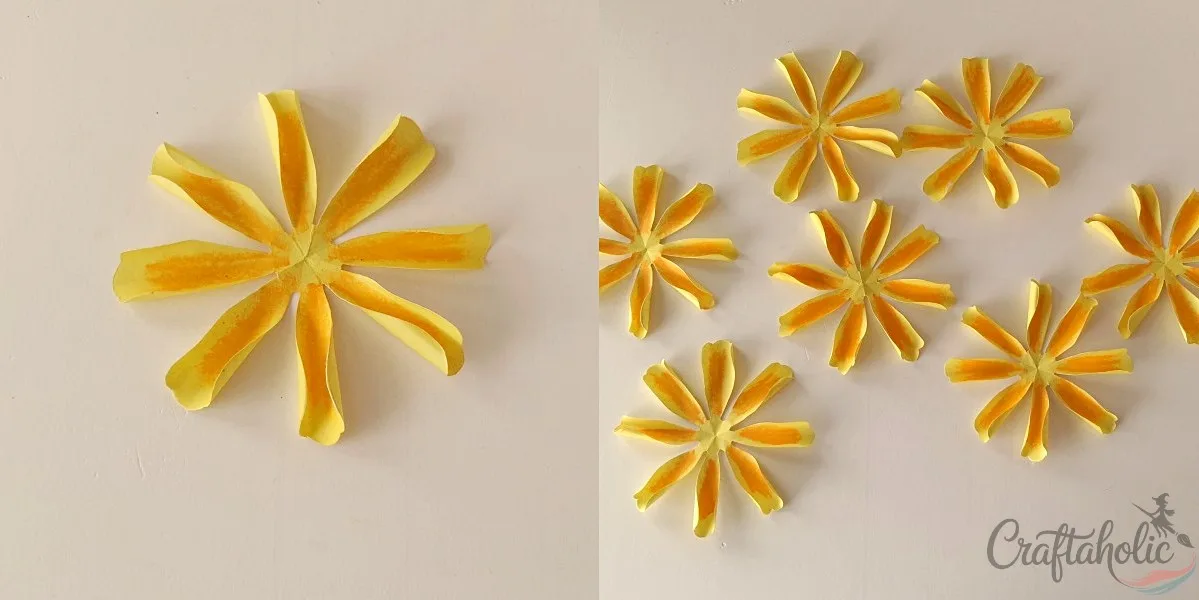
This marigold uses ten petal layers in total: seven big petals and three small ones. Work through steps 2 to 7 on the rest of your squares until all ten are folded, cut, shaded, and curled the same way.
Step 9: Glue the Seven Big Petal Layers Together
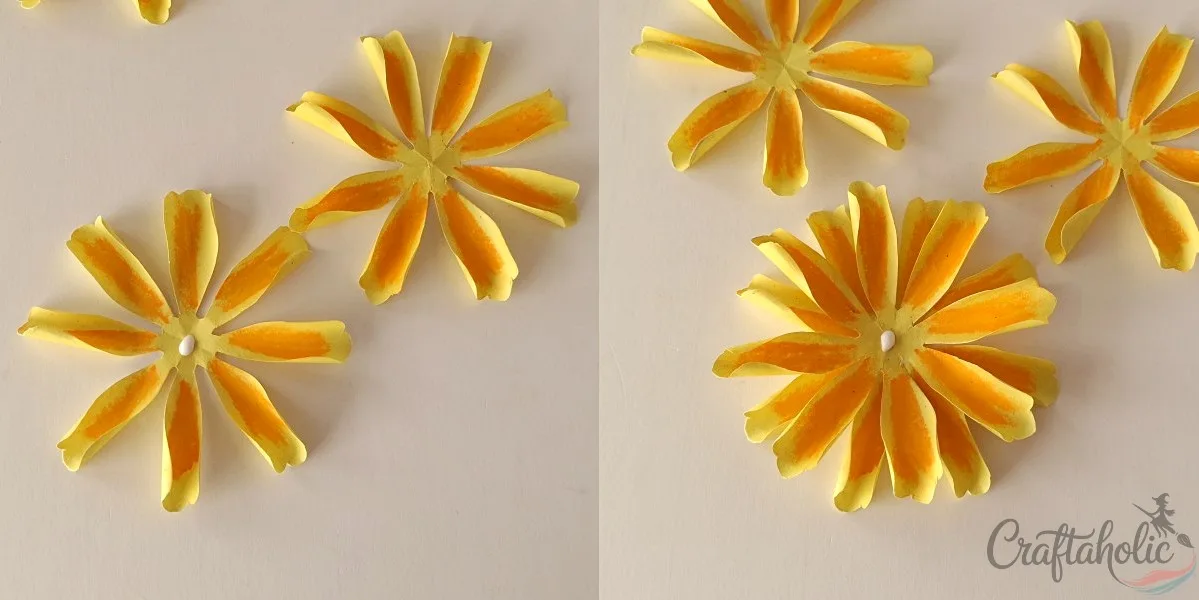
Take your seven big petal layers. Put a single drop of glue at the center of one, then press a second layer on top of it, right at its center, to secure the two together. Add the remaining big petals one at a time the same way, gluing each new layer to the center of the stack.
Tip: A drop of glue at the very center is enough. Spreading glue across the whole petal flattens the curl you just shaped.
Step 10: Glue the Three Small Petal Layers on Top
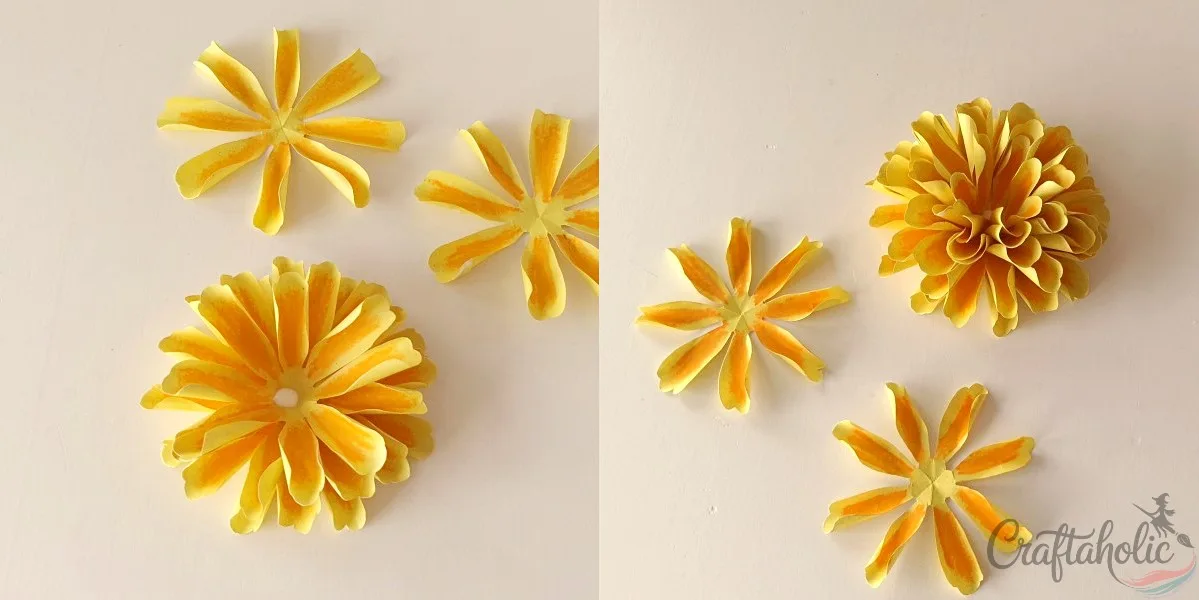
Once the big petal layer is dry, take your three small petals and glue them to the center the same way, one on top of the other. These form the innermost, tightest layer of the flower.
Step 11: Trace the Leaf Pattern
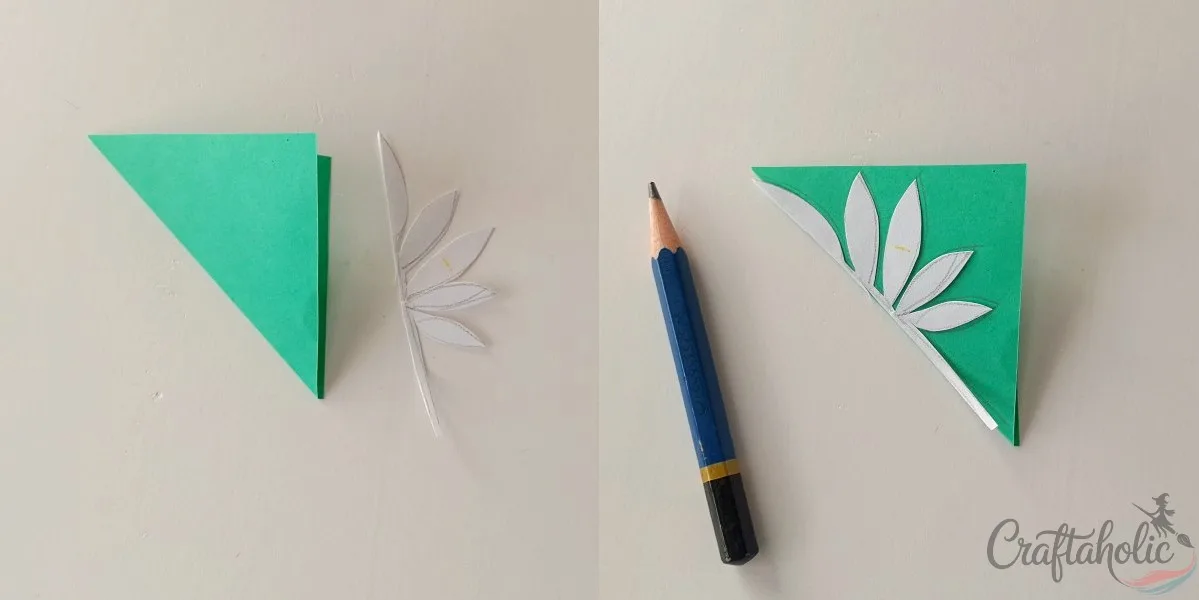
While the glue on the petal layers sets, fold the 8 cm green square in half diagonally. Line the leaf pattern’s straight edge up with the closed side of the fold and trace around it with a pencil.
Step 12: Cut Out and Unfold the Leaf
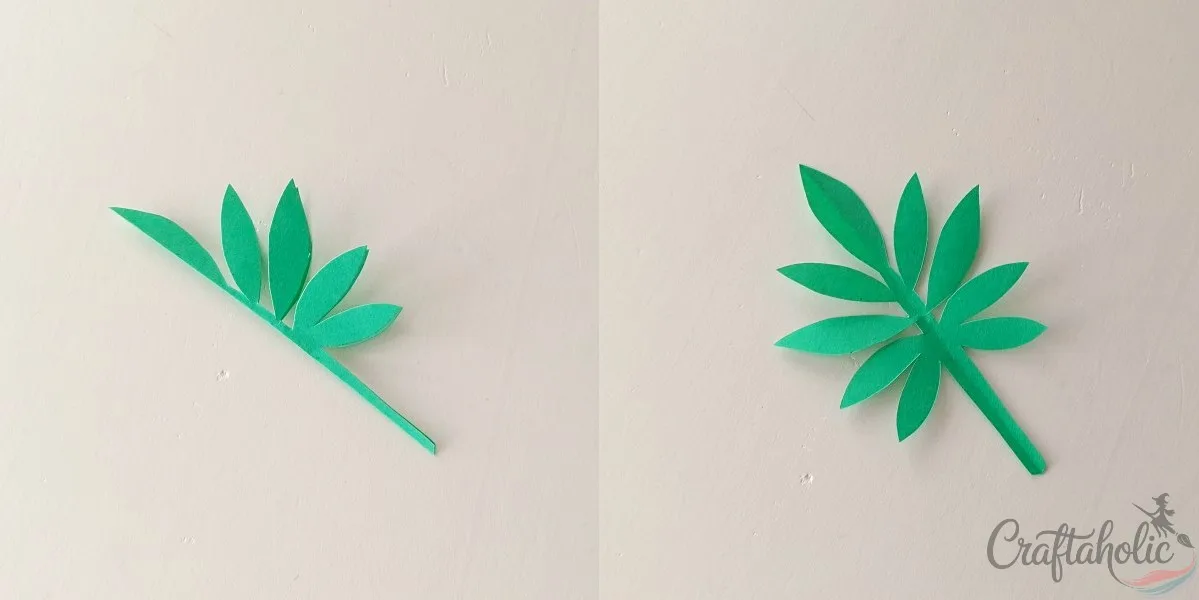
Cut along the traced line with a pair of sharp, narrow scissors, then carefully unfold the leaf. Separate the tips of its smaller points first so they don’t tear as you open it up.
Tip: A lighter-weight paper cuts more cleanly around the leaf’s narrow points than a heavier one.
Step 13: Trace the Sepal Pattern
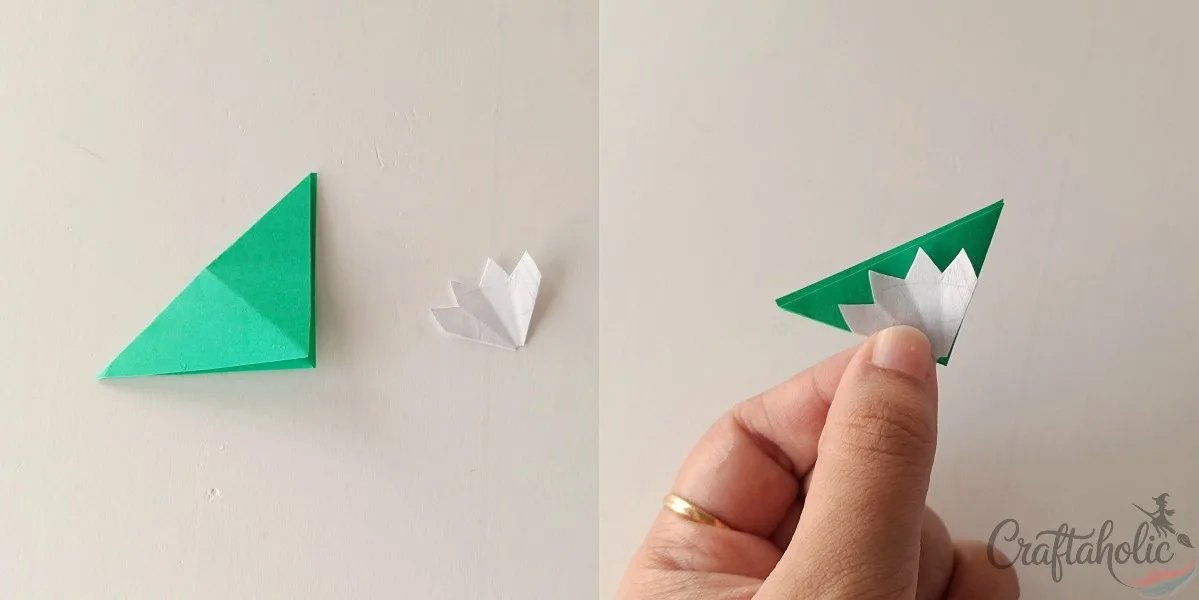
Fold the 6 cm green square in half diagonally twice. Line up the sepal pattern’s corner with the closed corner of the folded paper and trace the zigzag edge onto it.
Step 14: Cut Out and Unfold the Sepal
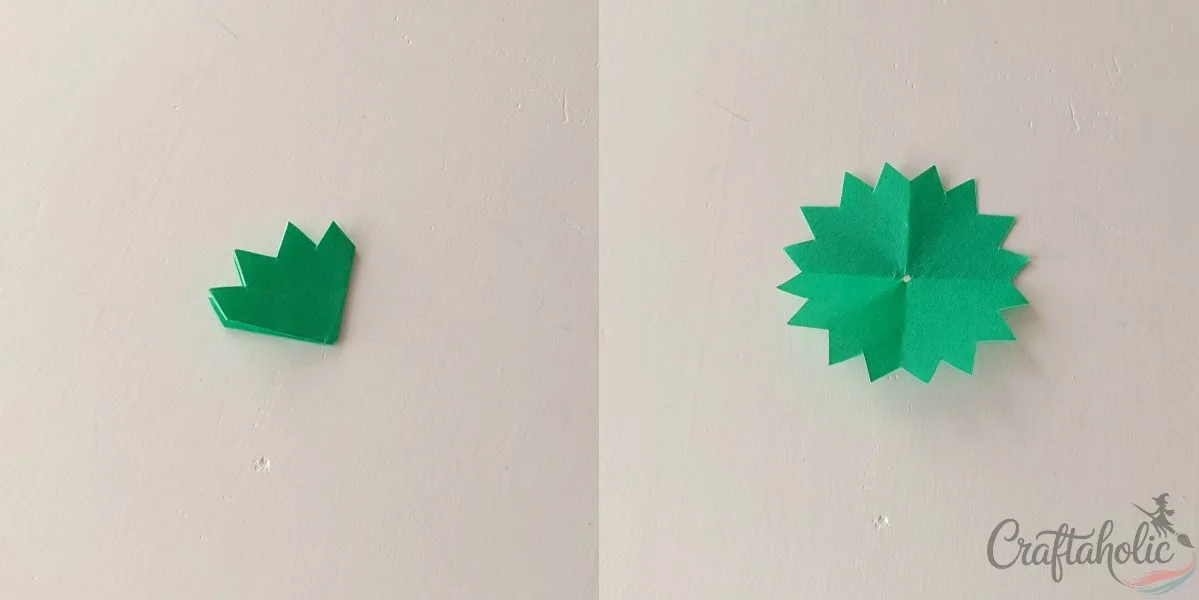
Cut along the traced zigzag line and carefully unfold the sepal.
Step 15: Shape the Sepal Into a 3D Cup
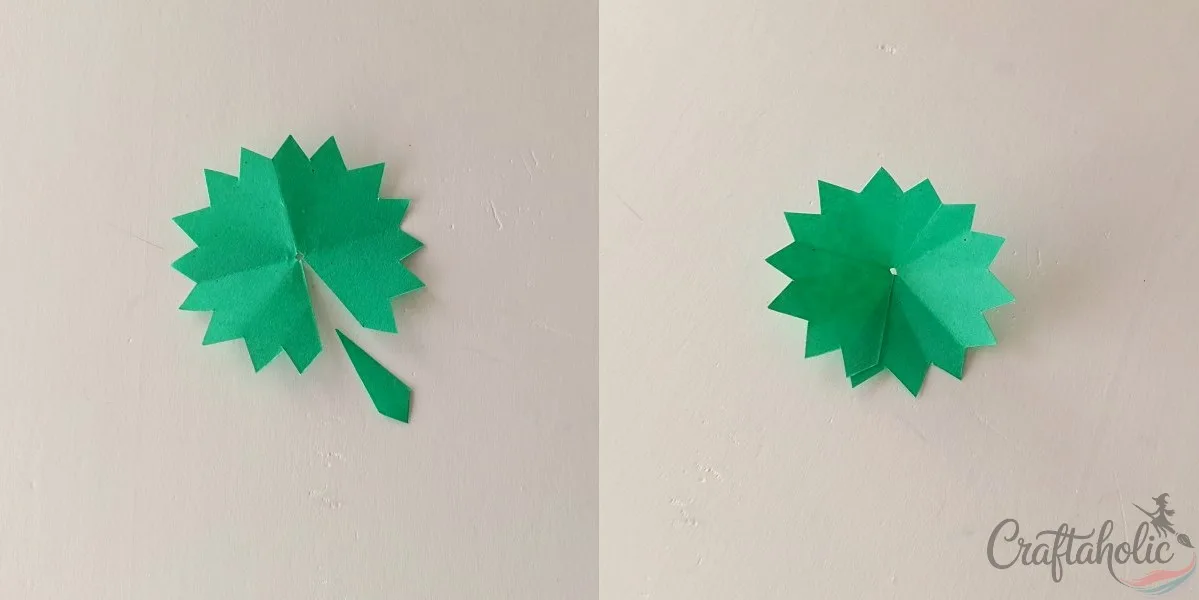
To give the flat sepal a real 3D shape, cut away just one of its zigzag points, then overlap the two freed edges and glue them together so the whole piece curves into a shallow cup.
Tip: Cut away exactly one zigzag point, not more. Removing more than one leaves the sepal too small to overlap and glue onto the back of the flower cleanly.
Step 16: Glue the Sepal and Leaf to Finish the Flower
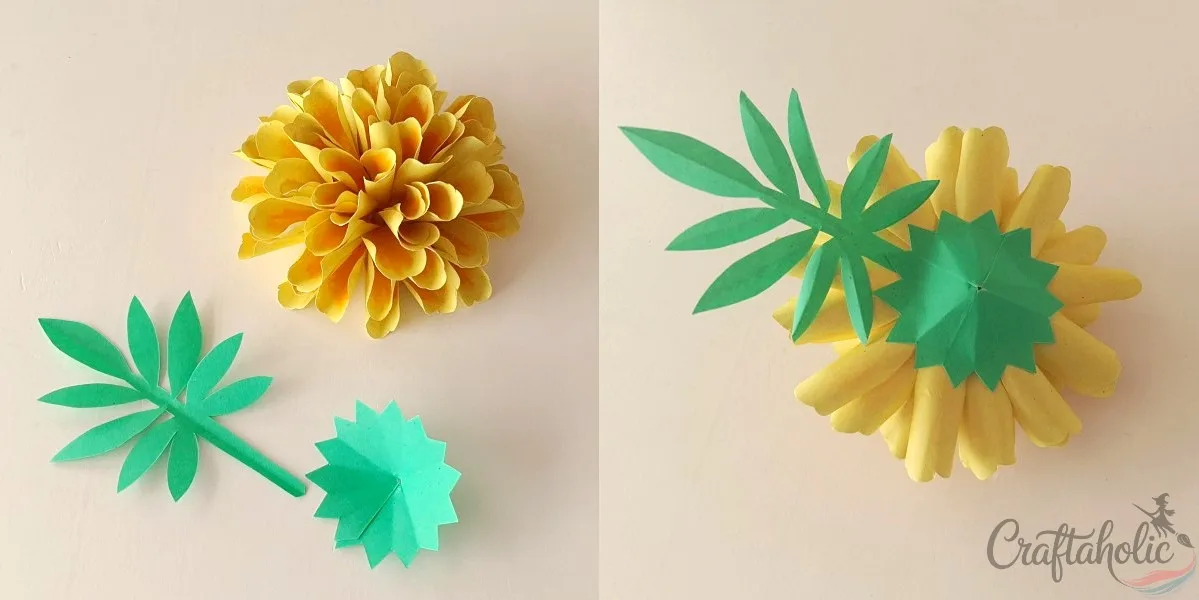
Turn your finished flower face down. Glue the stem end of the leaf to the bottom edge of the flower, then glue the sepal over the center back so it covers where the petal layers meet.
Tip: Cover the whole inner surface of the sepal with glue, not just the edges, before pressing it into place. That’s what keeps the petal layers locked in shape once it dries.
Share it in "I Made It" and let us cheer you on.
Post your finished make in "I Made It" so the community can celebrate it with you. Cheer on other makers too. Each month, the most loved craft wins 1 year of Craftaholic Premium ($59)
Tips for a More Realistic Paper Marigold
- If your petals look flat after curling, run the craft stick over them again with a light touch. Pressing hard creases the paper instead of curling it.
- Curl and shade every petal before you start gluing the layers together. It’s much harder to shape a petal once it’s already fixed in place.
- Scale the template up or down before tracing if you want a bigger or smaller marigold, keeping all four pattern pieces proportional to each other.
- Make a few marigolds in different shades, yellow, orange, or a deeper red-orange, for a fuller, more realistic bouquet.
Frequently Asked Questions
What can I use instead of oil pastel crayons for shading the petals?
Soft chalk pastels or colored pencils both work as a substitute. Whichever you use, blend it with a cotton swab or scrap fabric right after applying it so the color fades into a gradient instead of sitting as a hard line.
How long does it take to make one paper marigold flower?
Plan on about 45 to 60 minutes for one flower once you’re familiar with the steps, most of it spent curling and shading the ten individual petals. Cutting all your paper squares and template pieces ahead of time speeds up the rest.
Can I make this marigold without the printable template?
Yes, you can free-hand the four shapes using the sizes given in the supply list: 10 cm squares for the big petals, 9 cm for the small petals, 8 cm for the leaf, and 6 cm for the sepal. The printable template just gives you cleaner, more consistent edges.
Can I make the marigold bigger or smaller?
Yes. Scale all four pattern pieces up or down by the same percentage so the big petal, small petal, leaf, and sepal stay proportional to each other. A smaller marigold curls a little faster since there’s less paper to shape.
Why do my petals look flat instead of curled?
Flat petals almost always mean the curling step got rushed. Go back over both sides of the petal with the round craft stick, holding the curl a second before you pull the stick free, since letting go too fast lets the paper spring back flat.
How is this different from your paper gardenia flower tutorial?
The paper gardenia uses fifteen small petals stitched into a spiral center, while this marigold uses ten larger, bolder petals glued flat onto a base with a separate sepal and leaf. The marigold is the simpler build of the two, with no stitching involved.
Keep building your paper flower bouquet with:
More Paper Flower Tutorials
Share your realistic paper marigold flower in the I Made It space inside Craftaholic Community. The most-loved post each month wins a one year free Premium membership.
0 Comments
Join the conversation
Log in to your Craftaholic Community account to comment, ask questions, and cheer on fellow makers.
Log in to comment