

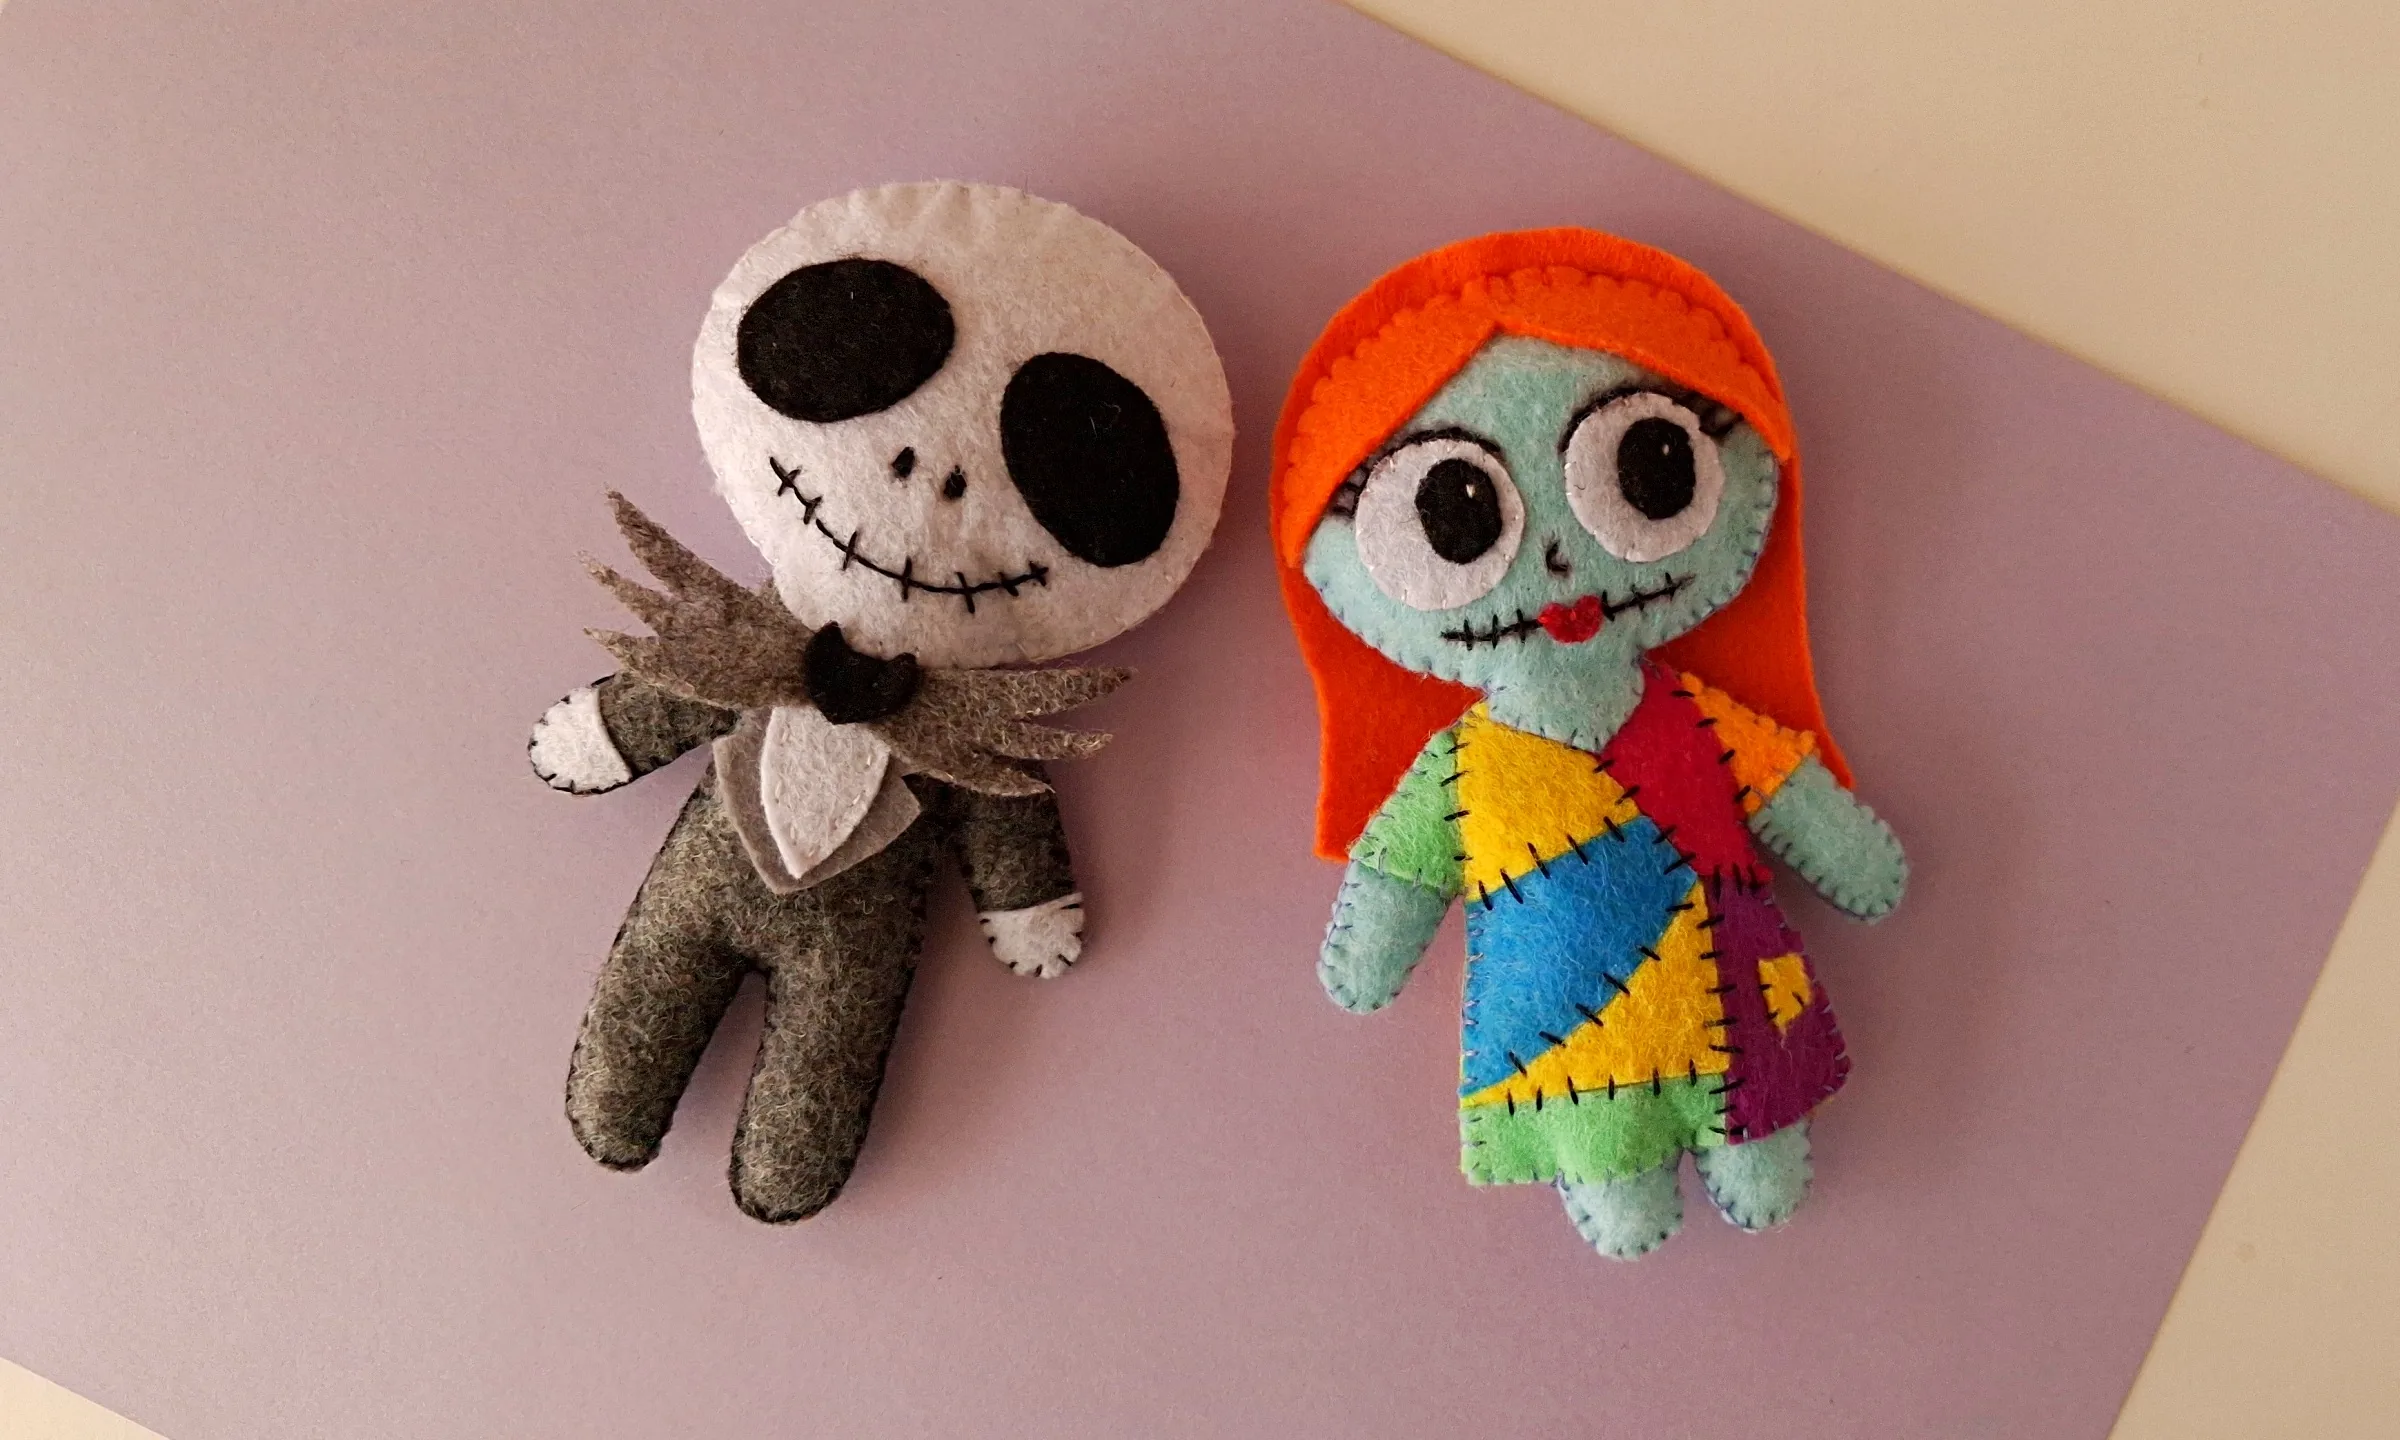
Some days you’re Jack, restless in a life you’re great at, wondering what else is out there. Other days you’re Sally, patched together from everything that’s happened to you, quietly holding it together while everyone else gets loud. Most of us are a little of both, which is probably why these two have stuck around for more than 30 years. This tutorial shows you how to make Jack and Sally felt dolls, so you can keep the pair on your shelf.
I love that these two don’t belong to a single season. Jack runs Halloween Town and then tries to take over Christmas, so the pair looks right on a shelf in October and just as right on a mantel in December. If you’re setting up for either one, our Halloween crafts and Christmas crafts pages have plenty more to put beside them.
Jack and Sally Felt Dolls at a Glance
- Difficulty: Intermediate
- Time: 2 to 3 hours for both dolls
- Cost: Under $10
- Ages: 10+ years
- Best for: Nightmare Before Christmas fans, Halloween and Christmas shelf decor, handmade gifts
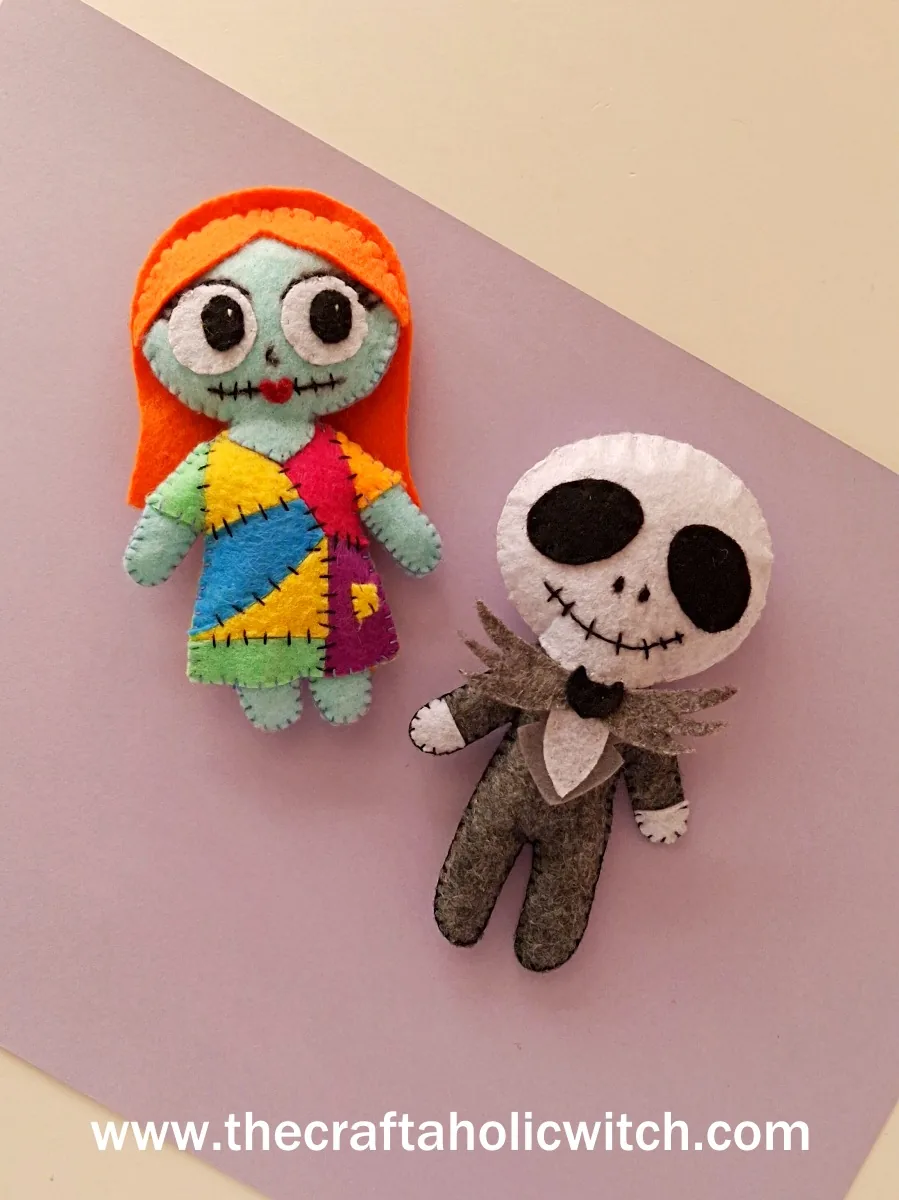
What You Need to Make Jack and Sally Felt Dolls
Materials
- Colored felt: White, black and gray for Jack; pale aqua, orange and a handful of bright scraps for Sally’s patchwork dress. Close shades are fine, since the shapes carry the characters.
- Paper template cutouts: Print the pattern pieces and cut them out so you can trace each shape onto the right felt color.
- Matching threads: Black for the patches and faces, white for Jack’s head, and a skin-tone thread for Sally’s arms, legs and head. Thread that blends in keeps the stitching tidy.
- Cotton stuffing: It fills out the head, arms, body and legs. Polyester fiberfill is an easy swap if that’s what you have.
- Fabric glue (optional): A small dab holds Sally’s hair in place if you want it extra secure.
Tools
- Fabric marker or chalk: For tracing the template onto the felt. Chalk brushes off, so it won’t show on the finished doll.
- Sharp scissors: Felt edges stay visible, so clean cuts matter, especially on the small pieces.
- Embroidery needle: The larger eye is easier to thread and pulls through layered felt without a fight.
- Black marker or gel pen: For drawing Sally’s eyelashes, nose and lips and Jack’s nose and mouth, so you have lines to stitch over.
Ask inside "Crafty Q&A" while you are making.
"Crafty Q&A" is free to join. Share your question, photo, or the exact step where you got stuck, and chat with other makers plus the Craftaholic Witch team. You can also join any discussion thread already happening inside the space.
How to Make the Felt Sally Doll
Step 1: Cut Sally’s Pieces from the Template
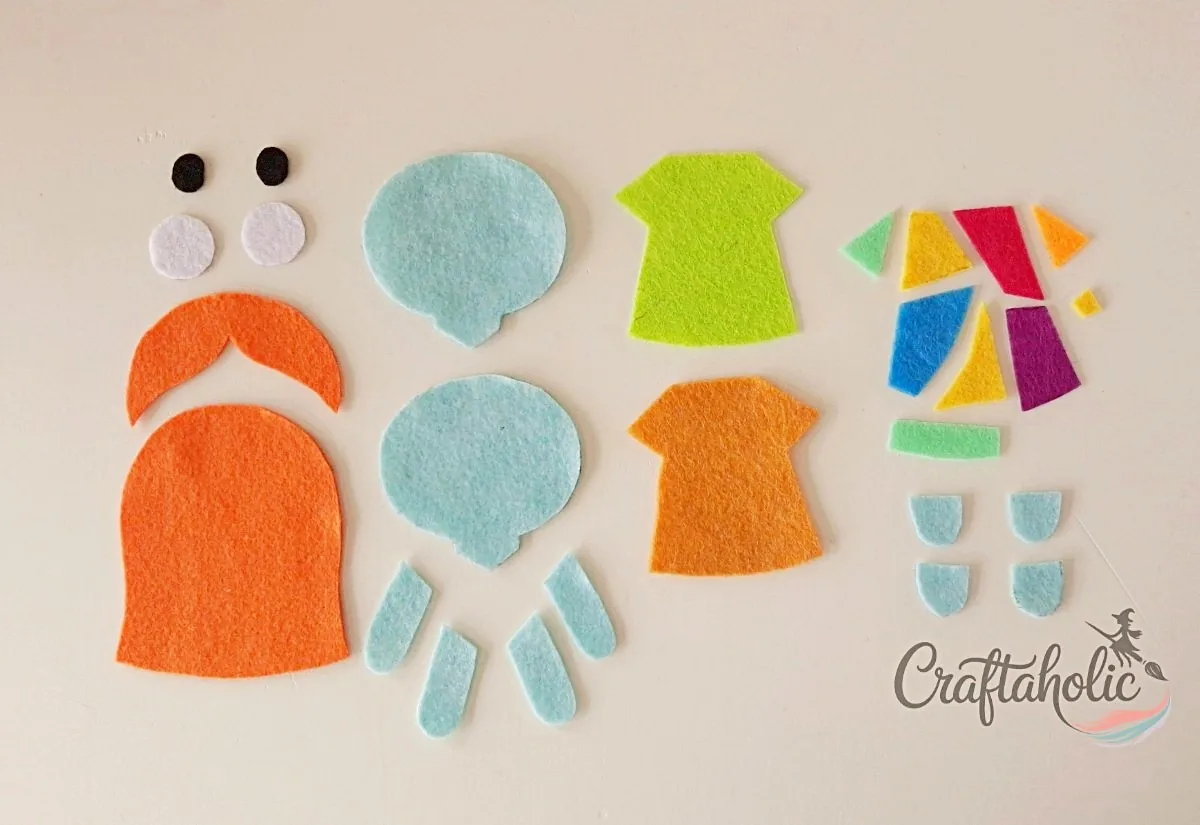
Print the paper template and choose your felt to match Sally from the movie: pale aqua for her skin, orange for her hair, and a mix of bright scraps for the patchwork dress. Trace each pattern piece onto the matching felt and cut them all out.
Tip: You don’t need to match the felt colors exactly. Shades that are close enough still read as Sally.
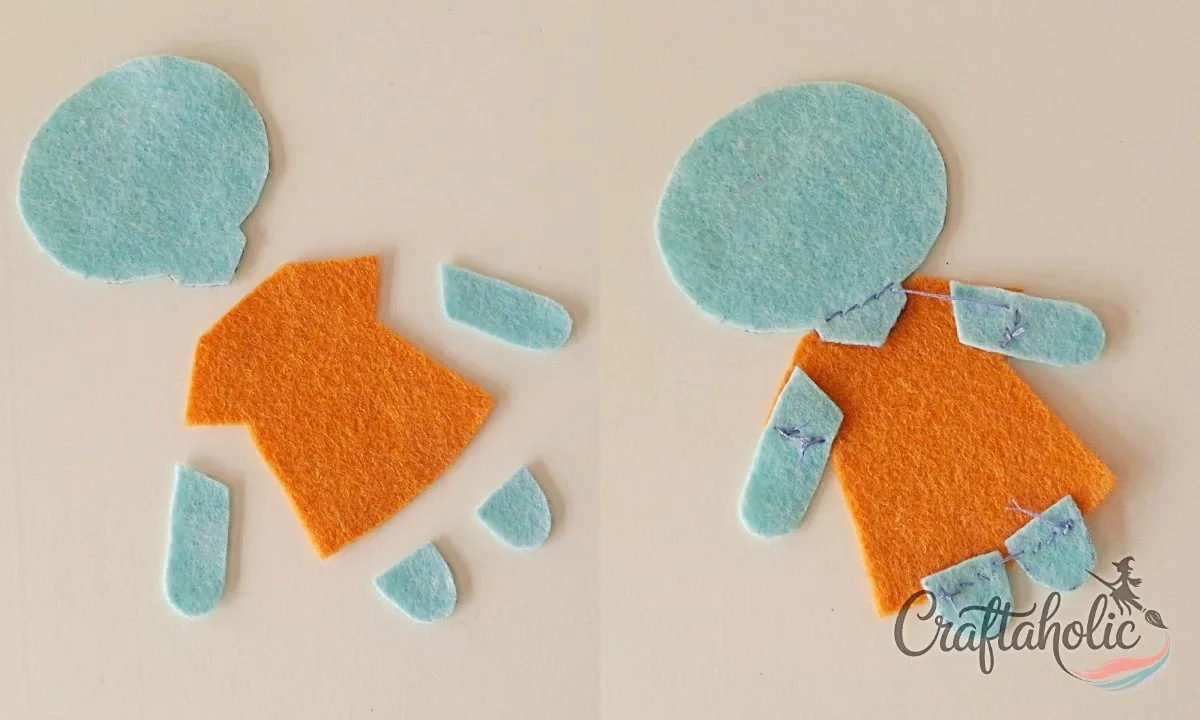
Step 2: Stitch the Patch Cutouts onto the Dress Base
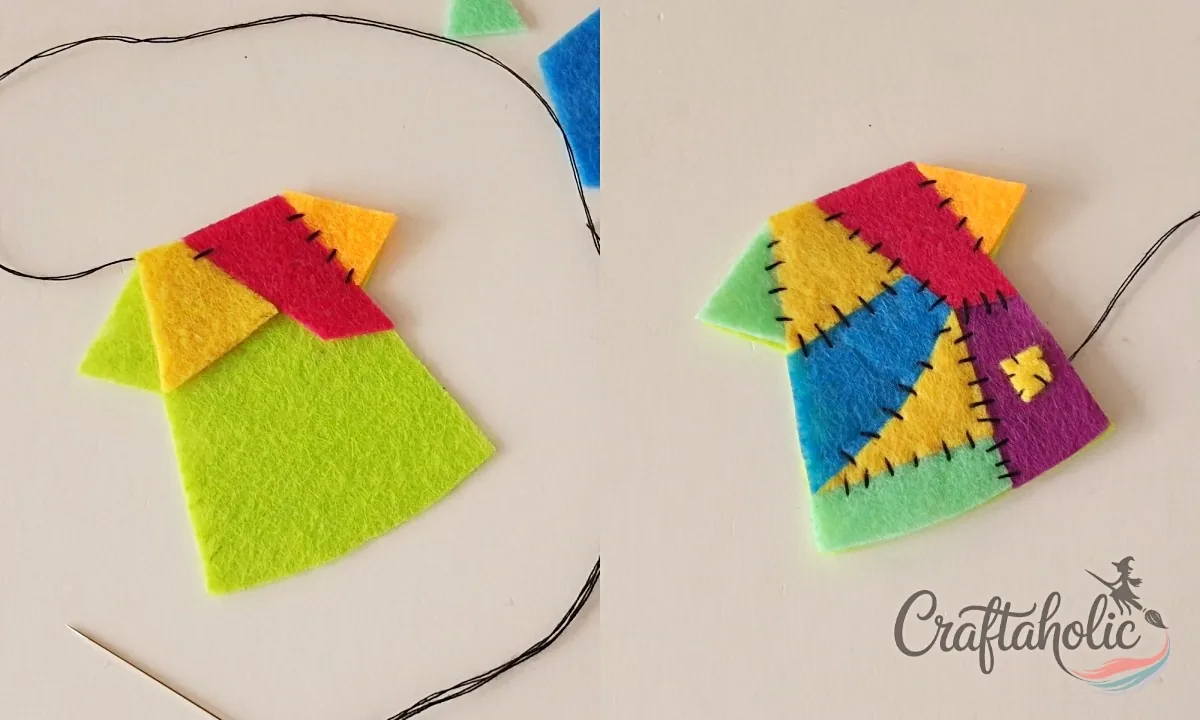
Lay the patch cutouts on the dress base like a puzzle. It’s the fun part, so move the pieces around until you like how the colors sit. Then stitch each patch down to the dress base with black thread.
Step 3: Layer the Eyes and Lips onto the Head Base
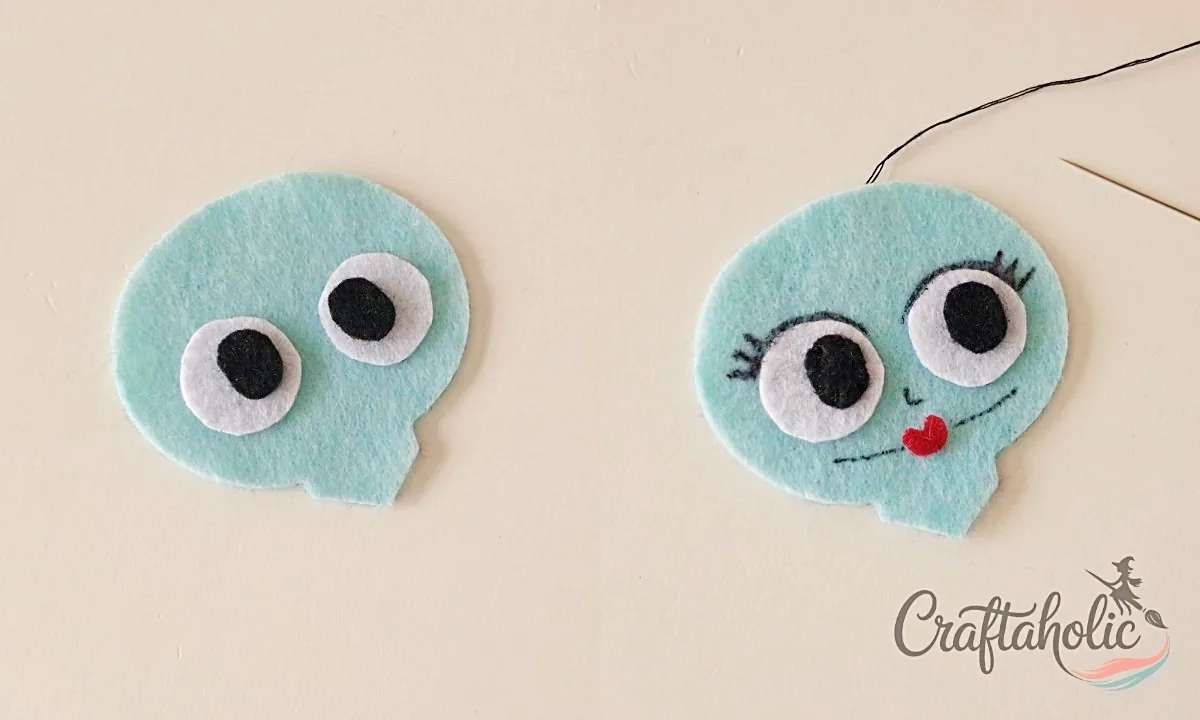
Set each eyeball cutout on its eye base, then place the finished eyes on the head base. Trace Sally’s eyelashes, nose and lips onto the head with a black gel pen, and place the lip cutout on the head as well.
Step 4: Stitch Sally’s Eyes, Lips and Mouth
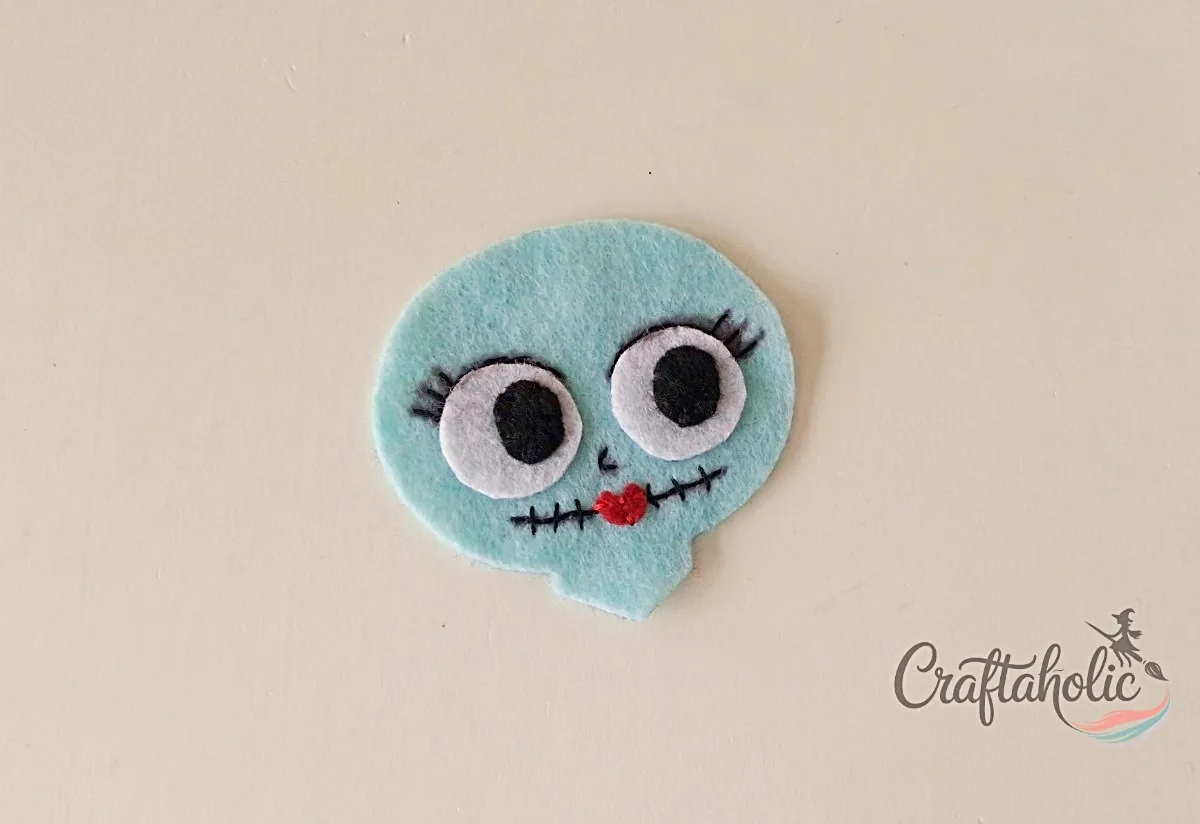
Stitch the eyes and the lip cutout to the head with matching thread. Then switch to black thread and stitch over your traced eyelashes, nose and mouth lines. Keep the stitches small; the face is the first thing anyone looks at, so it’s worth slowing down here.
Step 5: Stitch the Head, Arms and Legs to the Plain Dress Base
Start the back piece with the plain dress base, the head base, and one side of each arm and leg. Place the head at the top of the dress, the arms on the sleeves, and the legs along the bottom edge. Stitch them all to the dress base using thread that matches Sally’s skin tone.
Step 6: Knot Off and Turn the Back Piece Over
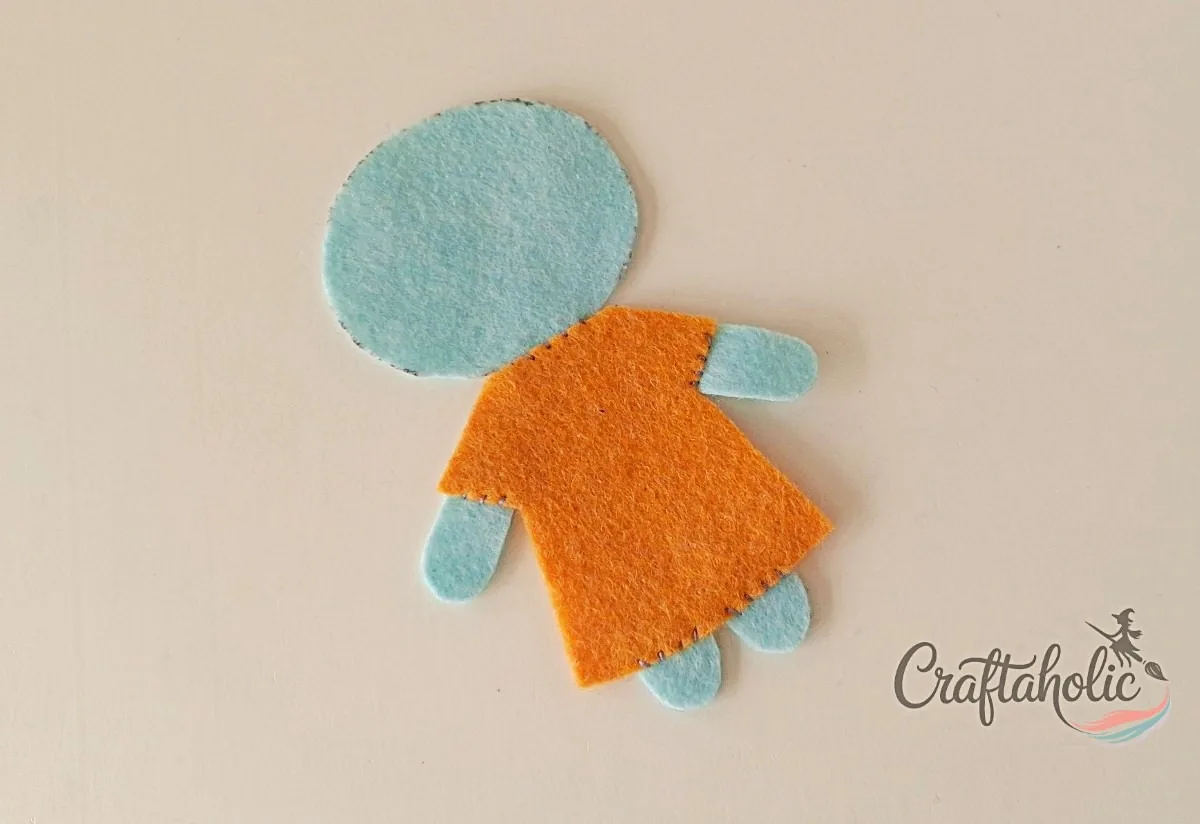
Secure your stitches with knots and trim the extra thread. Flip the piece to the other side. This is the back of your Sally doll.
Step 7: Attach the Arms and Legs to the Patchwork Dress
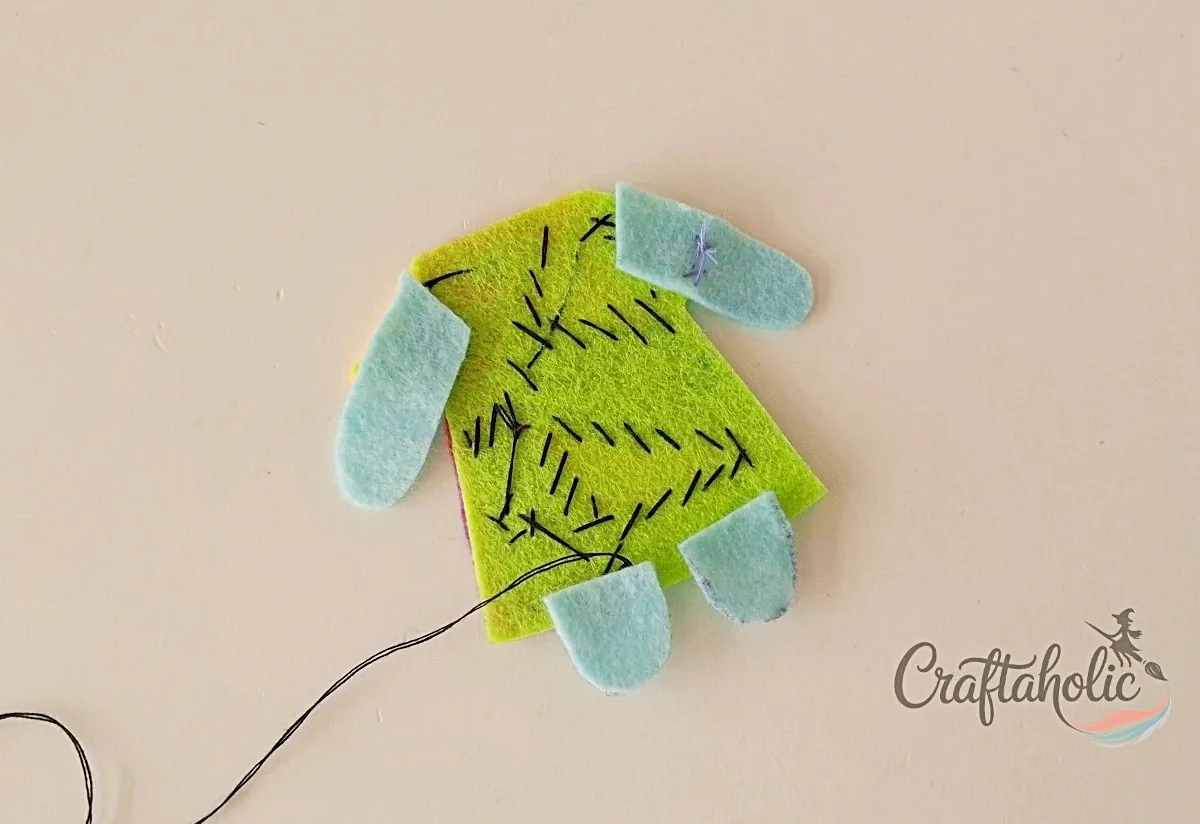
Lay the patchwork dress from step 2 on a flat surface with its wrong side facing up. Place the other side of each arm and leg on the sleeves and along the bottom, the same way you did for the back, and stitch them down.
Tip: Keep the overlapped parts the same as on the back piece so the two sides line up when you join them.
Step 8: Stitch the Face onto the Front Dress
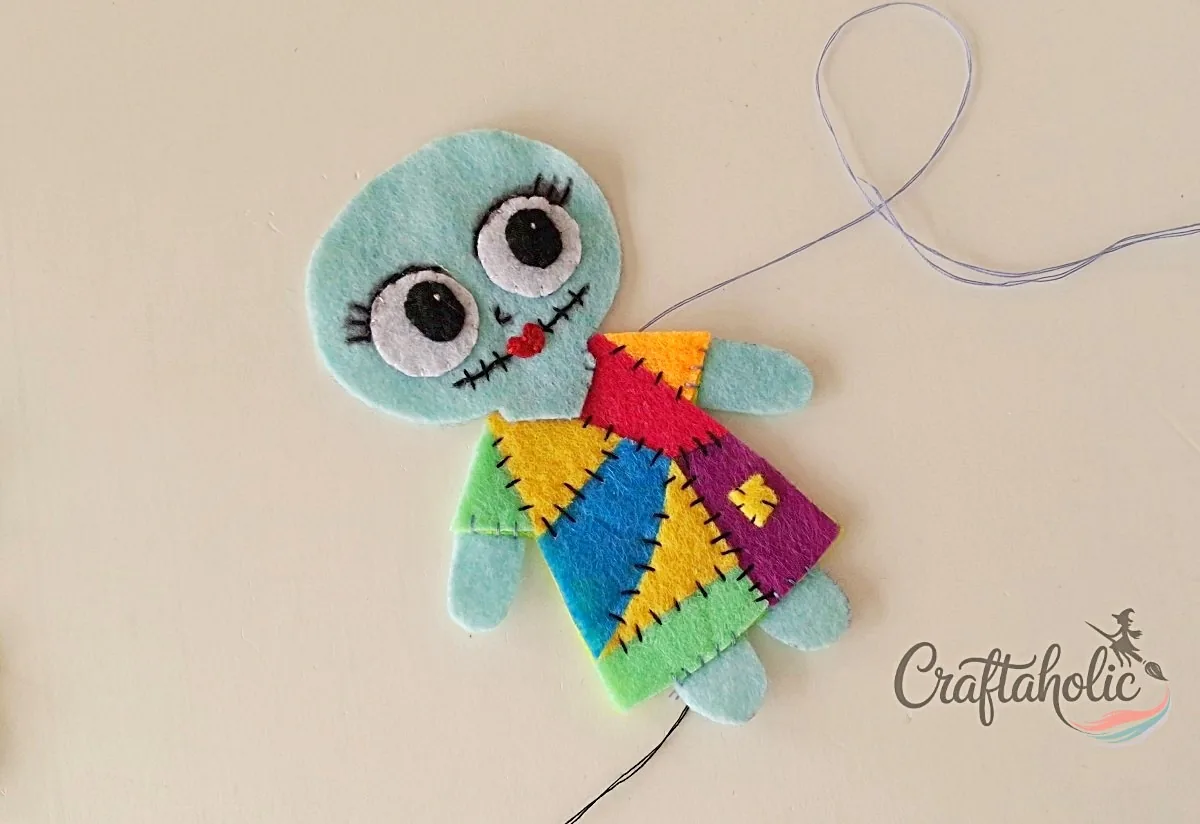
Turn the front piece to its right side. Set the face piece from step 4 on top of the dress, with the neck overlapping the top of the dress, and stitch along that overlap neatly.
Step 9: Check the Front and Back Pieces
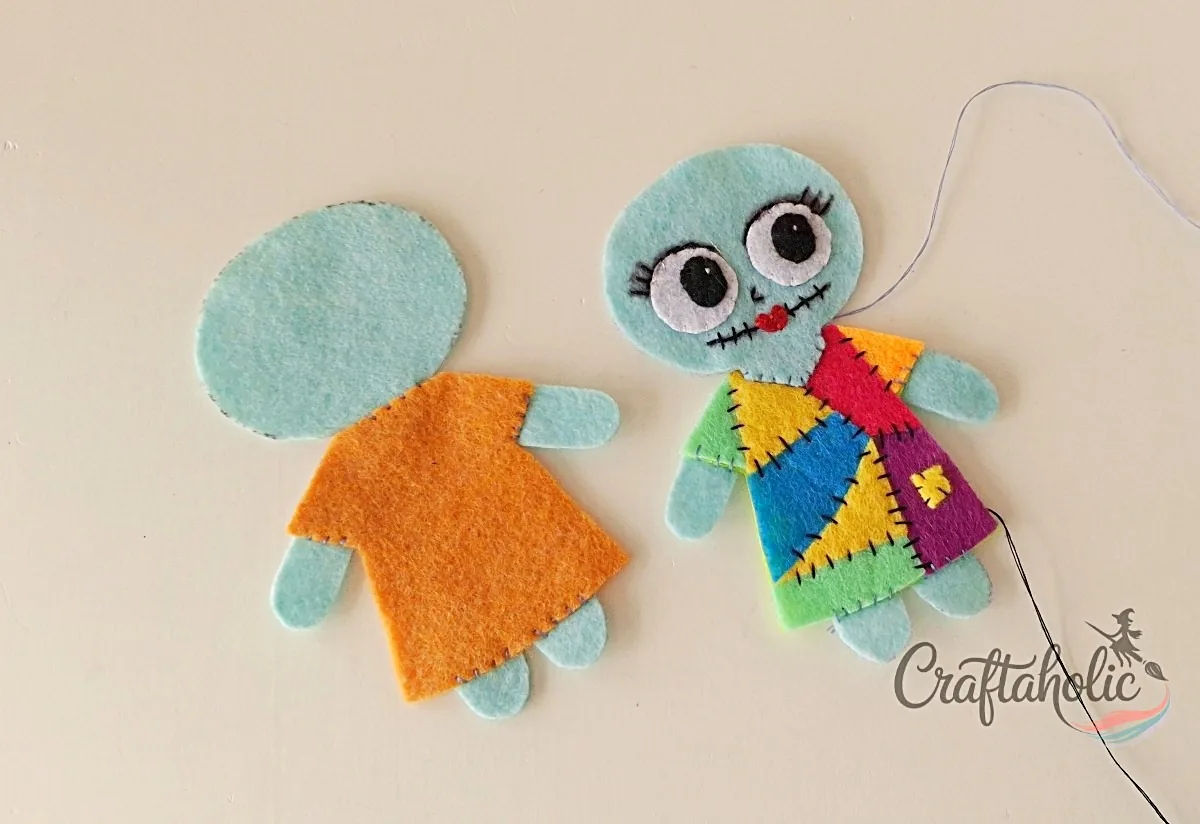
Put the front and back pieces side by side and check that every part is stitched on correctly. Fix any loose spots now, because once the layers are joined these seams are hard to reach.
Step 10: Stack the Front Piece on the Back Piece
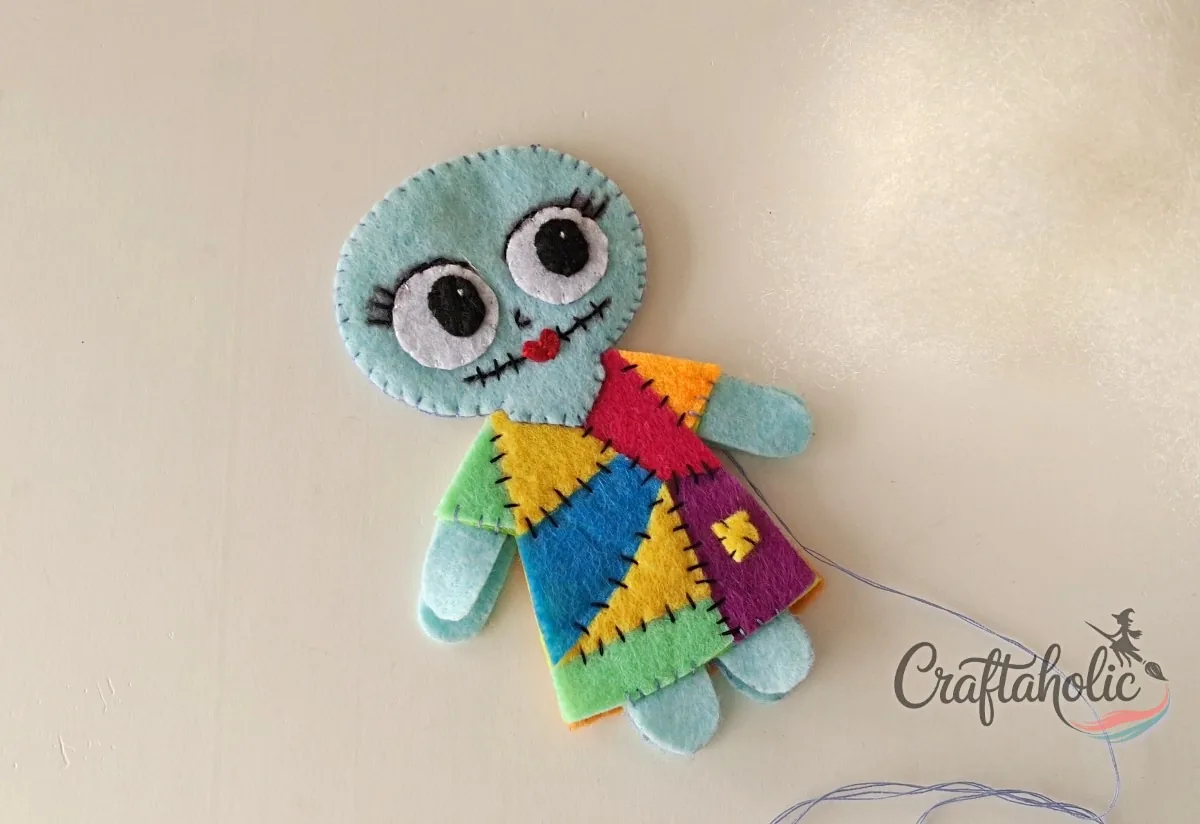
Place the back piece on a flat surface with its wrong side facing up, then lay the front piece on top of it with its right side facing up.
Step 11: Blanket Stitch Around the Sides and Stuff as You Go
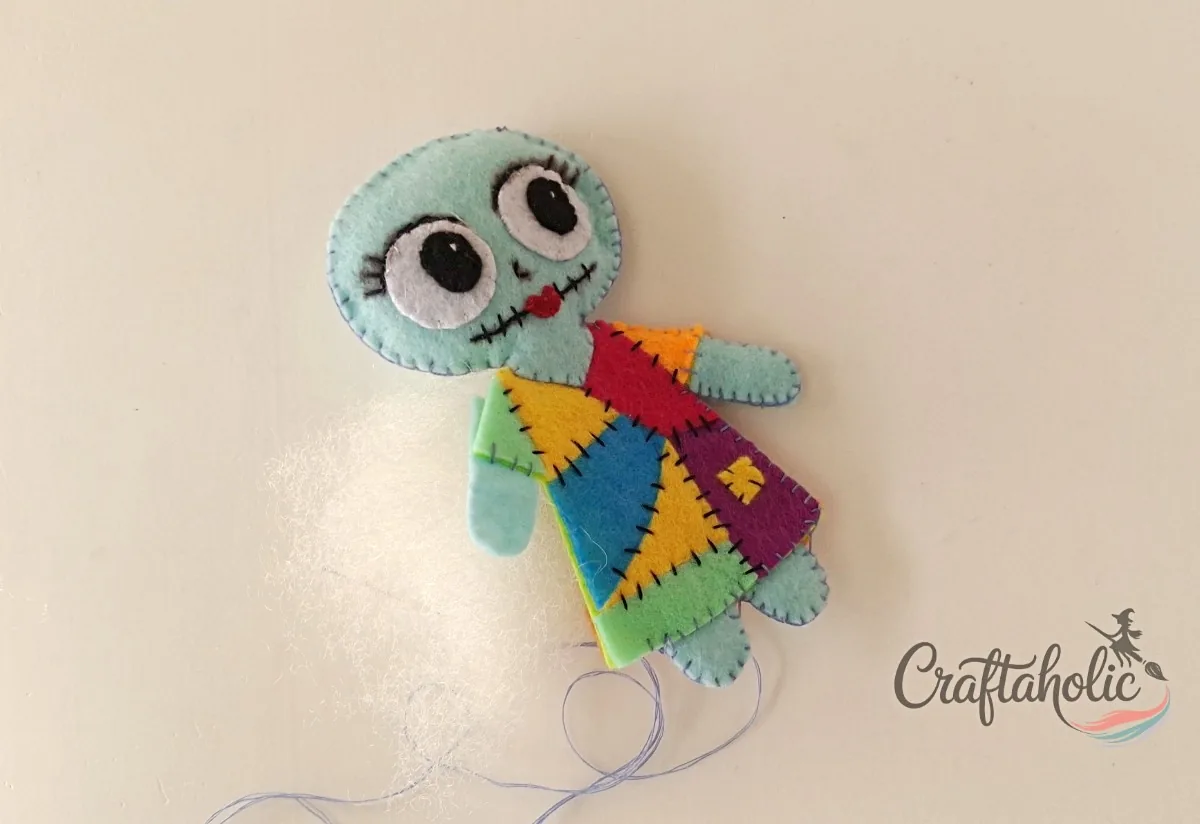
Begin at the head and work a flat blanket stitch to join the front and back pieces. Stuff each part (head, arms, body and legs) as you reach it, securing the stitches around that part before moving on.
When the doll is fully stuffed, close the sides and tie two tight knots. Push the needle all the way through the doll, bring it out anywhere, and cut the thread close to the felt so the end disappears into the stuffing.
Step 12: Place the Hair Base Behind the Head
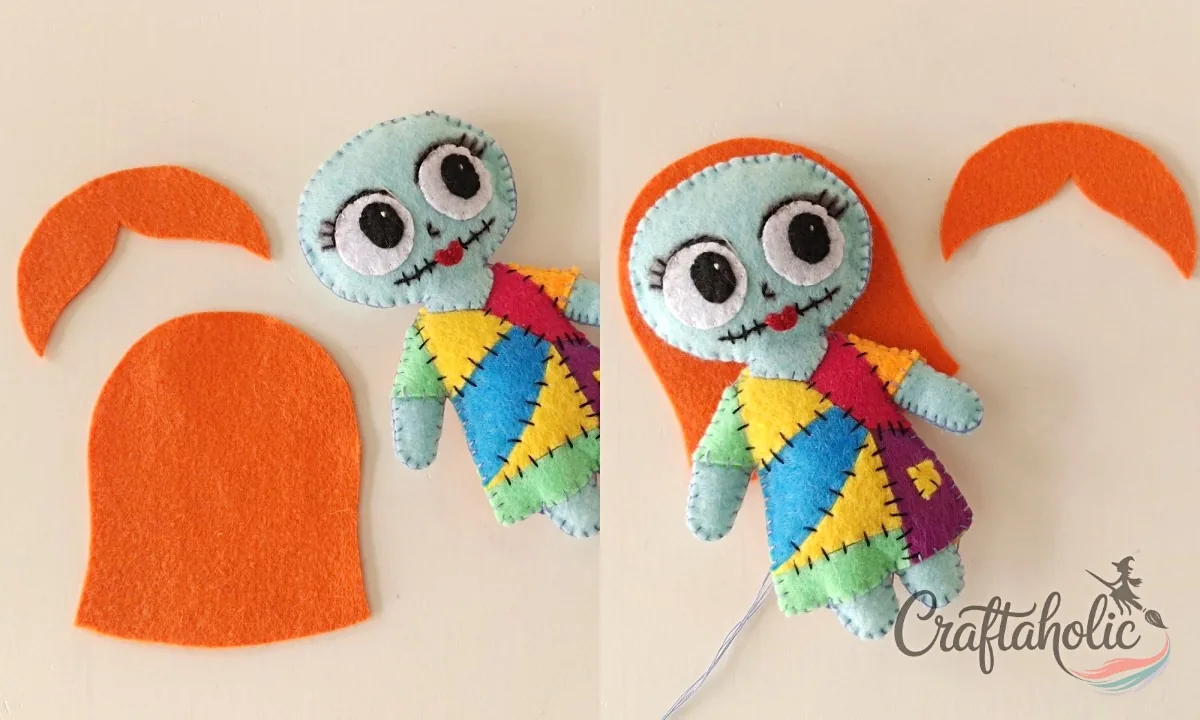
Set the hair base on the back of the head so the orange sits behind her face.
Step 13: Stitch the Fringe onto the Face
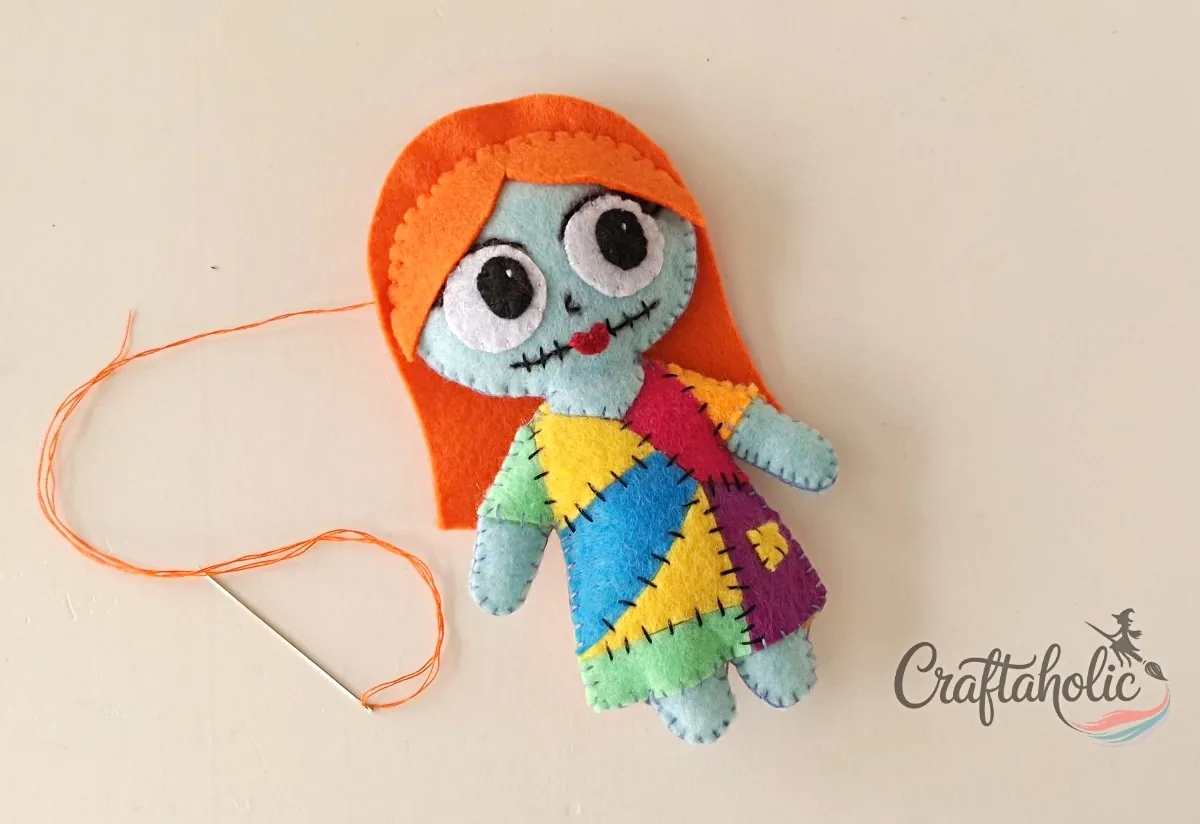
Place the fringe (bangs) cutout across the top of her face. Stitch along the top edge of the fringe to join the top of the head and the hair base together.
Tip: If you want the hair extra secure, add a little fabric glue between the back of the head and the hair base.
How to Make the Felt Jack Doll
Step 1: Cut Jack’s Pieces from the Template
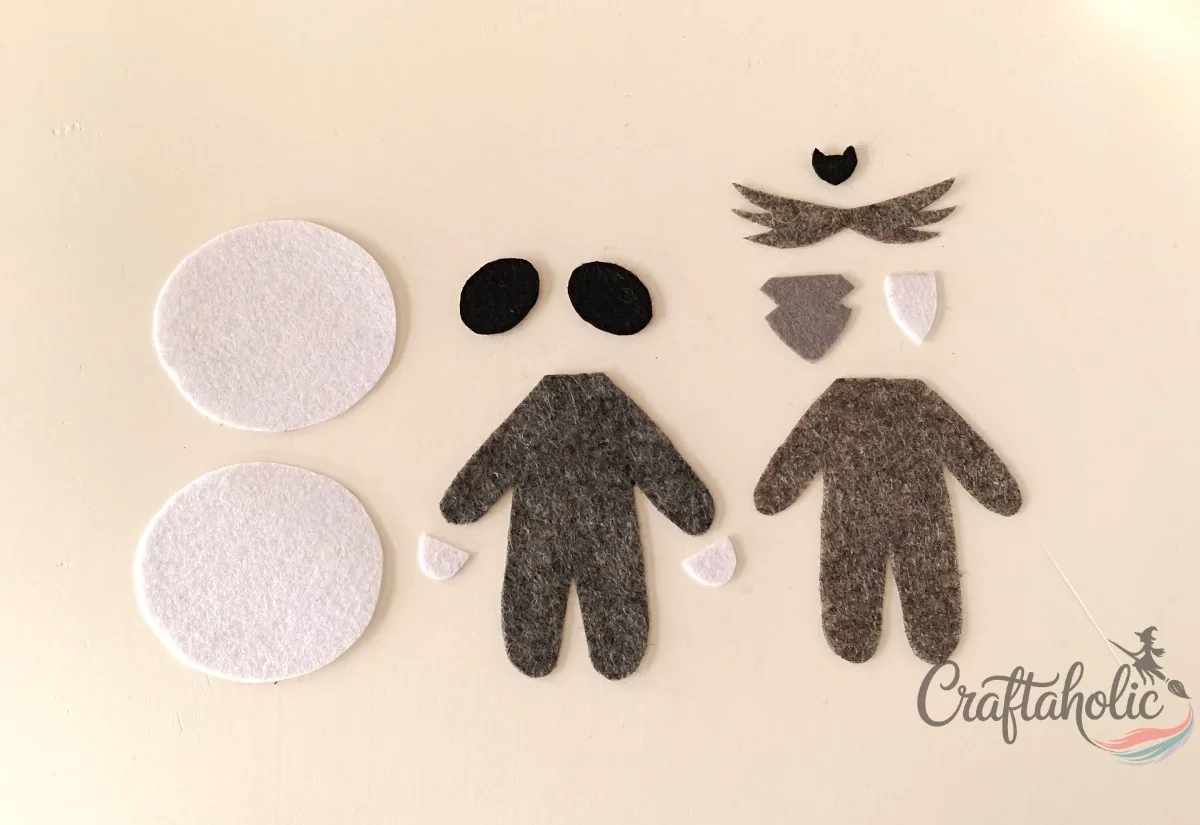
Print the Jack paper template and choose felt in the colors of Jack Skellington from the movie: white for the head, black for the eyes and bat tie, and gray for the suit. Trace each pattern piece onto the matching felt and cut them out.
Step 2: Stitch Jack’s Eyes and Mouth to the Head
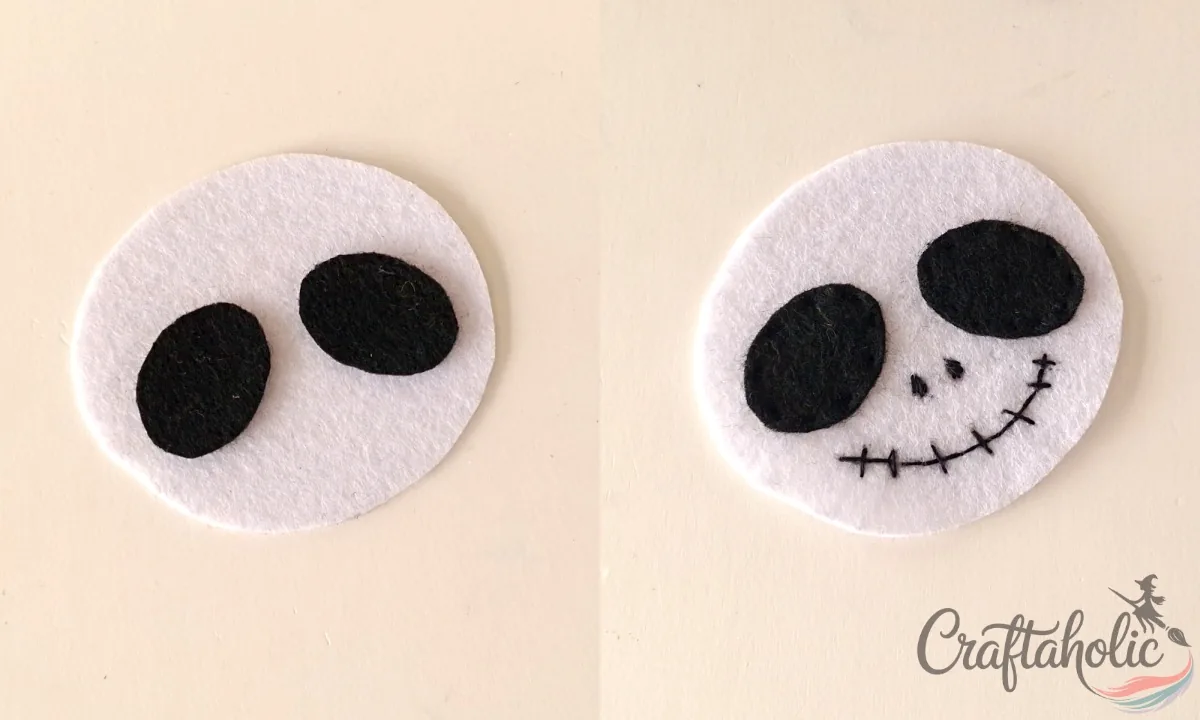
Place the eye cutouts on the head and stitch them down with matching thread. Draw the nose hole and the mouth with a black marker, then stitch along the lines with black thread. Drawing first gives you a path to follow, so the mouth stays even.
Step 3: Set Jack’s Hands, Bat Tie and Lapel on the Body Base
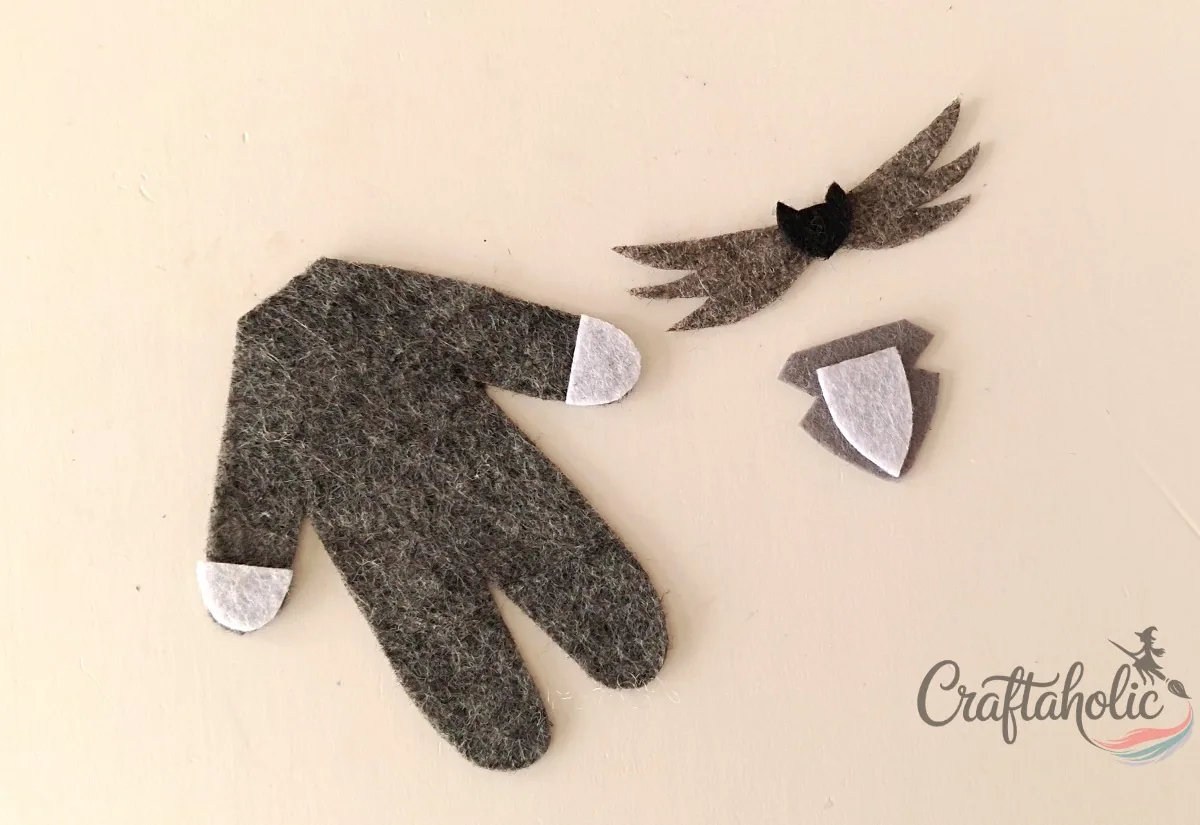
Take one of the body base cutouts and place the hand cutouts on the hand parts of the base. Put the bat tie in the middle of the collar cutout, and set the shirt piece on the lapel base.
Step 4: Stitch the Front Pieces and Head onto the Front Body Base
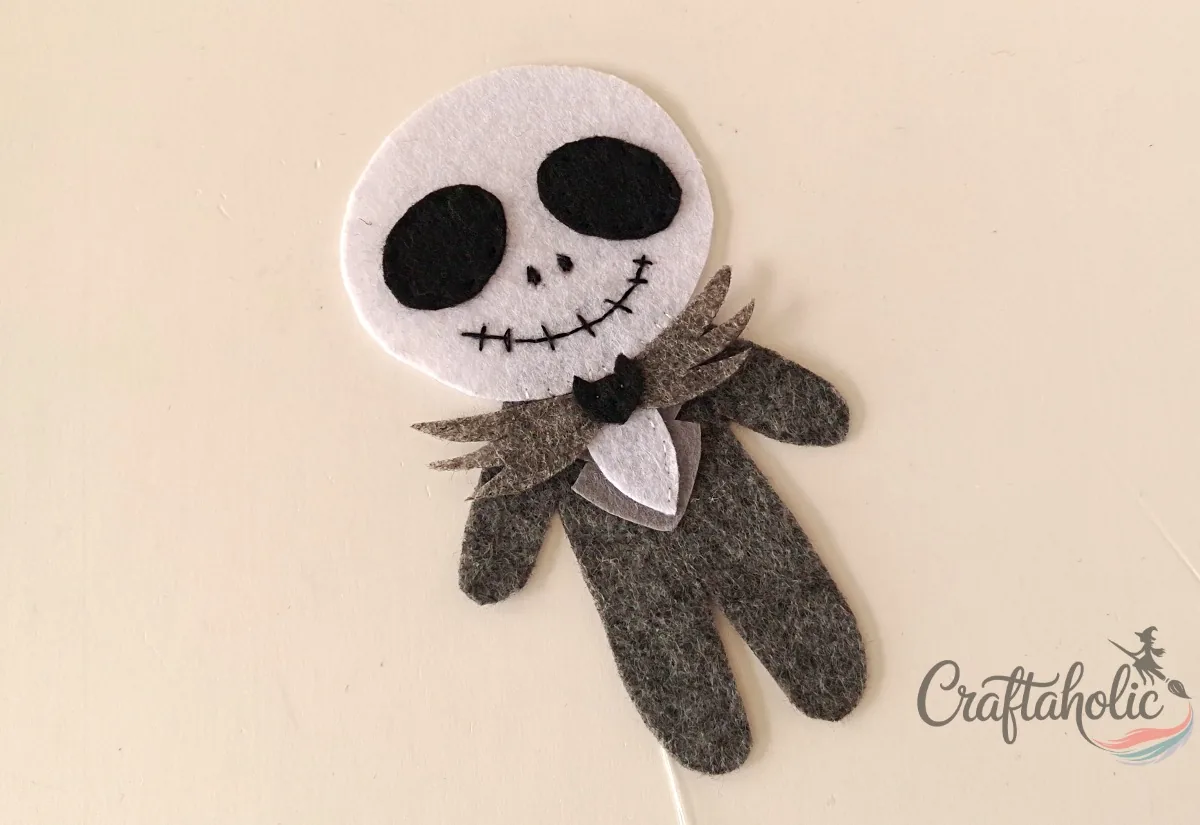
Lay the lapel with its shirt piece and the collar with its bat tie on the front body base. Place the stitched head at the top of the body base, then stitch all of the placed felt pieces down neatly.
Step 5: Stitch the Plain Head to the Back Body Base
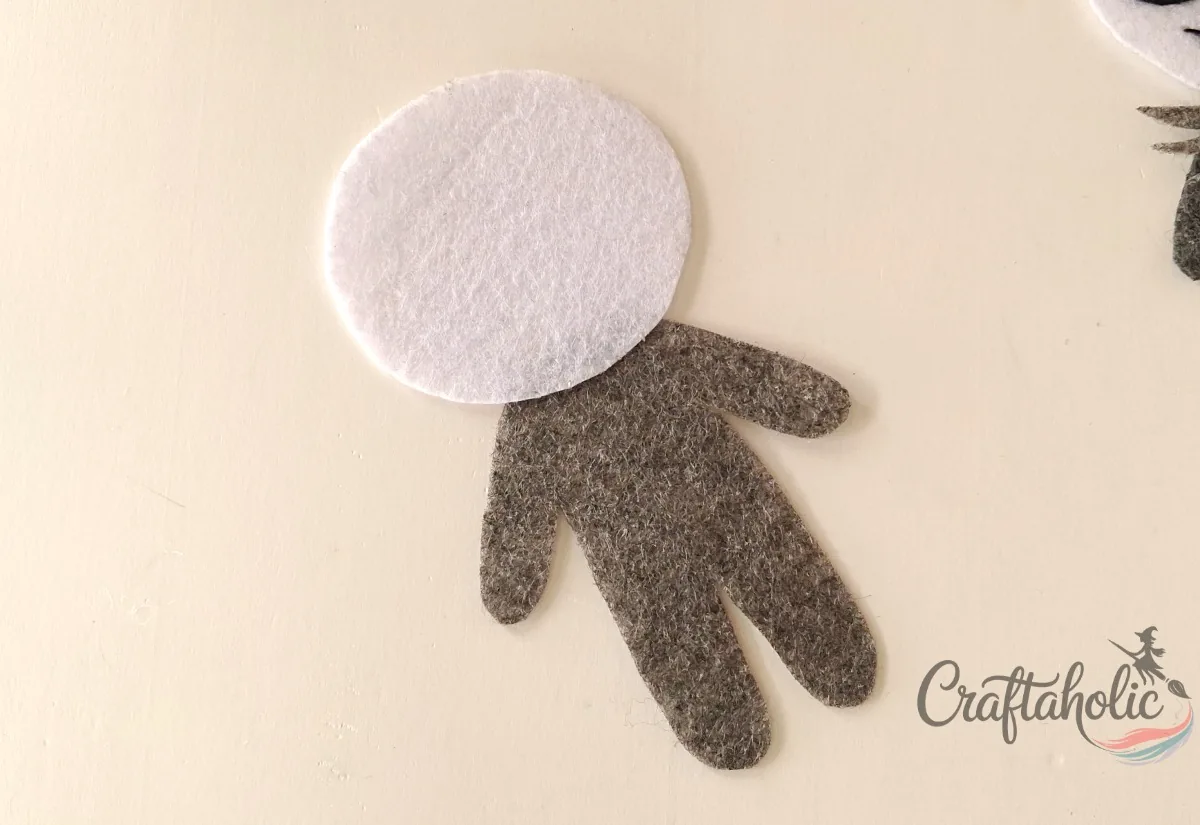
Place the plain body base on a flat surface, then set the plain head cutout so it overlaps the top of the body base. Stitch the overlapped parts together neatly.
Step 6: Join the Front and Back Body Bases
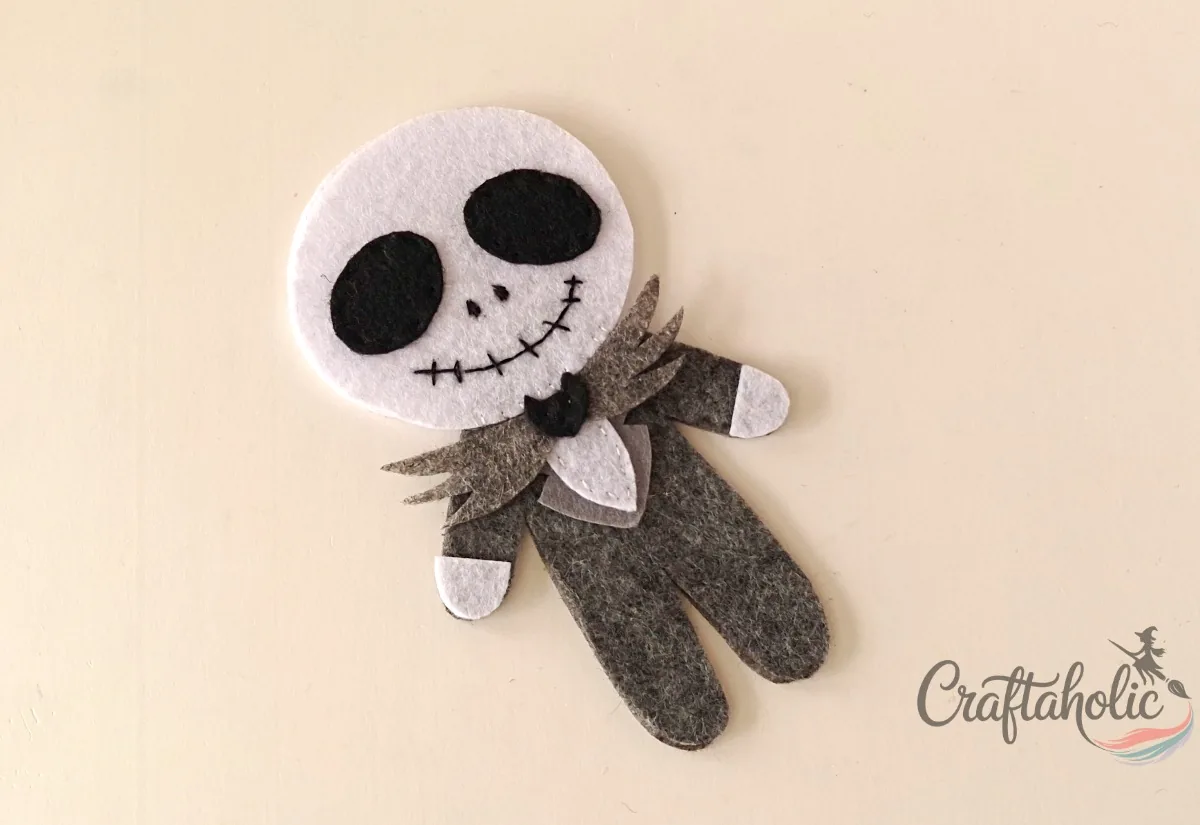
Place the front piece on top of the back piece. Thread a needle with black thread, which matches the body bases, and start stitching around the sides.
Step 7: Stitch the Head Layers with White Thread
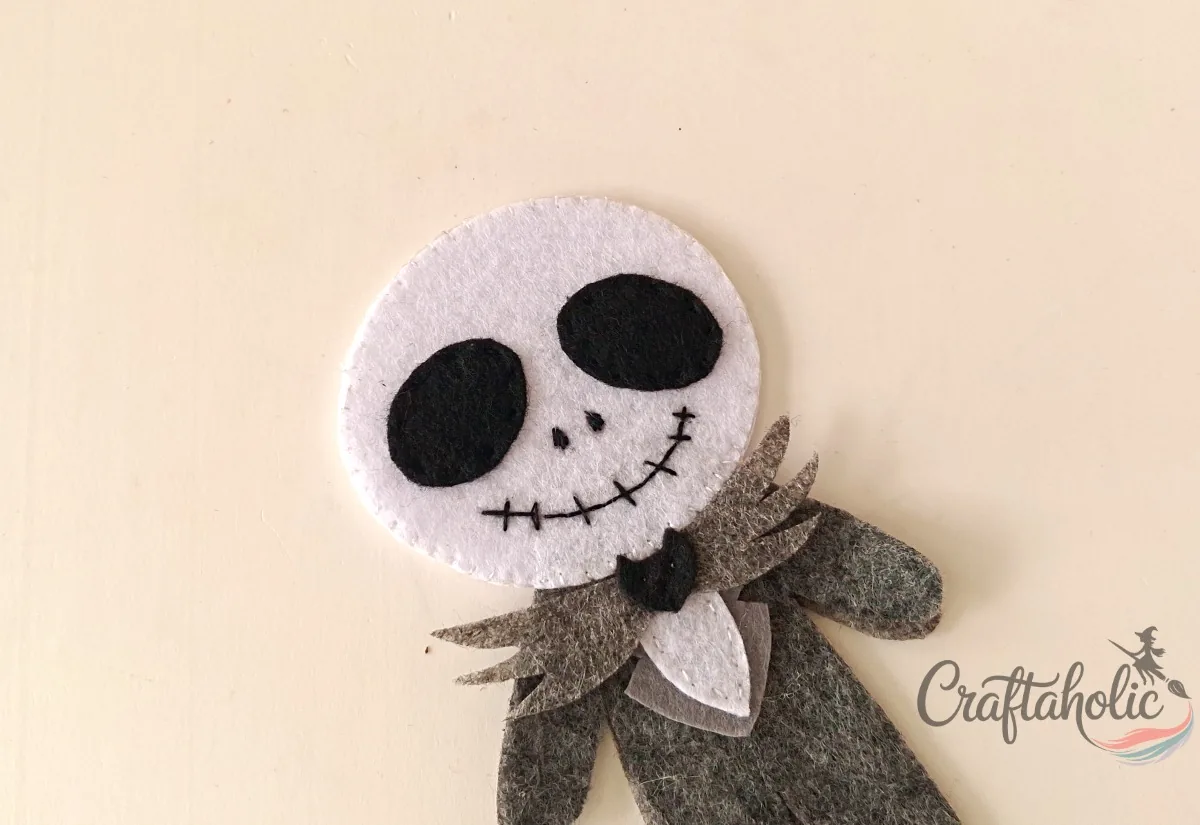
Switch to white thread and stitch the head layers together, working flat blanket stitches along the sides.
Step 8: Stuff the Head and Secure the White Thread
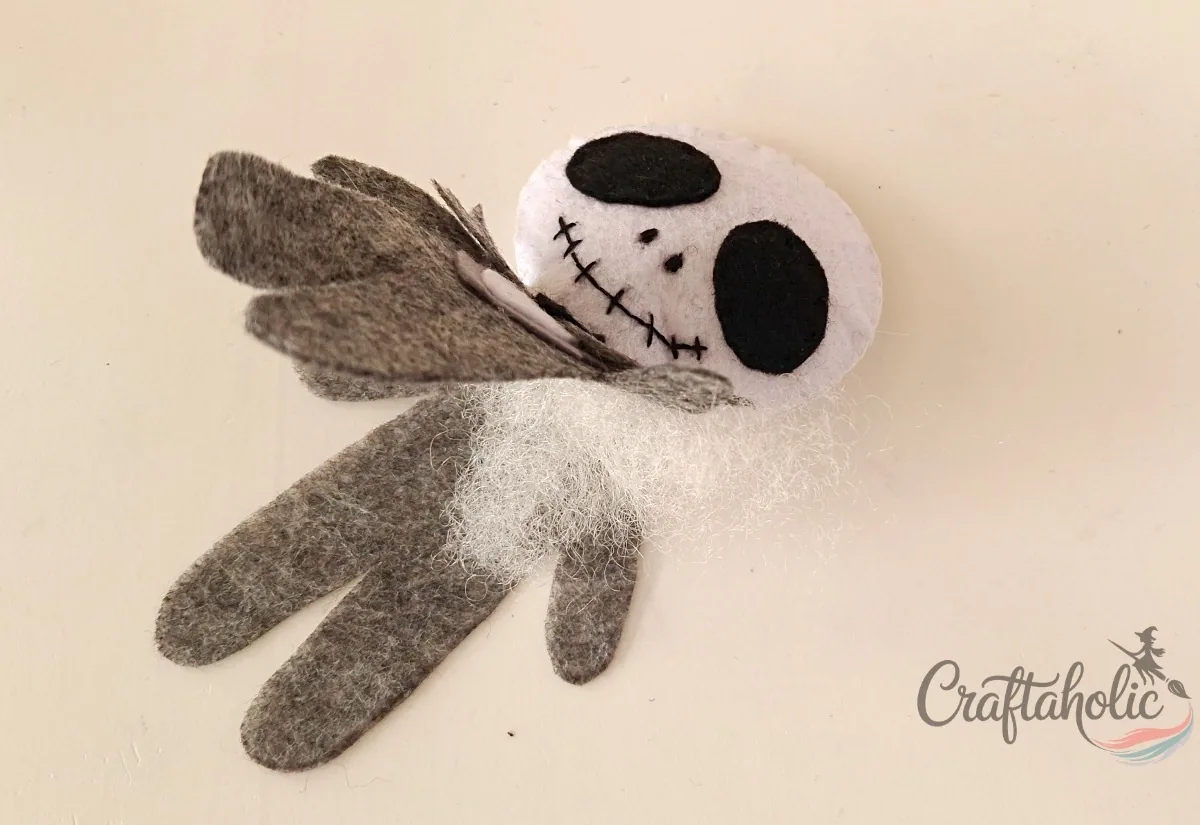
Once the head is stitched, stuff it through the neck opening. Knot off the white thread and trim any extra, then pick the black thread back up to carry on stitching.
Step 9: Stuff the Arms, Body and Legs
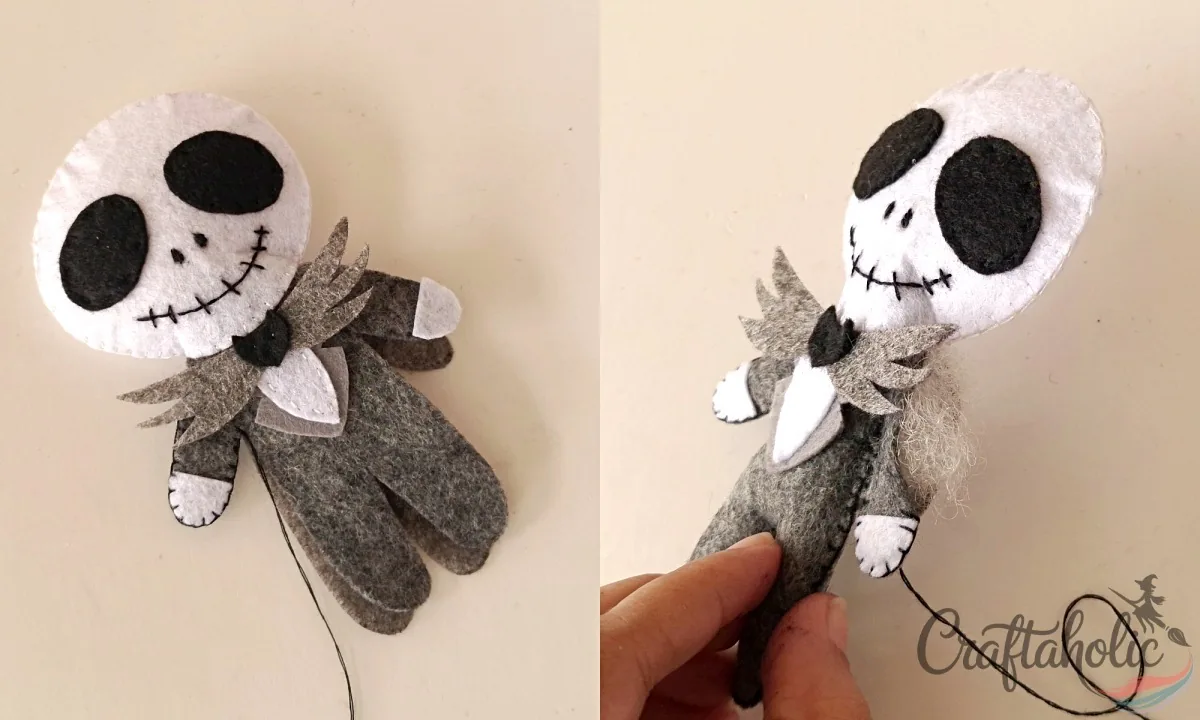
Stuff each of the other parts one at a time, the same way you did for Sally, and secure the stitches around each part as you go.
Step 10: Close the Sides and Finish Jack
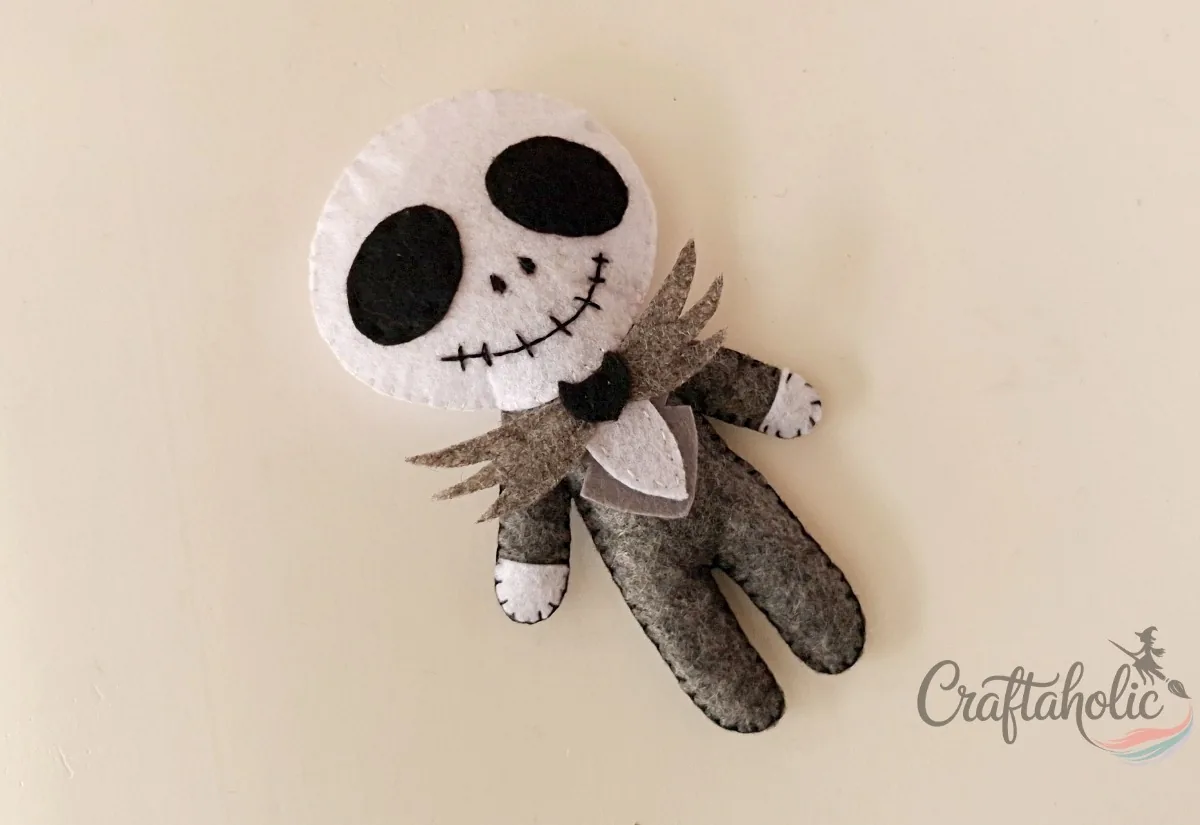
When the stuffing is in, stitch the sides closed and tie two tight knots. Pass the needle through the doll, bring it out anywhere, and cut the thread close to the felt. Now you have both dolls, ready to sit side by side.
Share it in "I Made It" and let us cheer you on.
Post your finished make in "I Made It" so the community can celebrate it with you. Cheer on other makers too. Each month, the most loved craft wins 1 year of Craftaholic Premium ($59)
Frequently Asked Questions
What colors of felt do I need for Jack and Sally?
For Jack, use white for the head, black for the eyes and bat tie, and gray for the suit. For Sally, use pale aqua for her skin, orange for her hair, and a mix of bright scraps for the patchwork dress. The shades don’t have to be exact, because close colors still read as the characters.
What can I use instead of cotton stuffing?
Polyester fiberfill is the easiest swap, and it works the same way here. Add it in small amounts so the head, arms, body and legs fill out evenly.
Should I make Sally or Jack first?
Make Sally first. Jack’s stuffing step refers back to how you stuffed her, and he has fewer steps (10 to her 13), so he goes quickly once Sally is done.
How do I keep the faces stitched evenly?
Draw the features on first with a black gel pen or marker, then stitch over the lines with black thread. The drawn lines act as a guide, so the eyelashes, nose and mouth stay where you want them.
Can I display Jack and Sally for both Halloween and Christmas?
Yes. Nothing about the dolls is tied to one holiday, because the movie itself sits between the two. Keep them out for Halloween and leave them up through Christmas.
More Felt and Plush Tutorials
Want more soft toys to sew? Browse all of our Plushies and Soft Toys tutorials, or start with these.
- 4 Easy to Make Felt Halloween Plushies (Bat, Cat, Ghost, Pumpkin) + Pattern
- 12 Spooky Felt and Plush Halloween Crafts (with PDF Patterns)
- How to Make a Felt Totoro Plush (Printable Pattern)
- How to Make Bat Plush Easily (with Template)
- 15 Halloween Origami Projects with Step-by-Step Tutorials
Share your Jack and Sally felt dolls in the I Made It space inside Craftaholic Community. The most-loved post each month wins a one year free Premium membership.
0 Comments
Join the conversation
Log in to your Craftaholic Community account to comment, ask questions, and cheer on fellow makers.
Log in to comment