

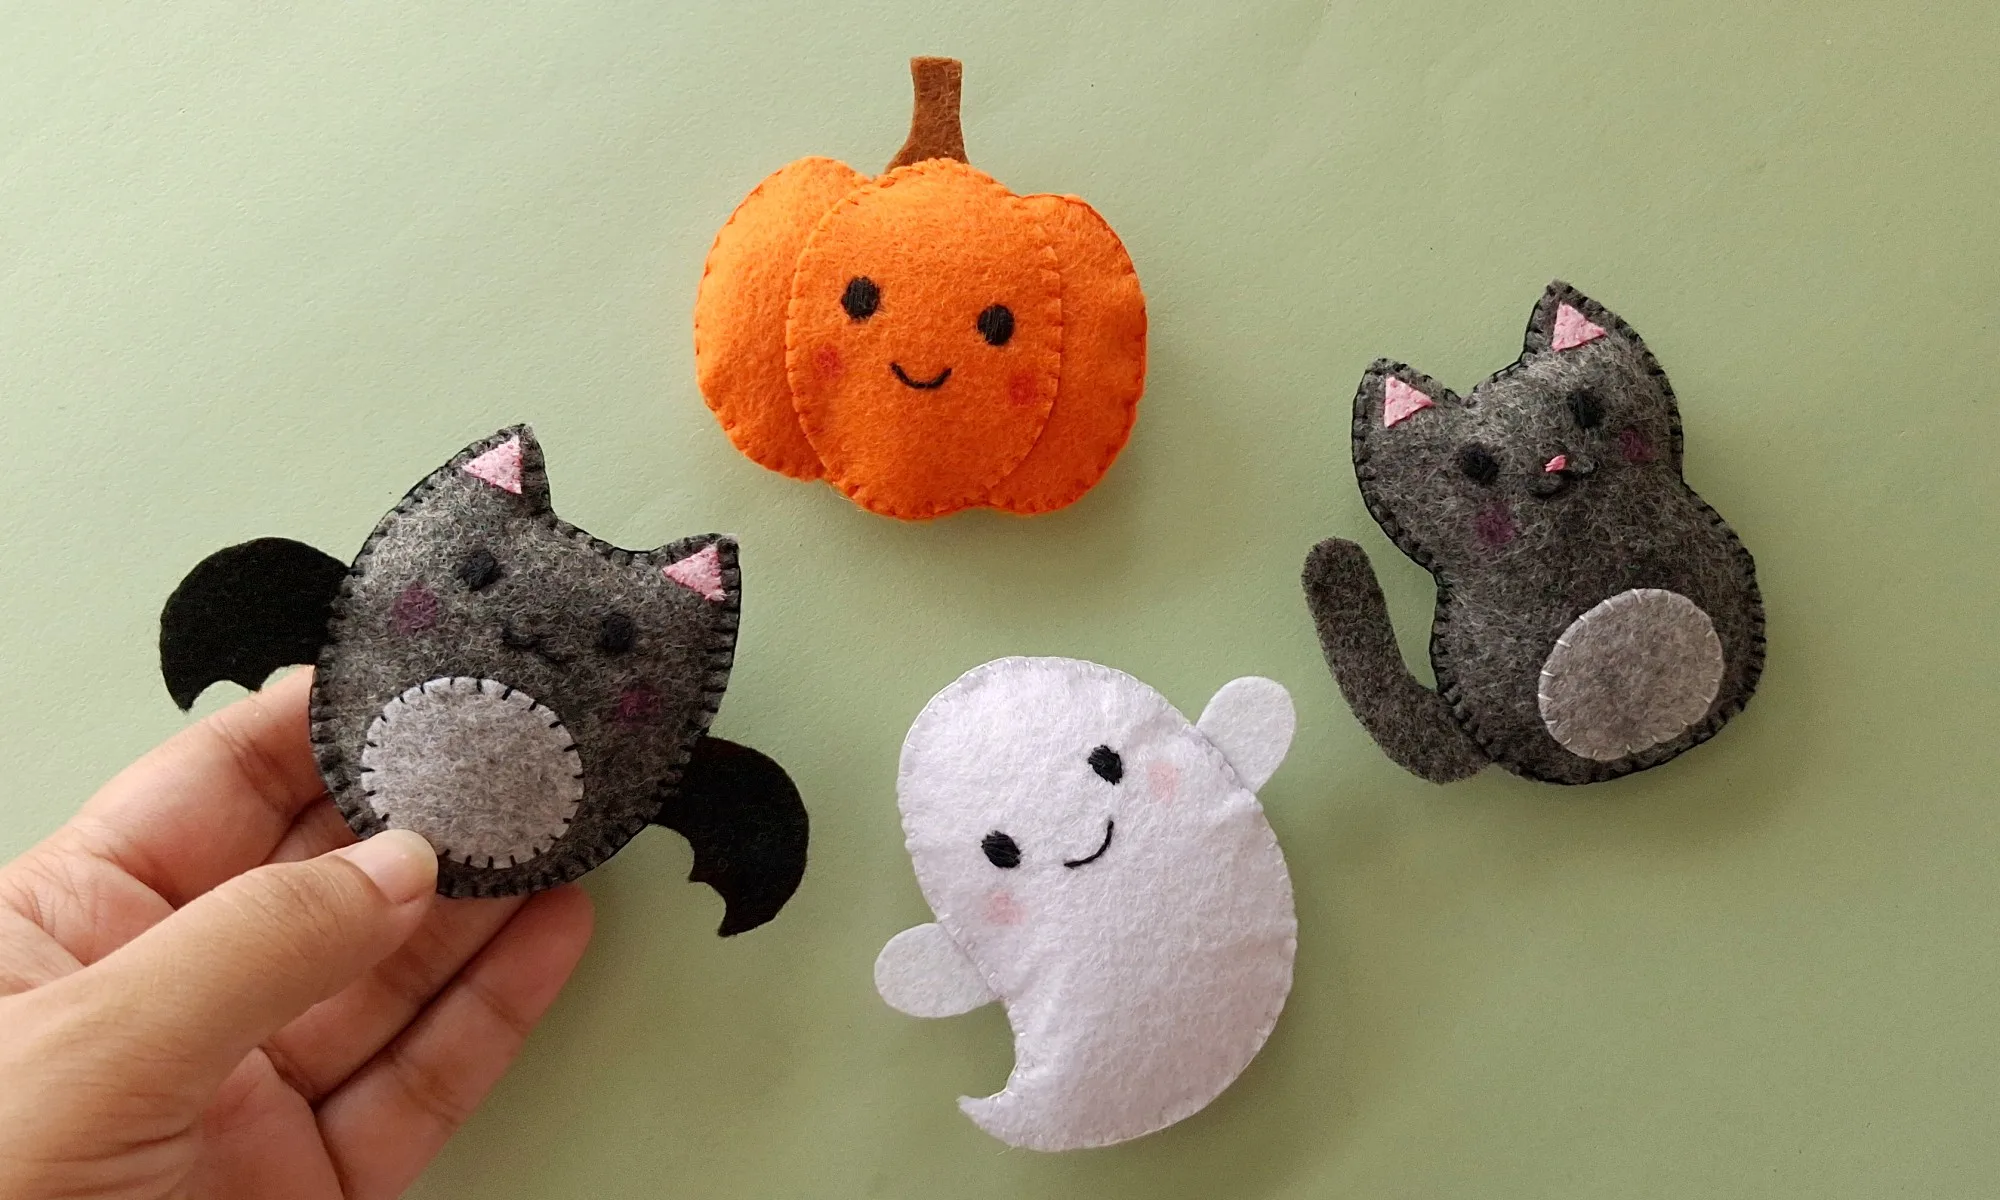
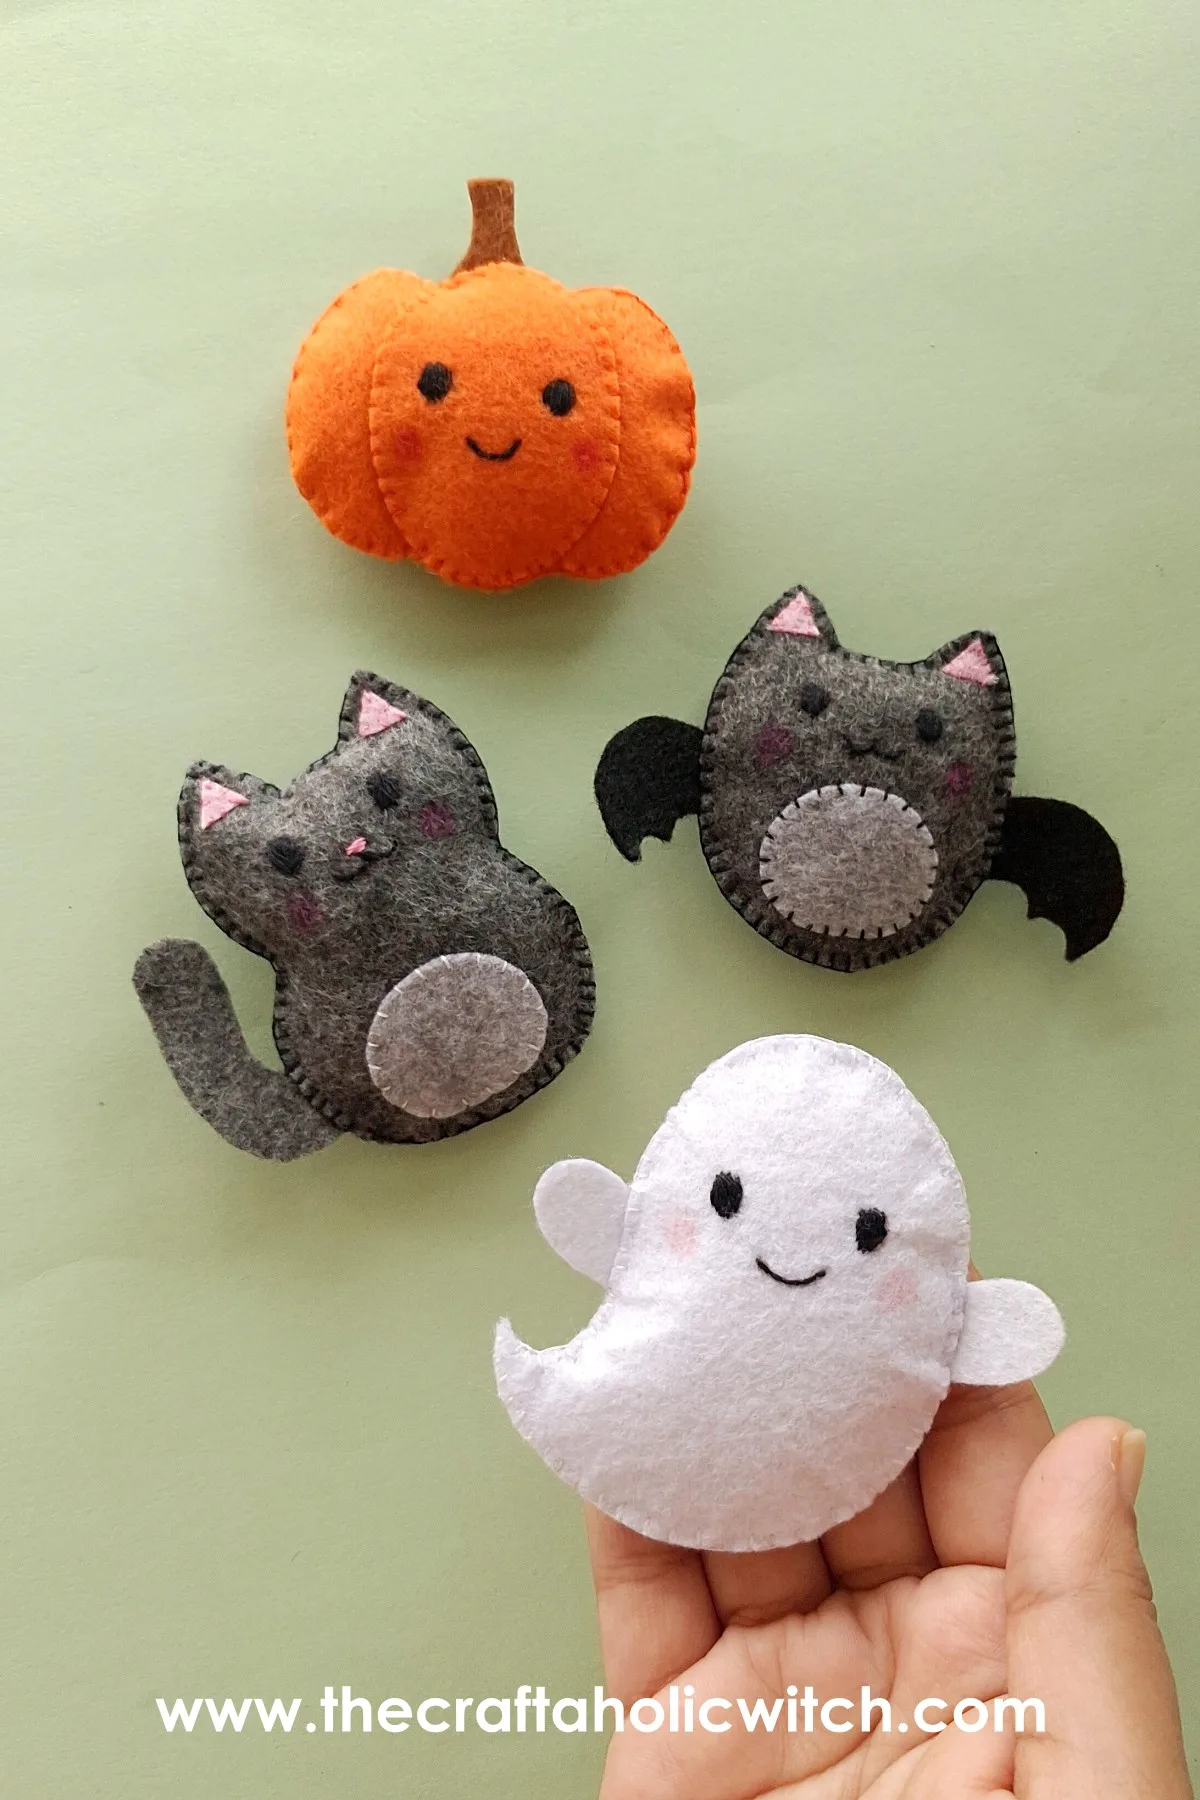
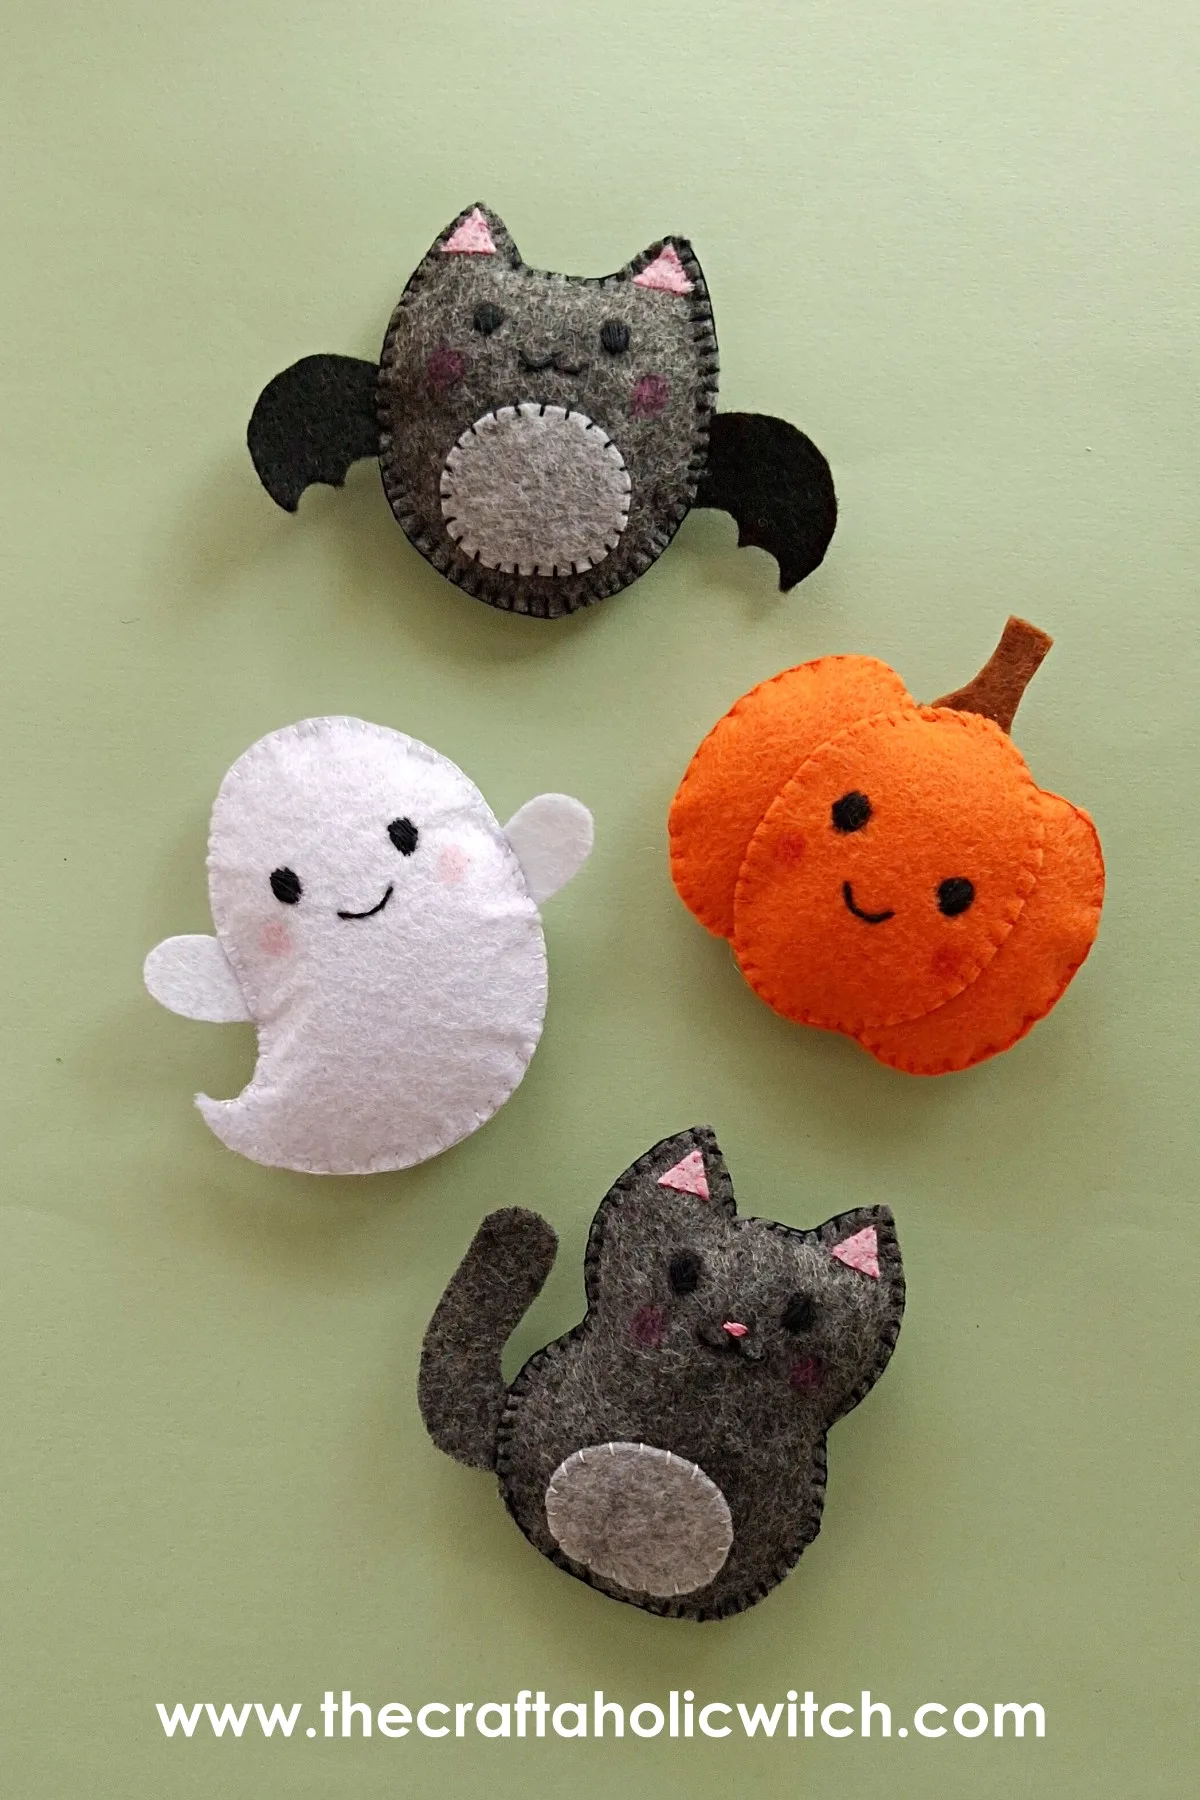
A shelf lined with tiny felt monsters is exactly the kind of Halloween decoration people stop to look at twice, and this set of felt Halloween plush patterns gives you four to make: a bat, a cat, a ghost, and a pumpkin, each one hand stitched and stuffed from simple felt shapes. They’re part of the same family as the rest of our felt plushies collection, all built from the same two base pieces you trace, cut, and stitch together.
Every plush uses the same basic skills: trace a pattern, cut the felt, and join two base layers with a whip stitch and a flat blanket stitch. None of it needs a sewing machine, and a single evening is enough to finish one plush from tracing to stuffing. Making the full set of four is more of a weekend project than a single sitting.
Line them up on a mantel, tuck one into a trick-or-treat bag, or hand the ghost over as a stand-alone gift. If you want more small Halloween projects once these are done, our roundup of spooky felt and plush Halloween crafts has a dozen more that use the same supplies.
Felt Halloween Plush Patterns at a Glance
- Difficulty: Intermediate
- Time: 45-60 minutes per plush (about 3-4 hours for all four)
- Cost: Under $10
- Ages: 10+ with adult help for stitching
- Best for: Halloween decor, gifting, and trick-or-treat bag charms
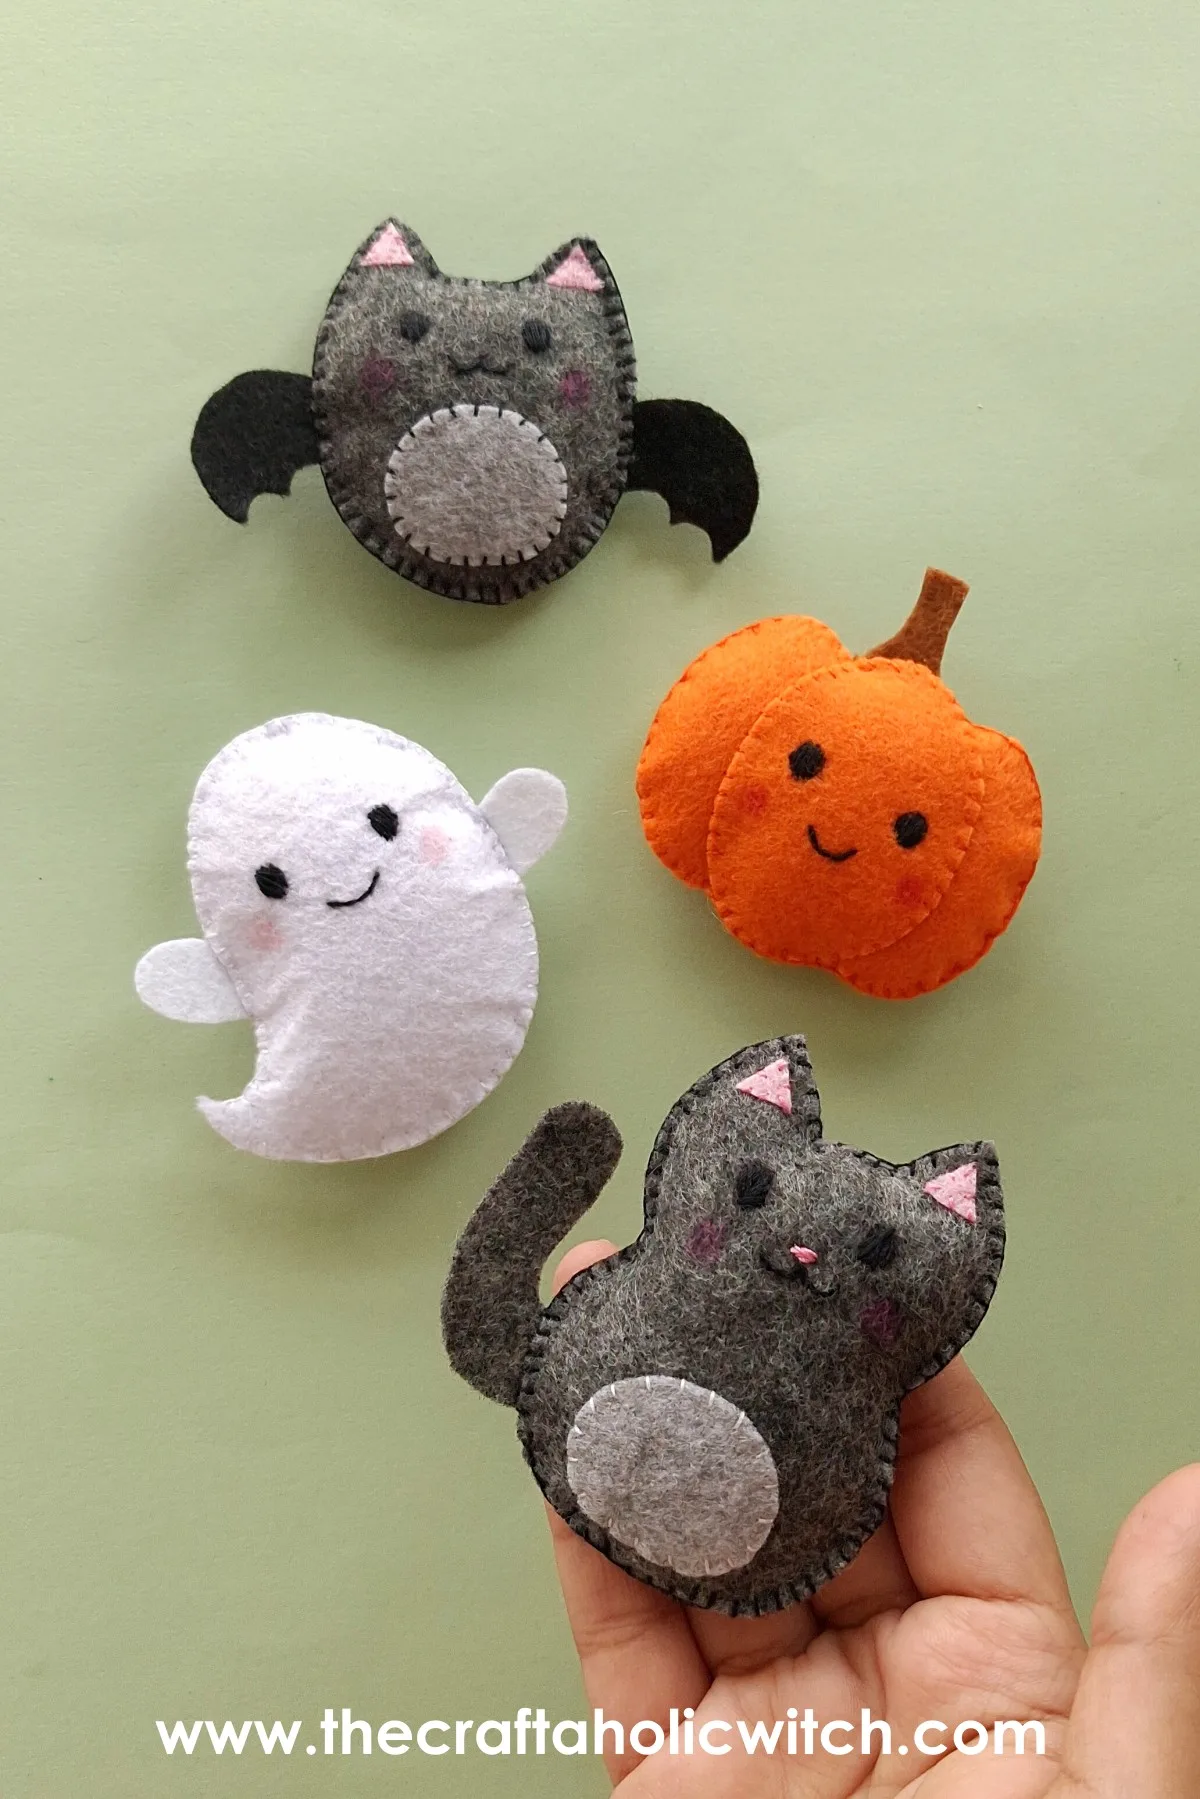
What You Need to Make Felt Halloween Plush Patterns
Materials
- Felt fabric in several colors (black or gray for the bat and cat, white for the ghost, orange for the pumpkin), since felt holds a cut edge without fraying and needs no hemming.
- Pattern pieces for each shape, traced from the step photos or your own felt animal pattern, since all four plushies share the same basic two-base construction.
- Matching sewing thread for each plush’s base color, plus black thread for the stitched faces.
- Cotton stuffing, or scrap felt pieces if you want a firmer, less fluffy result.
Tools
- A pencil or fabric marker, for tracing the pattern pieces before you cut.
- A pair of sharp scissors, for clean edges on small felt pieces.
- A sewing needle sized for hand stitching through two layers of felt.
Felt Halloween Plush Patterns
This tutorial is part of Create & Celebrate, our Premium Space inside the Craftaholic Community, where we share fun crafts for every holiday throughout the year.
📥 Download the template and start crafting!
This is the first project in this year’s Halloween Craft Kit, with more projects coming to help you create a wonderful handmade Halloween. 🧡
Ask inside "Crafty Q&A" while you are making.
"Crafty Q&A" is free to join. Share your question, photo, or the exact step where you got stuck, and chat with other makers plus the Craftaholic Witch team. You can also join any discussion thread already happening inside the space.
How to Make Felt Halloween Plush Patterns
How to Make Felt Bat
Step 1: Prepare the Bat Patterns
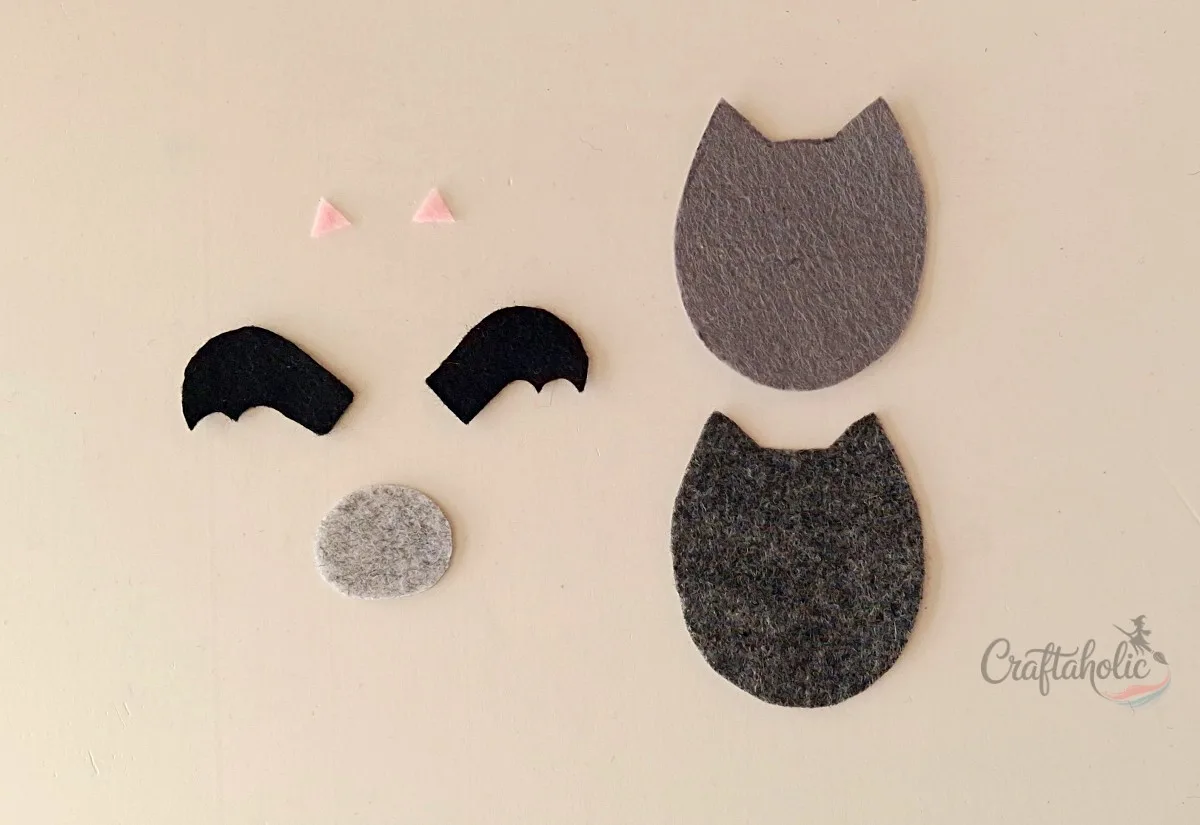
Select three different shades of black or gray felt for the bat. The template calls for two bases, two wings, one belly, and two inner ear pieces, so trace each shape onto your chosen felt and cut them out with sharp scissors.
Tip: If you plan to stitch the eyes and mouth in black thread, skip black or dark gray for the front base so the stitching actually shows up. Any leftover felt works fine for the back base, since it never shows once it’s stuffed.
Step 2: Prepare the Front Base of the Bat
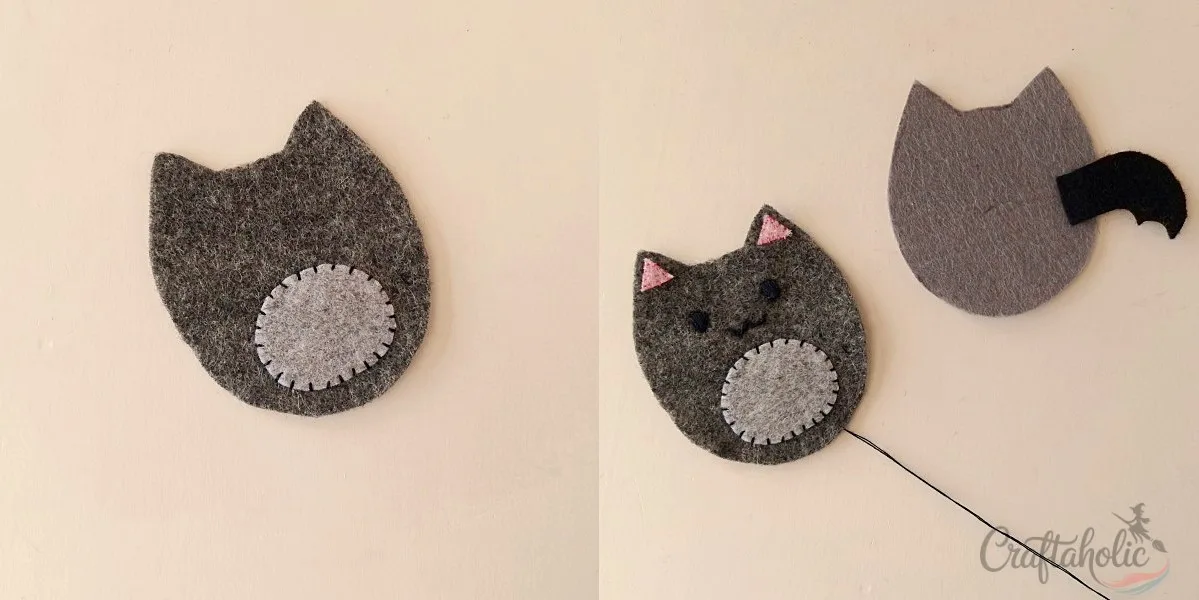
Center the belly cutout on the bottom of the front base and stitch around its edge. Stitch the inner ear pieces onto the ears, then switch to black thread to stitch the bat’s eyes and mouth line.
Lay the back base flat and position the right wing along its right edge, overlapping the two pieces slightly.
Step 3: Start to Stitch the Bases
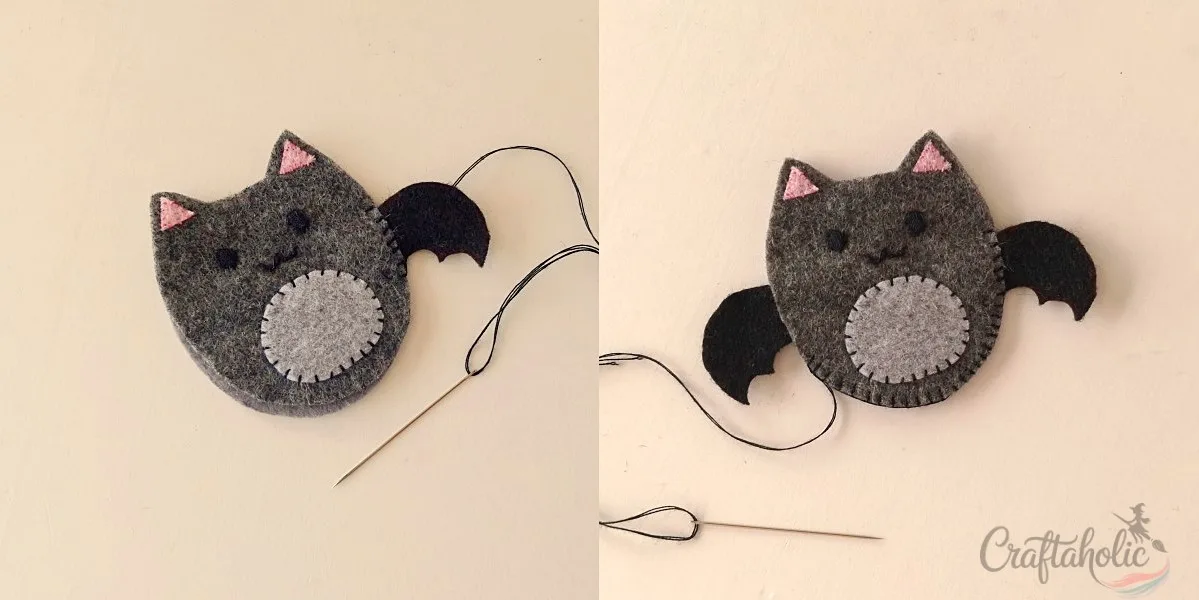
Lay the front base over the back base with the right wing sandwiched between them. Thread a needle to match the front base and start stitching at the top of the wing: work a whip stitch along the wing itself, then switch to a flat blanket stitch around the rest of the sides, since it holds a tight seam without puckering once you start stuffing.
Step 4: Stuff and Finish the Felt Bat
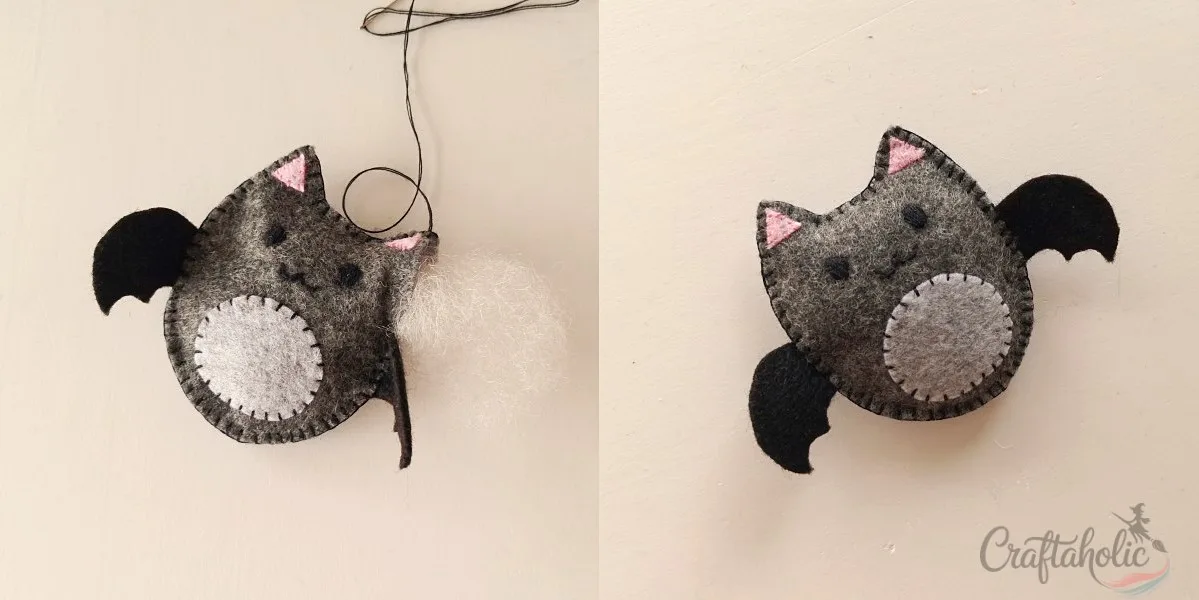
Tuck the left wing between the base layers the same way you did the right, whip stitch along it, then stop stitching to leave a small gap. Stuff the bat with cotton through the opening until it feels full and rounded, stitch the gap shut, and tie two tight knots before trimming the thread.
Tip: Cotton gives a soft, fluffy finish; small scraps of felt pack tighter for a firmer shape. Either way, cut your stuffing material into small pieces first so it doesn’t clump.
How to Make Felt Cat
Step 1: Prepare the Cat Patterns
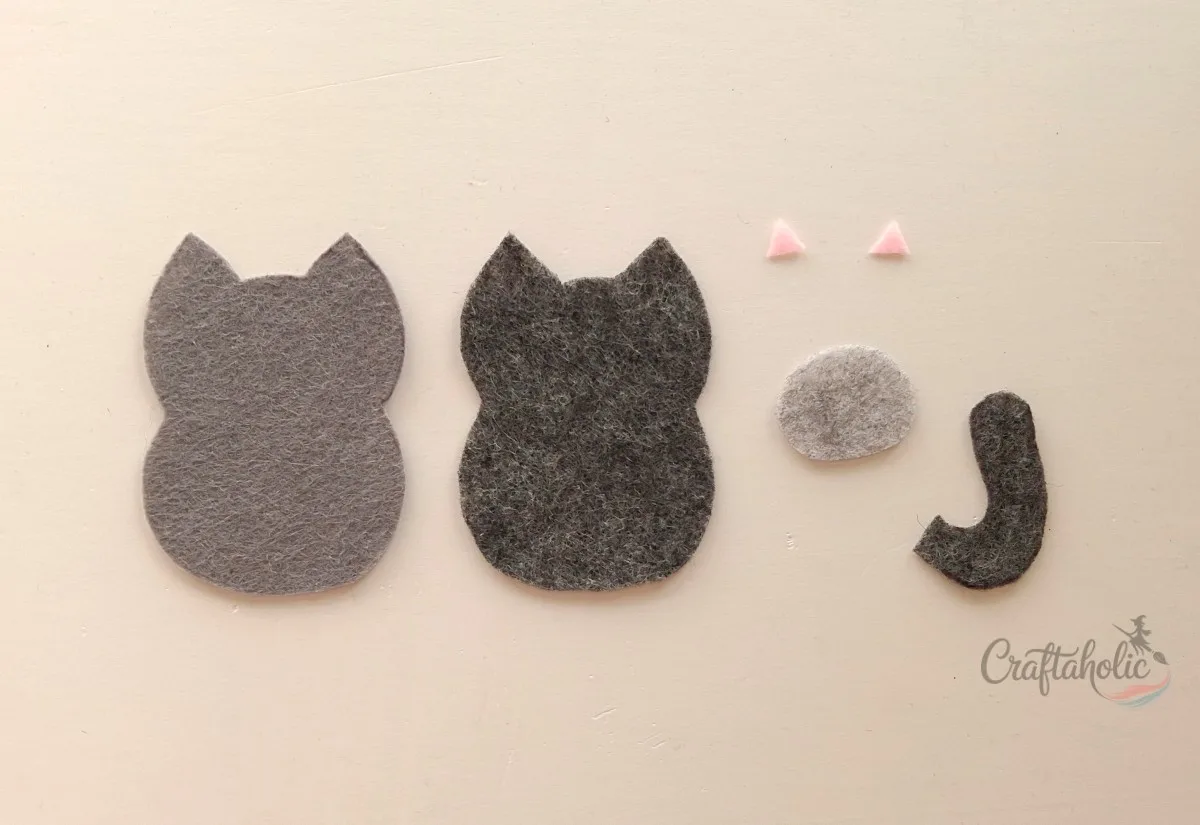
Select at least two shades of black or gray felt for the cat. The template needs two bases, one tail, one belly, and two inner ear pieces, so trace and cut each shape from your chosen felt.
Tip: Just like the bat, keep black or dark gray off the front base if you’re stitching the face in black thread. Leftover felt is fine for the back base.
Step 2: Prepare the Front Base of the Cat
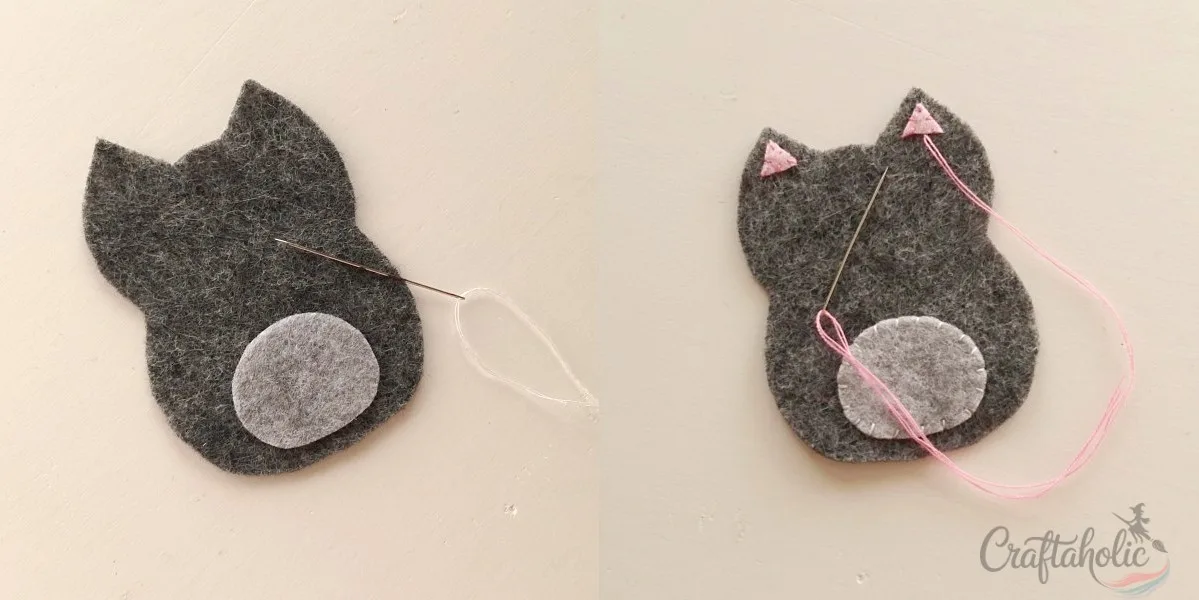
Center the belly cutout on the bottom of the front base and stitch neatly around its edge, then stitch the inner ear pieces onto the ears.
Step 3: Complete the Front Base and Start to Stitch the Bases
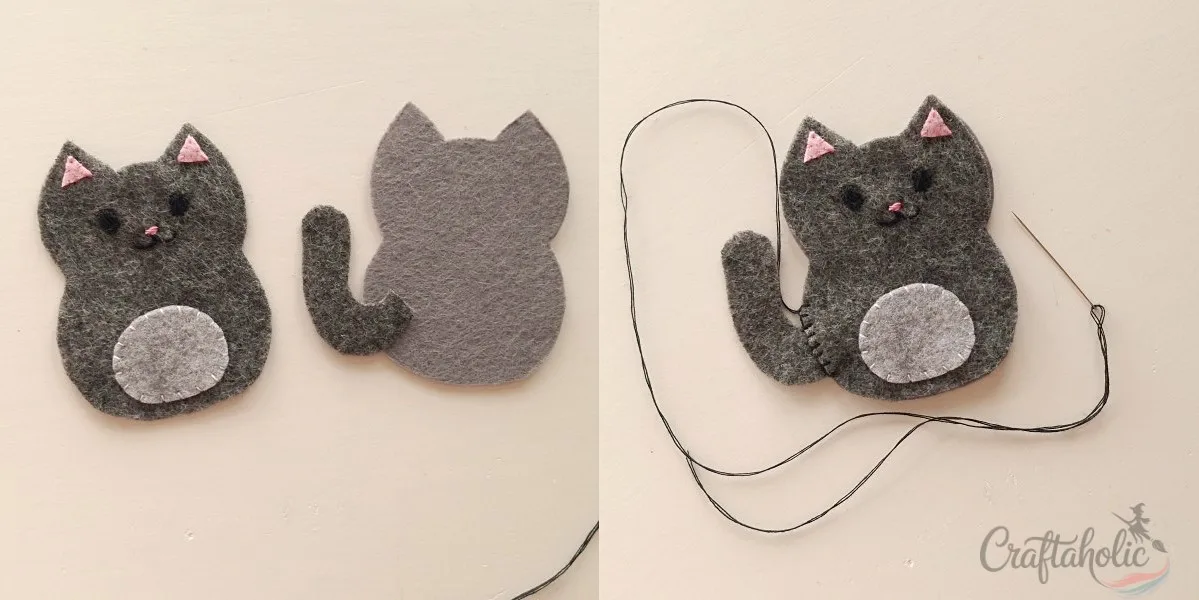
Stitch the eyes and mouth line in black thread, then switch to pink thread for the nose. Lay the back base flat and place the tail along one side (we placed ours to the left), overlapping the pieces slightly.
Sandwich the tail between the front and back bases, thread a needle to match the front base, and start at the top of the tail. Whip stitch along the tail, then work a flat blanket stitch the rest of the way around.
Tip: This same flat blanket stitch shows up again on the ghost and pumpkin, so it’s worth getting comfortable with it here.
Step 4: Stuff and Finish the Felt Cat
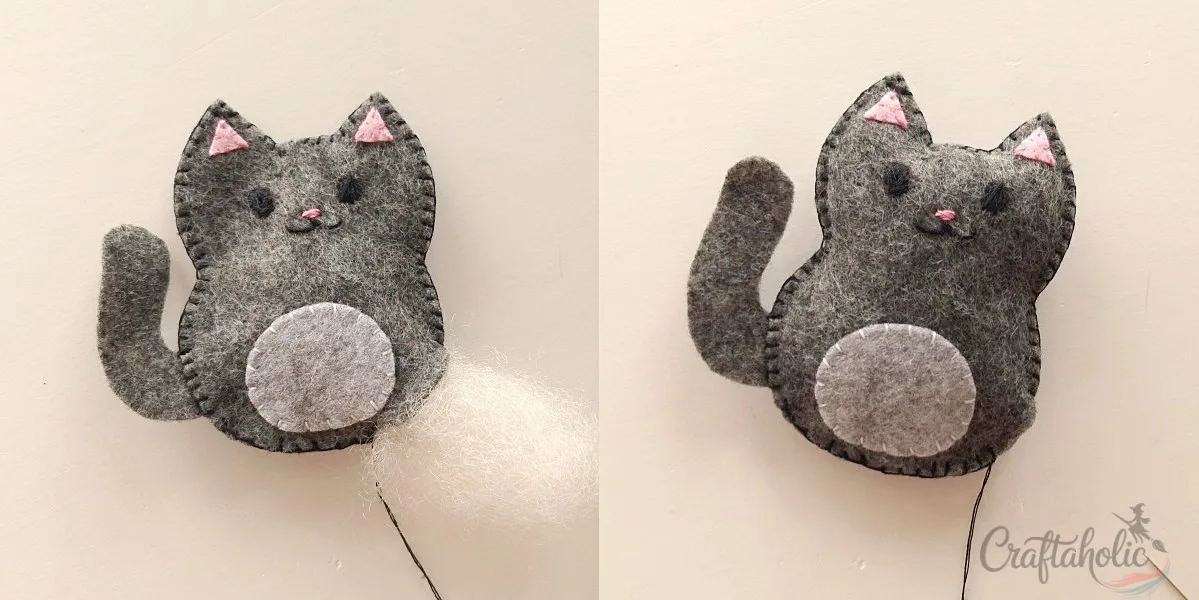
Stop stitching just before you reach where you started, leaving a small gap. Stuff the cat with cotton until it feels nicely full, then close the gap with a few stitches, tie two tight knots, and trim the extra thread.
How to Make Felt Ghost
Step 1: Prepare the Ghost Patterns
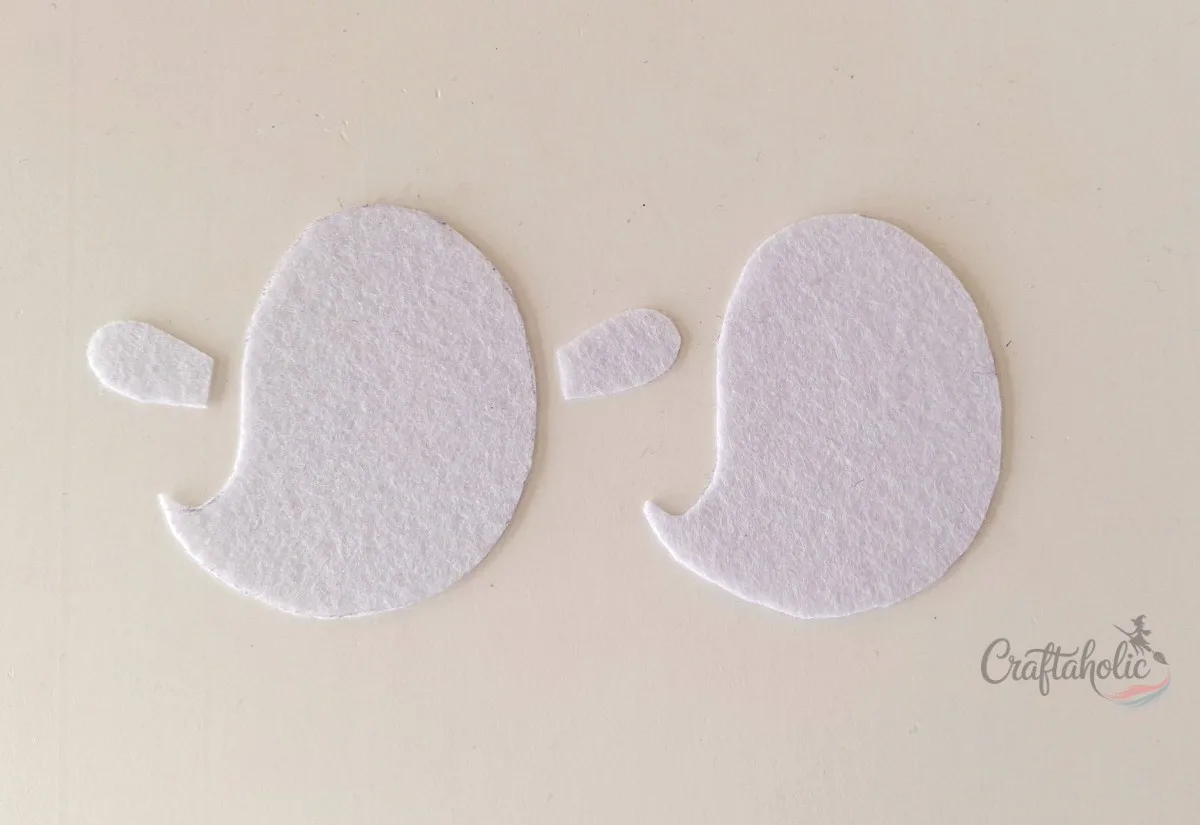
Select a thick, soft white felt for the ghost. The template needs two bases and two arms, so trace and cut each shape from your felt.
Tip: White is the classic choice, but any color works if you’d rather make a colored ghost. Just match the back base to whatever color you pick for the front.
Step 2: Prepare the Front Base of the Ghost
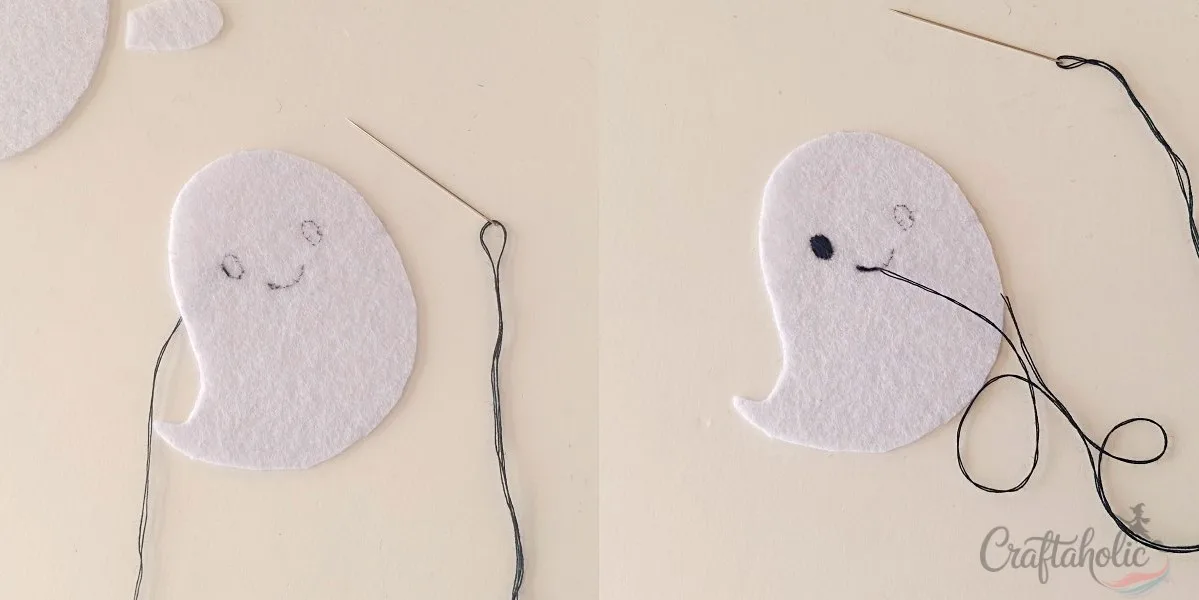
Draw the eyes and mouth onto one of the bases with a black pen or marker, then work a satin stitch to fill in the eyes solidly and a backstitch along the mouth line for a clean edge.
Step 3: Start to Stitch the Bases
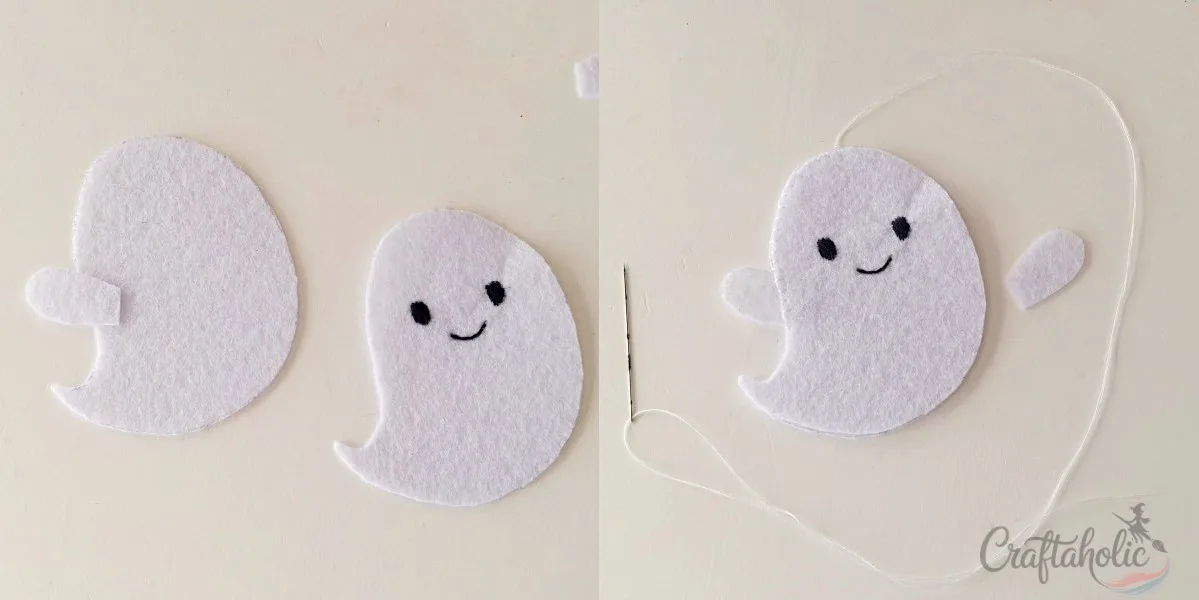
Lay the back base flat and tuck one arm along a side (we went with the left), overlapping the pieces slightly. Sandwich it between the front and back bases, thread a needle to match the front base, and whip stitch along the arm before working a flat blanket stitch around the rest of the sides.
Step 4: Stuff and Finish the Felt Ghost
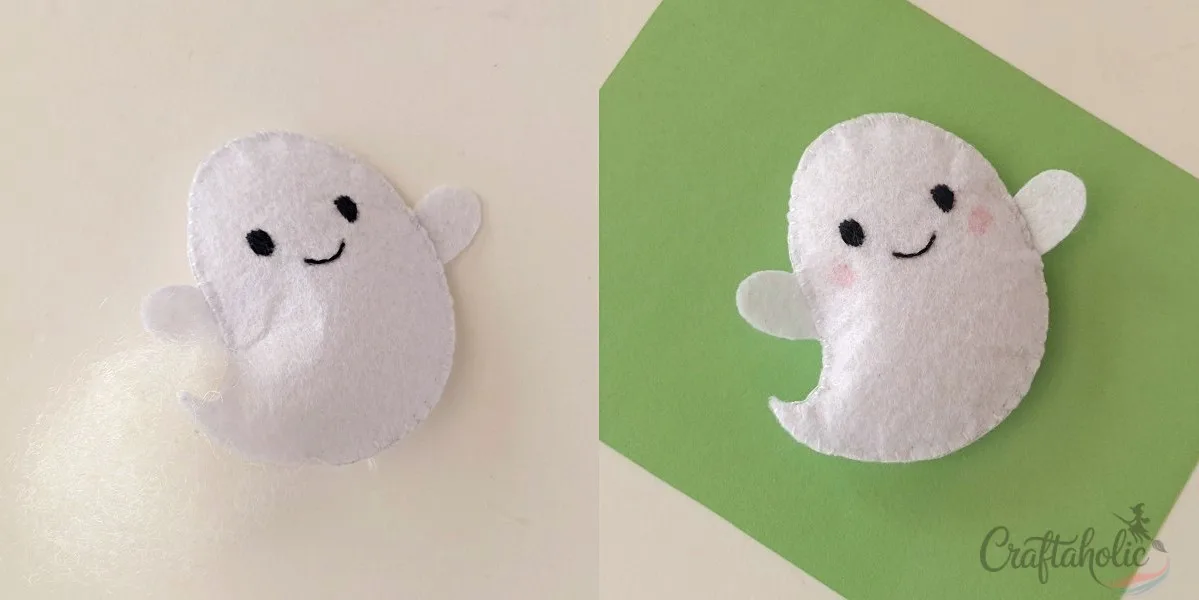
Once you reach the other side, tuck in the second arm the same way and whip stitch along it, then stop stitching to leave a gap. Stuff the ghost with white cotton until it feels full, stitch the gap shut, and tie two tight knots before trimming the thread.
Tip: Keep the stuffing white here too, since anything darker will show faintly through the felt. Cotton gives a soft, fluffy finish, while small white felt scraps pack tighter for a firmer shape.
How to Make Felt Pumpkin
Step 1: Prepare the Pumpkin Patterns
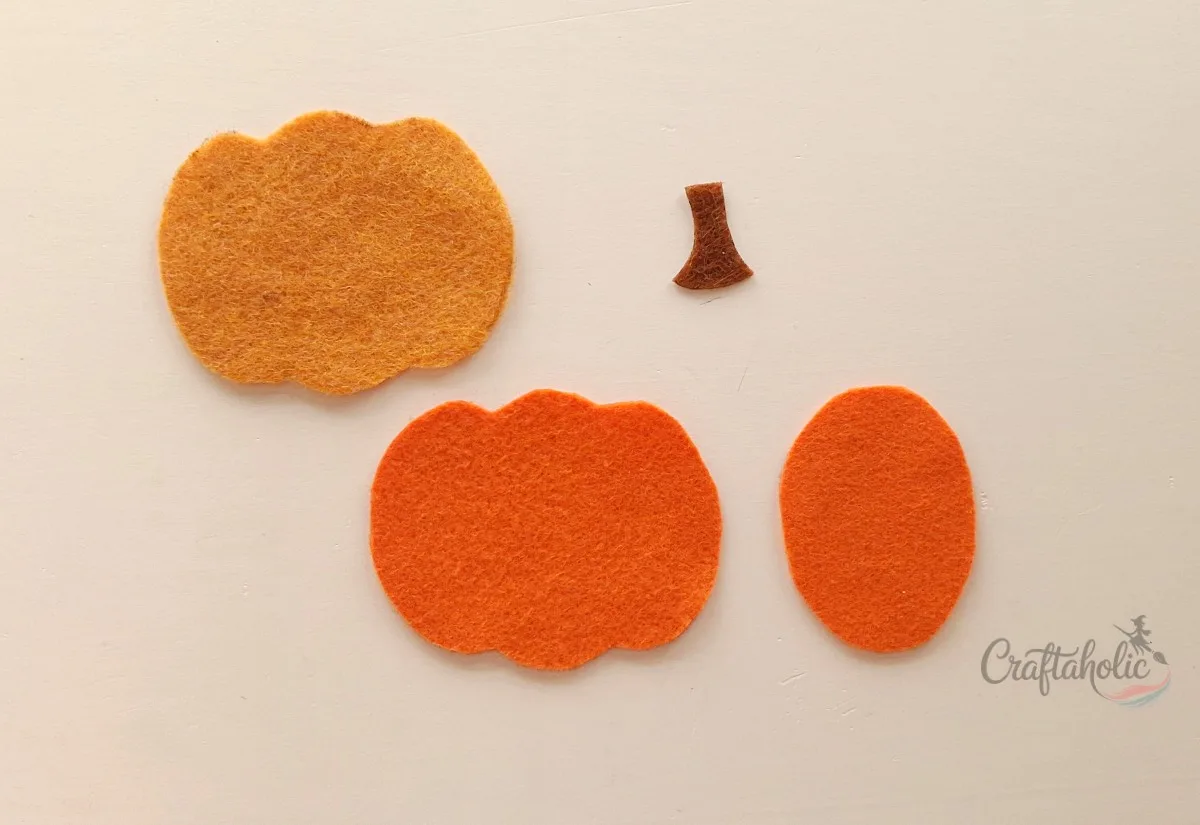
Select a soft orange felt for the pumpkin. The template needs two bases, one stem, and one middle section, so trace and cut each shape from your felt.
Tip: Two ombre shades of orange for the front base and middle section give the pumpkin some depth. Any color works for the back base, since it stays hidden.
Step 2: Prepare the Front Base of the Pumpkin
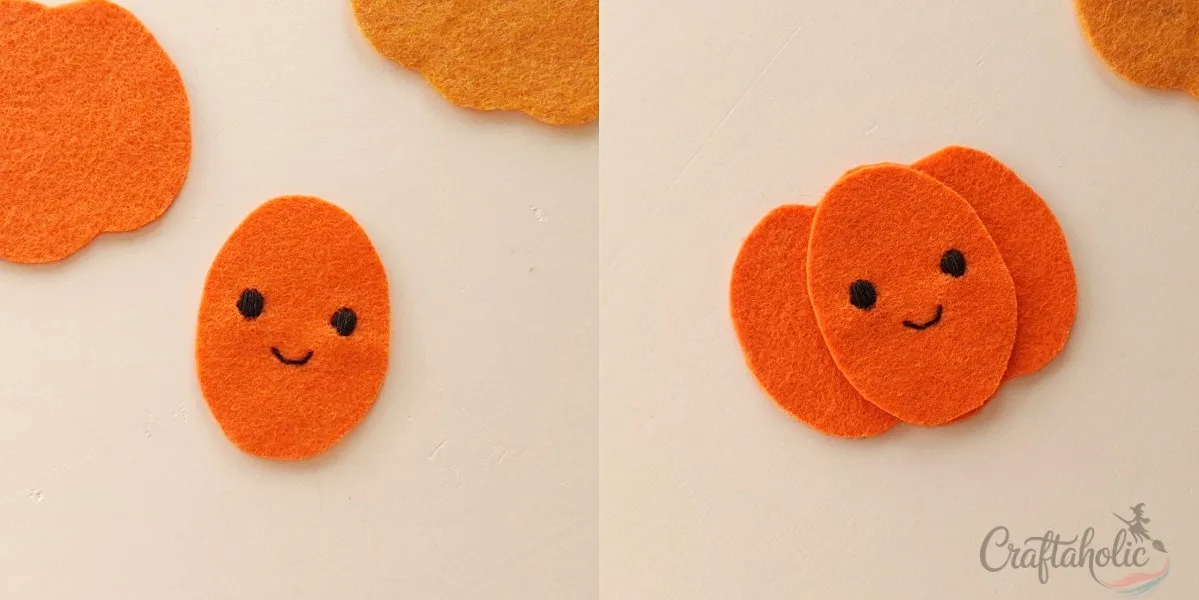
Draw the eyes and mouth onto one of the bases with a black pen or marker, then work a satin stitch to fill in the eyes solidly and a backstitch along the mouth line for a clean edge. Place the stitched middle section onto the middle of the front base.
Step 3: Start to Stitch the Face and Prep the Back Base
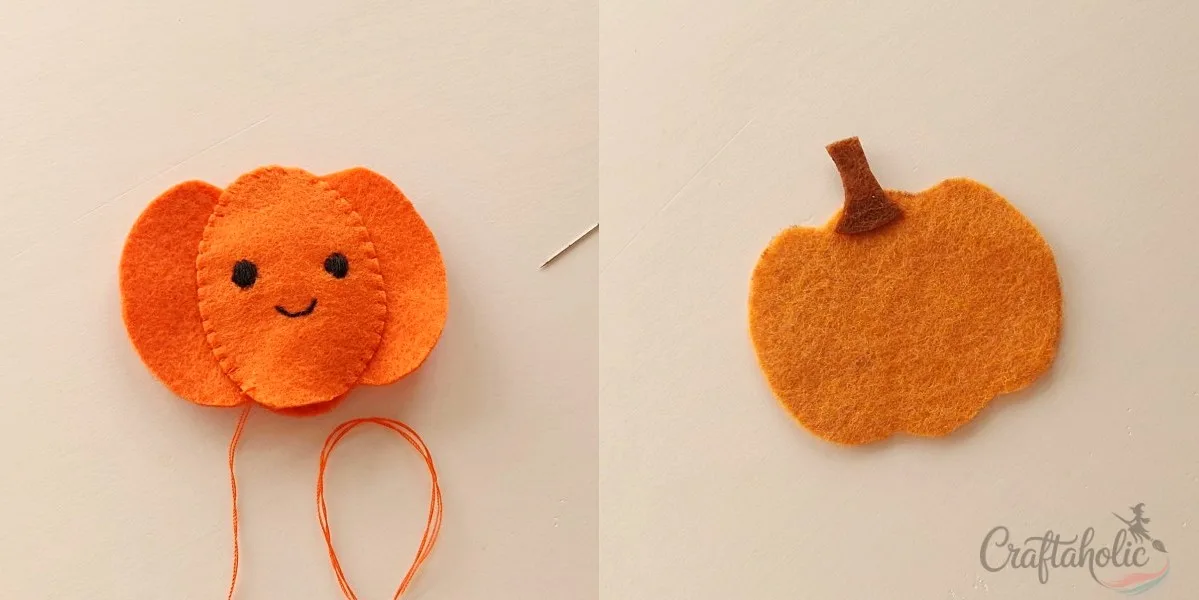
Stitch the middle section onto the front base and stuff it lightly through its opening. Lay the back base flat and position the stem at the top center, overlapping the pieces slightly.
Tip: A light stuffing in the middle section gives the pumpkin a slightly 3D face. Skip it if you’d rather keep the front flat.
Step 4: Stitch the Bases
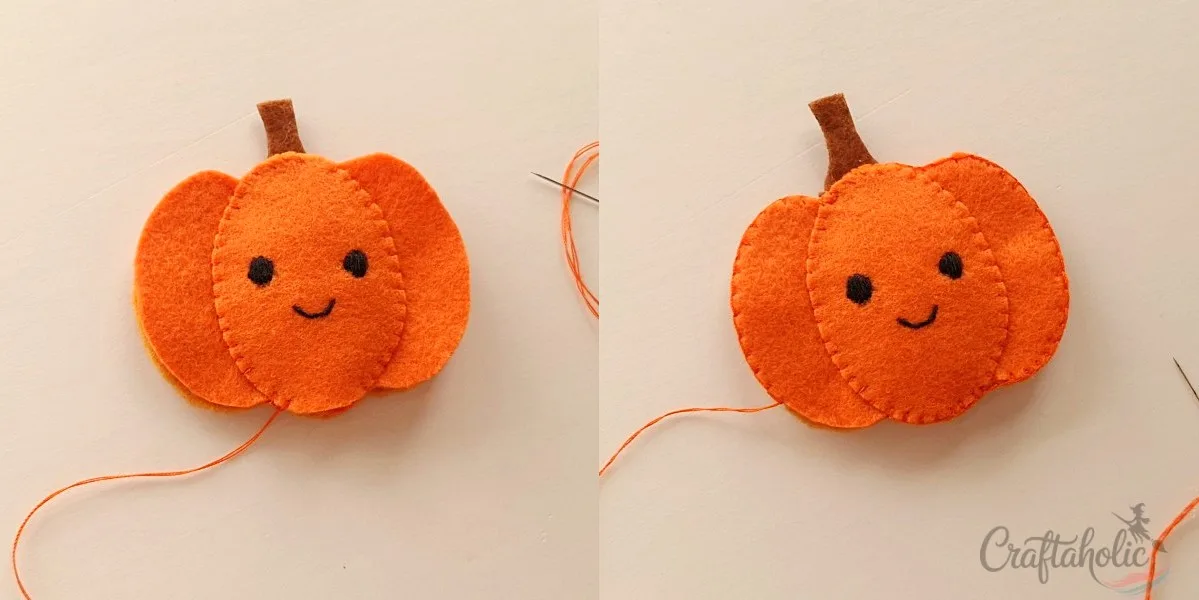
Sandwich the stem between the front and back bases. Thread a needle to match the front base, whip stitch along the stem starting from the top, then finish the rest of the sides with a flat blanket stitch.
Step 5: Stuff and Finish the Felt Pumpkin
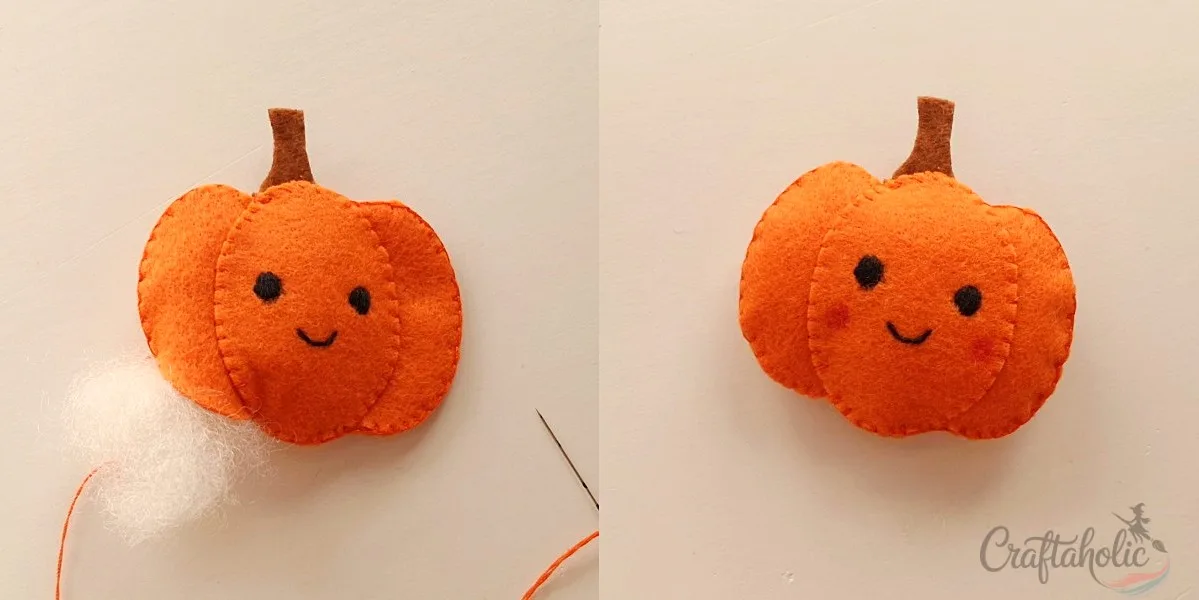
Stitch until you’re back near the gap on the far side, then stop there. Fill the pumpkin with cotton or scrap felt until it feels full and firm, stitch the gap shut, tie two tight knots, and trim the extra thread.
Share it in "I Made It" and let us cheer you on.
Post your finished make in "I Made It" so the community can celebrate it with you. Cheer on other makers too. Each month, the most loved craft wins 1 year of Craftaholic Premium ($59)
Frequently Asked Questions
What can I use instead of felt for these Halloween plushies?
Felt is the easiest fabric here because the cut edges don’t fray, so there’s no hemming before you stitch. A tightly woven cotton or wool blend can work as a substitute, but you’ll need to overlock or zigzag the edges first so they don’t unravel while you stuff and stitch.
How long does it take to make all four felt Halloween plushies?
Each plush takes about 45 to 60 minutes once the felt pieces are cut, so plan on 3 to 4 hours if you’re making the full set of bat, cat, ghost, and pumpkin in one sitting. Cutting all your pattern pieces first, before you thread a single needle, is the fastest way through the whole set.
Can I make these without a printed template?
Yes. Trace the shapes freehand from the step photos, or draw your own bat, cat, ghost, and pumpkin outlines straight onto the felt with a fabric marker. The construction is the same two-base method no matter where your pattern pieces come from.
How is this different from your felt bat plush tutorial?
Our dedicated felt bat plush tutorial focuses on one larger bat with extra wing detail. This pattern set trades that extra size for variety, giving you four smaller Halloween characters from the same basic two-base construction.
Can a beginner make these felt Halloween plushies alone?
A confident beginner can manage the tracing, cutting, and whip stitching without help, but the flat blanket stitch that joins the two bases is fiddly the first time. Plan on an adult sitting in for that part with kids under about 10.
More Plushies Tutorials
- How to Make Halloween Garland for Beginners + 3 Printable Patterns
- How to Make Felt Fall Gnomes (with Free Pattern & Video)
- How to Make a Felt BFF Bunny Plush
Share your felt Halloween plushies in the I Made It space inside Craftaholic Community. The most-loved post each month wins a one year free Premium membership.
0 Comments
Join the conversation
Log in to your Craftaholic Community account to comment, ask questions, and cheer on fellow makers.
Log in to comment