


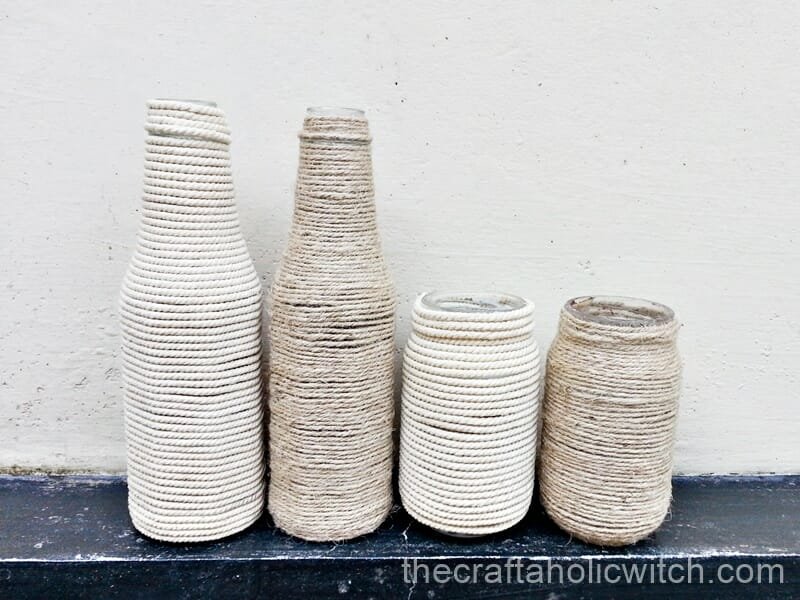
Wrapping a glass jar with twine is one of those projects I almost didn’t make. I was planning to paint some old jars but couldn’t get the labels off, so I reached for a bundle of twine I’d had sitting in my craft store for ages and just started winding. Four steps later I had planters I genuinely loved.
Each one takes about 10 minutes and needs only 4 supplies, most of which you probably already have. The result is a rustic, natural-looking flower pot you can fill with soil and a small succulent, use as a pencil holder, or line up on a windowsill with cuttings. They cost almost nothing when you’re recycling jars you’d otherwise throw away.
I’ve also made concrete planters and a Pokémon planter, but for a rainy afternoon or a craft with kids, this one is my go-to.
Twine-Wrapped Jars at a Glance
- Difficulty: Beginner
- Time: 10 minutes
- Cost: Under $2 (recycled jars are free)
- Ages: 8+
- Best for: Home decor, upcycling, desk organization
Join Craft Challenge: Craft Your Calm
Make something that brings you a sense of peace, share a photo, and tell us your story. It's free to enter, open to everyone, and the entry with the most reactions takes home a $100 gift card. Takes five minutes to join.
Entries close August 30, 2026. No purchase necessary.
What You Need to Make Twine-Wrapped Flower Pots
Materials
- Glass jar or bottle: any size, cleaned and completely dried. The label doesn’t need to come off; the twine covers it.
- Twine: jute or hemp for a natural rustic look, cotton for a slightly cleaner finish. Both wrap the same way, and one bundle is usually enough for several jars.
- Craft glue: PVA or a dedicated craft adhesive. Avoid hot glue on glass; it bonds quickly but tends to peel off over time, especially in cool rooms.
Tools
- Scissors: for cutting the twine cleanly once you reach the base.
Ask inside "Crafty Q&A" while you are making.
"Crafty Q&A" is free to join. Share your question, photo, or the exact step where you got stuck, and chat with other makers plus the Craftaholic Witch team. You can also join any discussion thread already happening inside the space.
How to Make Twine-Wrapped Flower Pots
Step 1: Prepare Your Materials
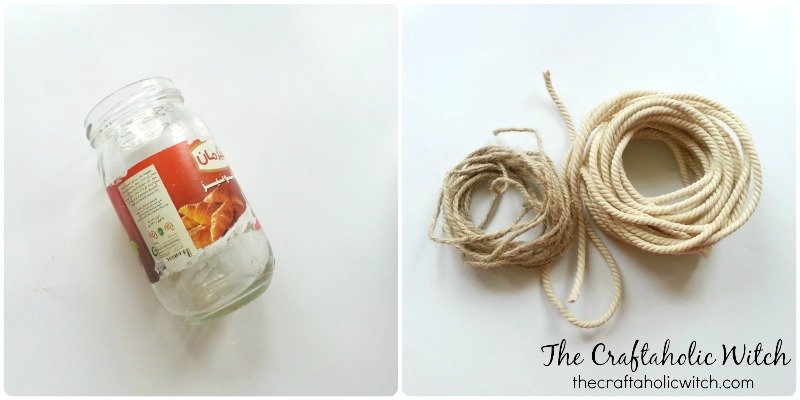
Gather your jar, twine, glue, and scissors before you start. The jar should be clean and completely dry; water under the twine stops the glue from bonding properly. Take a moment to pick your twine type here: rustic jute gives a farmhouse feel while smooth cotton has a slightly cleaner look.
Step 2: Start Wrapping from the Top

Apply a band of craft glue around the neck of the jar and press the end of your twine into it. Hold it for a few seconds, then begin winding downward, keeping each row tight against the last with no gaps. If you spot a space, push the rows together with your fingernail before the glue sets; it’s much easier to close gaps now than after the adhesive hardens. Apply a fresh line of glue every few rows so the twine stays anchored all the way down, not just at the start.
Step 3: Reach the Bottom and Secure the Ends
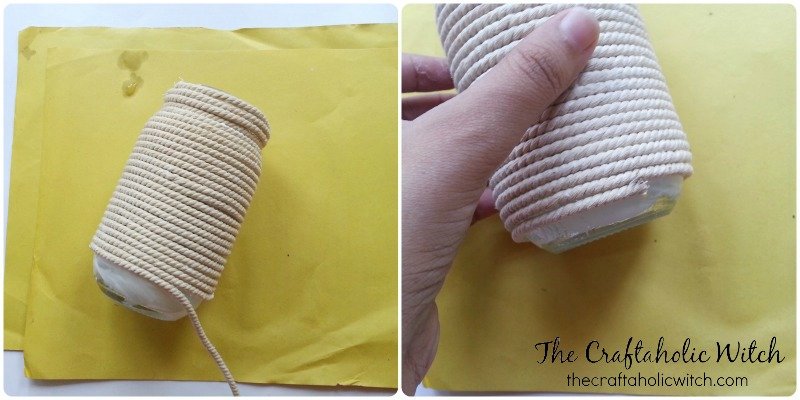
Continue wrapping until you reach the base of the jar. When you get to the bottom edge, apply a generous bead of glue and press the last few rows firmly into it; this end takes the most stress when the jar is picked up, so it’s worth securing well. Cut the twine close to the jar and press the tail flat into the wet glue. Hold it for a count of ten to make sure it sticks.
Step 4: Let It Dry and Style It
Set the jar aside for at least 30 minutes so the glue sets completely before you handle it. Once dry, the natural twine is already its own decoration. I kept mine as they are because I love the rustic look. If you want to add some color, a thin wash of acrylic paint over the twine gives a subtle tint without hiding the texture. Then fill it with soil and a small succulent, drop in some pencils, or tuck a few dried flowers in and it is ready to use.
Share it in "I Made It" and let us cheer you on.
Post your finished make in "I Made It" so the community can celebrate it with you. Cheer on other makers too. Each month, the most loved craft wins 1 year of Craftaholic Premium ($59)
Tips for Twine-Wrapped Jars
- If the top rows keep slipping before the glue dries, wrap a rubber band around them to hold everything in place. Peel it off once the adhesive sets.
- Raffia, yarn, or strips of fabric tape all work as substitutes for twine and give a completely different look with the same technique.
- To plant directly in the jar with soil rather than setting a potted plant inside, drill a small drainage hole in the bottom using a glass drill bit before you start wrapping.

Frequently Asked Questions
Can I use hot glue instead of craft glue for wrapping twine on glass?
Hot glue works in a pinch but tends to peel off glass over time, especially in cooler rooms. Craft glue (PVA) makes a stronger, more flexible bond once it cures and is much easier to control when you’re pressing close rows of twine into place. Stick with craft glue for anything you want to last.
How do I keep the twine rows even without gaps?
Apply glue in small sections rather than all at once, and push each new row firmly against the previous one with your fingernail before moving on. Working slowly at the start is genuinely faster than trying to fix gaps after the glue has begun to set.
Can these twine-wrapped jars be used as actual plant pots with soil?
Yes, with one thing to keep in mind. Glass has no drainage, so water can pool at the roots. For succulents or cacti, a layer of pebbles at the bottom of the jar helps. For plants that need more frequent watering, it’s better to keep the plant in a small nursery pot and sit it inside the twine jar as a decorative sleeve.
What jar size works best for indoor plants?
A wide-mouthed jar with at least 500 ml capacity gives roots enough room for small succulents, herbs, or propagated cuttings. Smaller jars are great for a single cutting in water or a few flower stems used as a vase.
More Planters and Home Decor Tutorials
- How to Make Golden Egg Shell Planters
- DIY Concrete Planters from Cement or Concrete Mix
- DIY Recycled Pokemon Bulbasaur Planter
- How to Make a Paper Mache Vase
- How to Make Beautiful Paper Mache Bowls
Share your twine-wrapped jars in the I Made It space inside Craftaholic Community. The most-loved post each month wins a one year free Premium membership.
0 Comments
Join the conversation
Log in to your Craftaholic Community account to comment, ask questions, and cheer on fellow makers.
Log in to comment